Mastering the Gaggiuino touchscreen interface for a faster workflow
The Gaggiuino project has revolutionized the home barista experience, transforming the capable Gaggia Classic Pro into a machine that rivals equipment costing thousands more. At the heart of this powerful upgrade is the intuitive touchscreen interface. This small screen is your command center, offering precise control over every variable of the brewing process. However, simply having this control is not enough. To truly elevate your coffee game, you must master the interface to create a seamless and repeatable workflow. This guide will walk you through navigating the Gaggiuino touchscreen, from understanding the basics of the home screen to programming complex profiles, all with the goal of making your daily espresso routine faster, more consistent, and more enjoyable.
Understanding the home screen layout
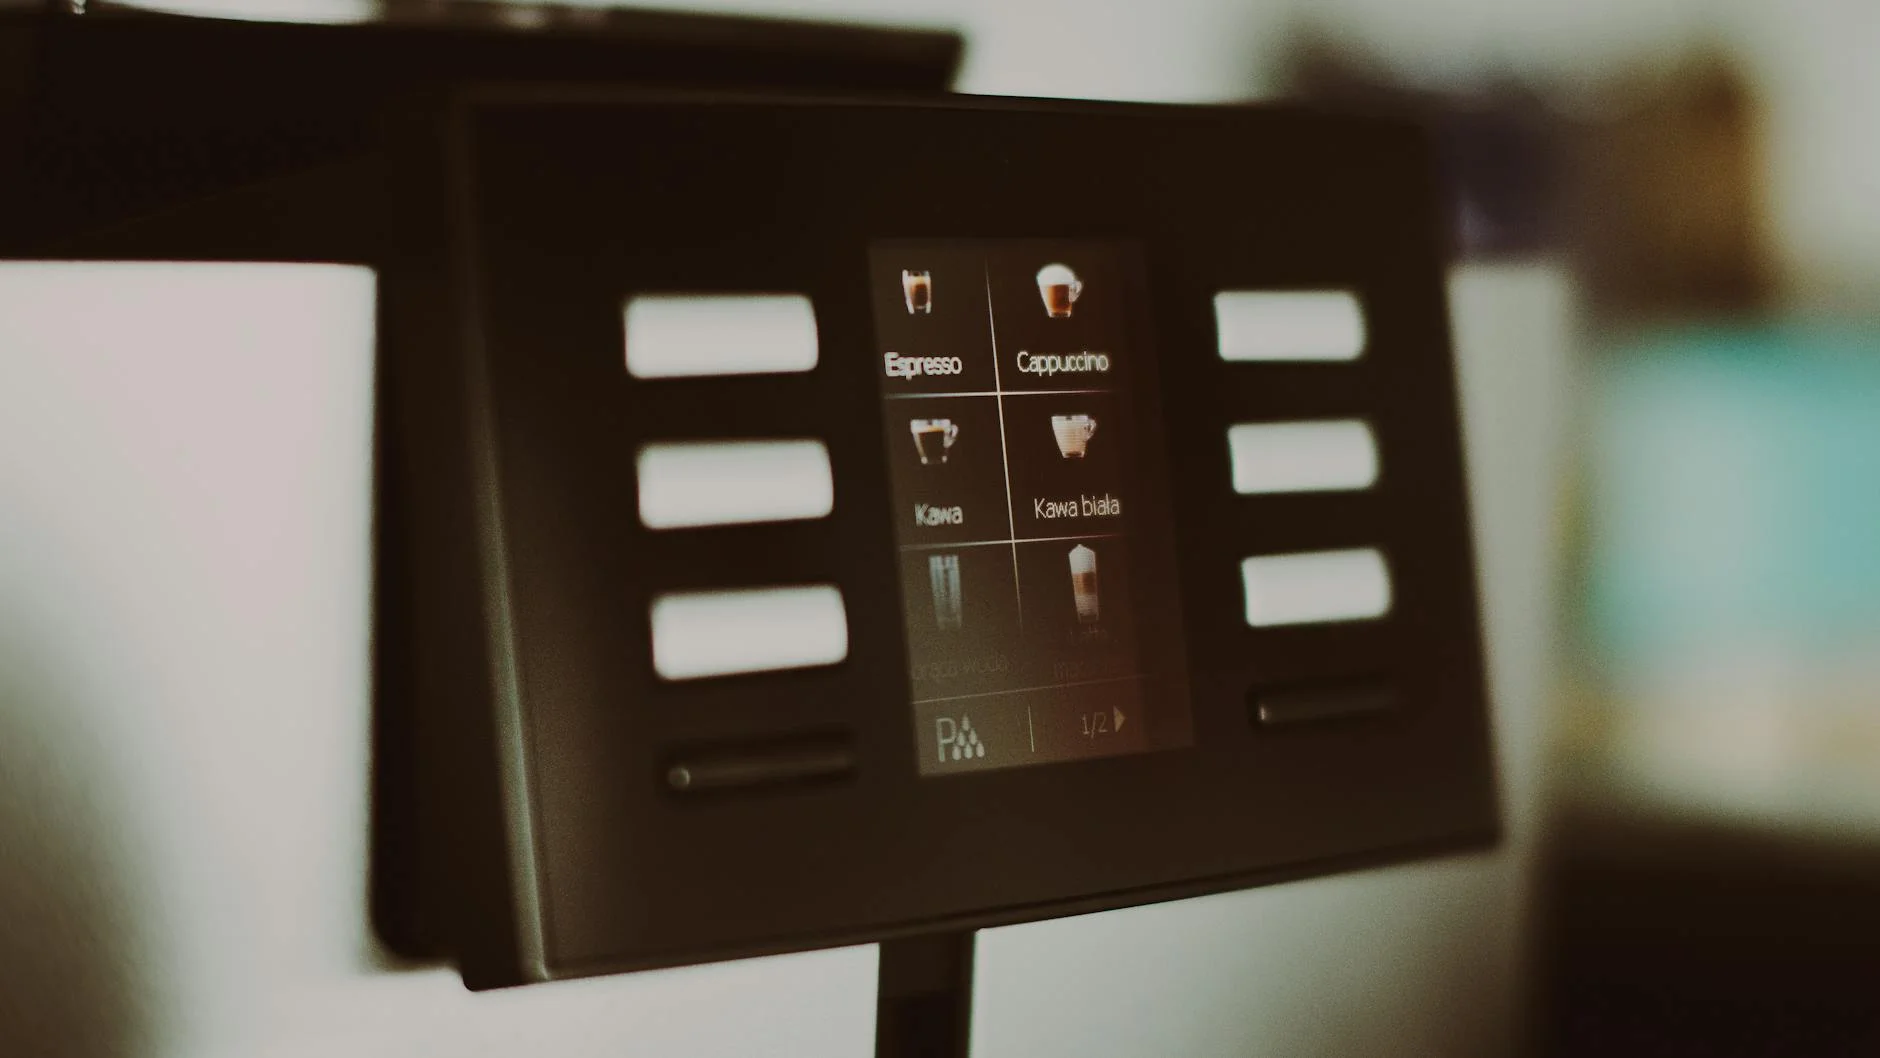
Your first interaction with the Gaggiuino is its home screen, a dense dashboard of real-time data. Understanding this layout is the first step toward a faster workflow, as it allows you to assess the machine’s status at a glance. Typically, the screen is dominated by several key metrics:
- Boiler temperature: This shows the current temperature of the water in the boiler. The system’s PID controller works to keep this number as close to your set target as possible, eliminating the need for “temperature surfing.”
- Grouphead temperature: (If you have the sensor installed) This provides a more accurate reading of the water temperature just before it hits the coffee puck, which is a critical variable for extraction.
- Pressure: Displayed in bars, this shows the real-time pressure being applied to the coffee puck during a shot. Watching this helps you understand how your profile is executing.
- Weight and time: If you have an integrated scale, you’ll see a live readout of your shot’s weight in grams alongside a shot timer. These are crucial for consistency.
Below these metrics are your primary action buttons: Brew, Steam, and sometimes Hot Water. Knowing where these are without thinking is key. The goal is to internalize this layout so you can focus on your puck preparation, not on finding the right button.
Navigating menus and core settings
While the home screen is for execution, the real power lies within the menu system. A simple tap on a “settings” or “menu” icon opens up the Gaggiuino’s brain. Here, you can fine-tune the machine’s core behavior. Instead of getting lost in every single option, focus on the settings that have the most impact on your daily workflow. The most important area to familiarize yourself with is the Profiles menu, which we will cover in the next chapter.
Beyond profiles, the Settings menu holds crucial parameters. Here you can set your target brew temperature, which you might adjust for different beans (e.g., lower for dark roasts, higher for light roasts). You can also adjust your target steam temperature, which affects milk texturing speed and quality. Understanding how to quickly access and change these two settings allows you to adapt to new coffees without a complicated process, directly contributing to a more efficient and versatile brewing routine.
Creating and managing brew profiles for consistency
This is where you truly unlock Gaggiuino’s potential for speed and precision. A brew profile is a pre-programmed set of instructions that controls pressure, flow, and time during a shot. Instead of manually trying to manipulate a dimmer or valve, you can execute a perfect, repeatable shot with a single button press. This is the ultimate workflow enhancement.
Creating a profile involves setting stages. For example, a classic “Slayer” style shot might look like this:
- Pre-infusion: Hold pressure at 3 bars for 10 seconds to gently saturate the puck.
- Ramp up: Smoothly increase pressure to 9 bars over 4 seconds.
- Full pressure: Hold at 9 bars until the shot reaches a certain weight.
- Ramp down: Taper pressure down to 6 bars to reduce channeling at the end of the shot.
By saving different profiles for different beans or desired tastes, you can eliminate guesswork. You simply select your desired profile from a list on the home screen and press “Brew.” This level of automation is what separates a good workflow from a great one.
Example brew profiles
| Profile name | Goal | Key stages |
|---|---|---|
| Classic 9 Bar | A traditional, balanced shot | Short, low-pressure pre-infusion followed by a solid 9-bar extraction. |
| Gentle Bloom | For light roasts, avoiding acidity | Long, low-flow pre-infusion to fully saturate, then a gentle ramp to 8 bars. |
| Turbo Shot | Fast, high-clarity shot | No pre-infusion, fast ramp to 6 bars for a quick, low-ratio extraction. |
Advanced features for a streamlined routine
Once you are comfortable with profiles, you can integrate advanced features to make your process even faster. The single most impactful feature is the brew-by-weight functionality. By integrating a compatible scale, you can program your profile to automatically stop the shot once it reaches a specific target weight, for example, 36 grams for a standard 1:2 ratio shot. This is a game-changer.
Imagine this workflow: you place your cup on the scale, select your profile, and press “Brew.” The machine handles the entire extraction process and stops automatically at the perfect moment. While the shot is pulling, your hands are free. You can grab your milk pitcher, purge the steam wand, and be ready to start steaming the moment the espresso is done. This parallel processing of tasks can easily shave 30-60 seconds off your routine for each drink, which is invaluable on a busy morning. Combining custom profiles with auto-stop functionality is the pinnacle of Gaggiuino workflow mastery.
Mastering the Gaggiuino touchscreen interface is a journey from basic comprehension to effortless execution. It begins with understanding the data on the home screen and progresses to navigating the core settings. The real transformation in your workflow happens when you embrace brew profiles, turning complex extraction theories into a simple, one-touch action. By programming profiles for different beans and taste preferences, you eliminate the inconsistencies of manual brewing. Finally, integrating advanced features like brew-by-weight automation streamlines the process entirely, freeing you up to focus on other steps like milk preparation. Ultimately, the Gaggiuino is more than just a PID controller; it’s a tool that, when mastered, makes crafting café-quality espresso at home faster and more repeatable than ever before.


 No products in the cart.