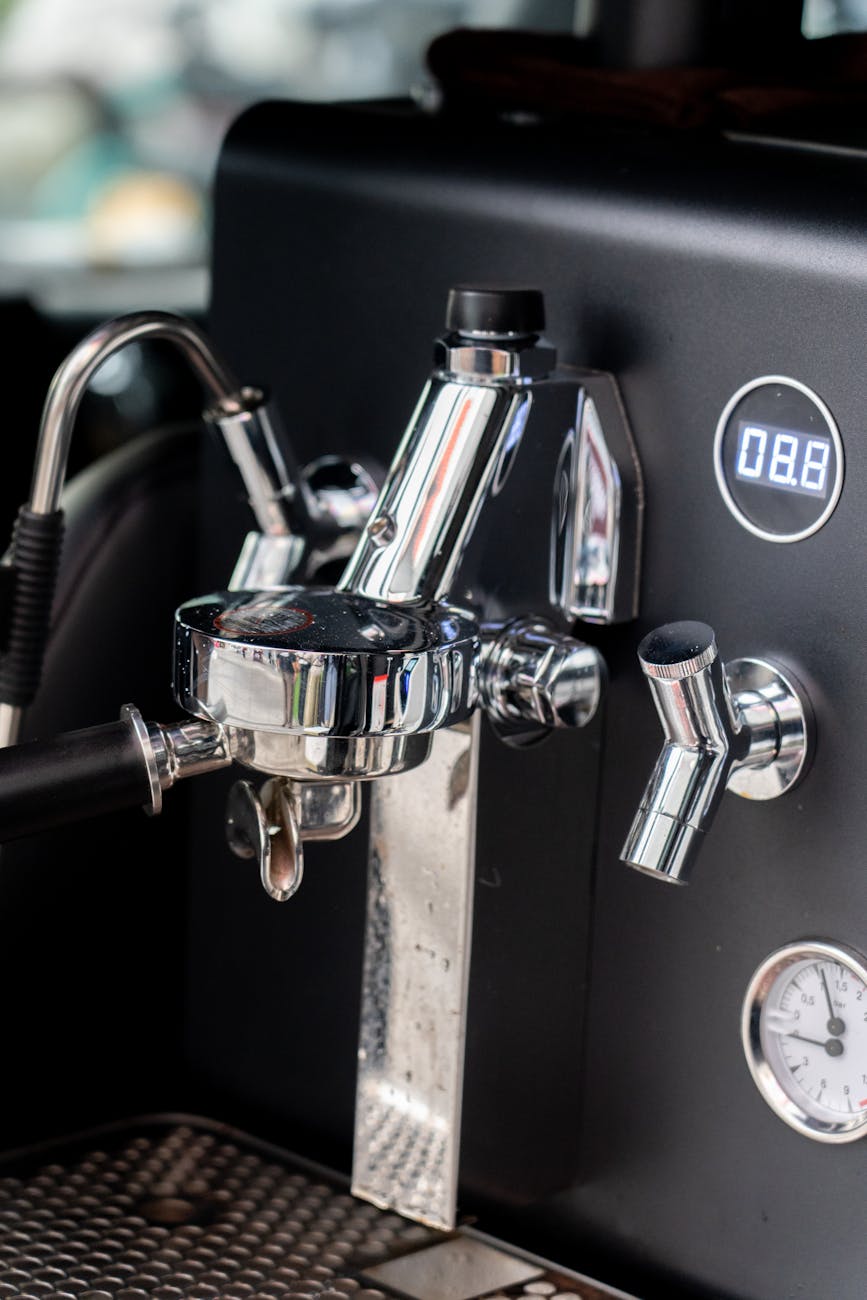
How to read and use the Flair Espresso pressure gauge
Pulling a perfect shot of espresso at home is a craft. For owners of a Flair Espresso maker, this craft is both a hands-on and rewarding experience. The key to moving from inconsistent, guessing-game shots to consistently delicious, cafe-quality espresso lies in one crucial component: the pressure gauge. This small dial is your window into the heart of the extraction process, providing real-time feedback that empowers you to take full control. This guide will demystify the Flair pressure gauge, teaching you not only how to read it but how to use it as a tool to diagnose issues, repeat your successes, and ultimately, brew better espresso than you ever thought possible from your kitchen counter.
What the pressure gauge tells you
Before you can use the gauge effectively, you must understand what it’s measuring and why it matters. The dial on your Flair measures the amount of pressure, in a unit called bars, that you are applying to the water on top of your puck of coffee grounds. This pressure is the force responsible for pushing water through the coffee, extracting all the oils, sugars, and acids that create the complex flavors of espresso.
Think of it as a speedometer for your extraction. Go too slow (low pressure), and you risk a sour, underdeveloped shot, a phenomenon known as under-extraction. Go too fast (high pressure) or apply it incorrectly, and you can blast through the puck, pulling out bitter, harsh compounds in a process called over-extraction. The gauge is divided into zones, typically with a shaded area between 6 and 9 bars. This is widely considered the “espresso zone,” the ideal pressure range for a balanced extraction. Mastering your pull means learning to guide the needle through different pressure phases with intention.
The three phases of a perfect shot
A great espresso shot isn’t about simply slamming the lever down to 9 bars. It’s a nuanced dance of pressure that can be broken down into three distinct phases. By targeting specific pressure ranges for each phase, you can build a flavor profile and ensure even extraction.
- Phase 1: Pre-infusion (1-3 bars)
The goal here is to gently saturate the entire coffee puck with water before applying full pressure. This helps prevent channeling, where water finds a path of least resistance and bypasses parts of the coffee, leading to an uneven extraction. Slowly apply pressure to the lever until the gauge reads between 1 and 3 bars. Hold it there until you see the first few drops of espresso begin to form at the bottom of the portafilter. This phase usually lasts for 5 to 10 seconds. - Phase 2: Extraction (6-9 bars)
This is the main event. Once the puck is saturated, smoothly and steadily increase pressure by pressing down on the lever. Your target is the “espresso zone” between 6 and 9 bars. The key here is consistency. Try to hold the needle as steady as possible within this range. A fluctuating needle can indicate uneven pressure application from you or channeling in the puck. This phase should last until you are close to your desired final beverage weight, typically taking 20-30 seconds. - Phase 3: Ramping down (Tapering pressure)
As you near the end of your shot, the last compounds to be extracted are often the most bitter. To avoid these, you can gently ramp down the pressure. As you see the shot blonding and reach your target yield, ease off the lever, allowing the pressure to fall from the 9-bar peak down to 4-5 bars before stopping completely. This controlled finish can add sweetness and body to the final cup.
Using the gauge for advanced pressure profiling
Once you are comfortable hitting the standard 9-bar profile, the pressure gauge becomes your tool for creative expression. Pressure profiling is the art of intentionally manipulating the pressure throughout the shot to highlight specific flavors in your coffee beans. This is where the Flair truly shines, offering a level of control that many expensive semi-automatic machines lack.
Here are a few profiles to experiment with:
- The blooming profile: Ideal for bright, acidic light roasts. Perform a very long, low-pressure pre-infusion (e.g., 15-20 seconds at 2 bars) to fully saturate the dense beans. Then, ramp up quickly to a lower peak pressure, perhaps 7-8 bars, and hold. This can temper acidity and bring out more sweetness.
- The declining profile: This profile can enhance body and texture. Start by ramping up to 9 or 10 bars quickly, then immediately begin to slowly decrease the pressure throughout the entire shot, ending around 6 bars. This front-loads the extraction and can lead to a rich, syrupy mouthfeel.
- The “Slayer” style shot: Named after the high-end espresso machine, this involves an extremely long, low-flow pre-infusion, often at 2-3 bars for up to 30 seconds, until the puck is completely saturated and dripping. Then, ramp up to a lower extraction pressure of around 6-7 bars. This gentle approach is renowned for producing exceptionally sweet and clear shots.
Troubleshooting your shots with pressure feedback
Perhaps the most powerful day-to-day use of the pressure gauge is as a diagnostic tool. It gives you instant, objective feedback on what went wrong with a shot, removing the guesswork and helping you dial in your coffee faster.
Here’s how to interpret what the gauge is telling you:
| Problem & Symptom | Gauge Reading | Likely Cause | Solution |
|---|---|---|---|
| Shot runs too fast (Gusher) Espresso flows out thin and watery in under 20 seconds. | You struggle to build pressure; it’s difficult to get the needle past 5-6 bars. | Your grind is too coarse, your dose is too low, or you didn’t tamp hard enough. | Grind finer. This is the most common solution. Adjust your grinder one step finer and try again. |
| Shot is choked Very little or no espresso comes out, even with extreme force. | The needle spikes to 10+ bars with very little effort. | Your grind is too fine, your dose is too high, or you tamped too hard. | Grind coarser. Make a significant adjustment to a coarser setting. You can also try reducing your dose by a gram. |
| Unsteady pressure The needle jumps around during the extraction phase. | The needle is erratic and won’t stay in one place despite your best efforts. | Uneven puck preparation (channeling) or inconsistent force on the lever. | Focus on your puck prep. Use a WDT tool to break up clumps and ensure even distribution before tamping. Practice applying smooth, steady force. |
By paying attention to the relationship between your actions, the gauge’s reading, and the final taste in the cup, you can quickly learn how to make precise adjustments to achieve your desired result.
The Flair Espresso pressure gauge is far more than a simple accessory; it’s your coach, your diagnostic tool, and your guide to the world of manual espresso. It transforms the brewing process from one of blind hope into one of intention and control. By understanding how to read its feedback during the three main phases of a shot—pre-infusion, extraction, and ramp down—you build a foundation for consistency. From there, you can use it to troubleshoot bad shots with precision, eliminating the frustrating guesswork. Ultimately, mastering the gauge unlocks the true potential of your Flair, empowering you to experiment with advanced pressure profiles and tailor every single shot to your exact taste. It is the key to elevating your home coffee from good to truly exceptional.


 No products in the cart.