How to dial in a new coffee grinder for espresso
Unboxing a new coffee grinder is a moment of pure excitement for any coffee enthusiast. You imagine the aroma of freshly ground beans and the taste of a perfectly balanced, cafe-quality espresso shot pulled in your own kitchen. However, that excitement can quickly turn to frustration when your first few shots are gushing, watery messes or bitter, choked disasters. The truth is, a new grinder isn’t a plug-and-play device. It requires a crucial calibration process known as dialing in. This involves adjusting the grind size to achieve the correct extraction time for a specific dose of coffee and yield of espresso. This guide will walk you through the essential variables, provide a step-by-step process, and help you troubleshoot common issues to get you from bean to bliss.
Understanding the core variables of espresso
Before you touch the adjustment collar on your grinder, it’s vital to understand the four interconnected variables that define an espresso shot. Think of them as a balancing act; changing one will inevitably affect the others. Mastering your grinder means learning how to manipulate these elements to achieve a delicious result.
- Dose: This is simply the weight of dry coffee grounds you put in your portafilter basket. Consistency here is key. A common starting point for a double-shot is between 17 and 20 grams. Sticking to a consistent dose, measured with a scale to at least 0.1g accuracy, removes one variable from the equation while you adjust the others.
- Yield: This refers to the weight of the liquid espresso in your cup. It is also measured with a scale. The relationship between your dose and yield is called the brew ratio. A standard starting ratio for modern espresso is 1:2. For example, an 18-gram dose would aim for a 36-gram yield.
- Time: Extraction time is how long it takes to reach your target yield, starting from the moment you engage the pump. A general ballpark for a well-balanced shot is between 25 and 35 seconds. Time is not the goal itself, but rather an indicator of whether your grind size is appropriate for your chosen dose and yield.
- Grind size: This is the most important variable you will adjust. The fineness or coarseness of your coffee grounds determines the resistance the water faces as it’s forced through the coffee puck. A finer grind creates more resistance, slowing down the shot. A coarser grind creates less resistance, speeding it up.
Your goal is to adjust the grind size to make the time fall into the target range for your chosen dose and yield. Taste will always be the final judge, but these numbers provide the framework for consistency.
A step-by-step process to dial in your grinder
With an understanding of the variables, you can now begin the practical process of dialing in. The cardinal rule is to only change one variable at a time. Since dose and yield are your fixed targets, your primary adjustment will be the grind size. Be prepared to waste a few shots; this is a normal and necessary part of the learning curve.
1. Establish your baseline recipe.
Decide on your starting parameters. A great place to start is with a 1:2 brew ratio. For this example, let’s use:
– Dose: 18g
– Yield: 36g
– Target time: ~30 seconds
2. Set your initial grind size and pull a shot.
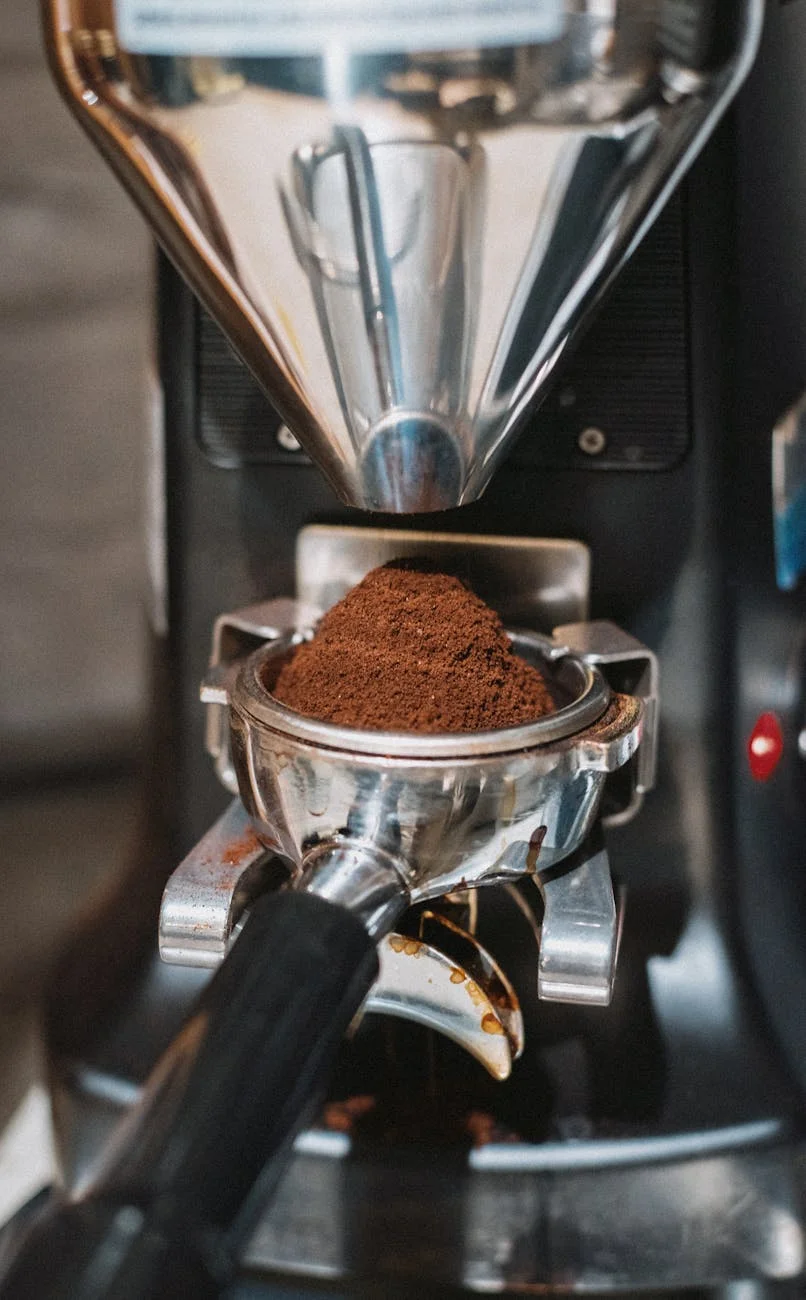
Your grinder’s manual may suggest a starting point for espresso. If not, adjust it until the grounds feel slightly finer than table salt. Weigh out your 18g dose, prepare your puck, place a cup on a scale under the portafilter, and start your shot and a timer simultaneously. Stop the shot just before the scale reads 36g, as a few extra drips will fall. Note the final time and yield.
3. Analyze the result and make an adjustment.
How did it go?
- The shot was too fast (e.g., 18 seconds): This is the most common first result. The water flowed through the puck with little resistance. Your grind is too coarse. You need to make the grind finer.
- The shot was too slow (e.g., 45 seconds): The pump was struggling to push water through the puck. Your grind is too fine. You need to make the grind coarser.
After making an adjustment on the grinder, it’s crucial to purge a small amount of beans (enough for a single shot) to clear out any grounds from the previous setting that are retained in the burr chamber.
4. Repeat and refine.
Using your new grind setting, pull another shot aiming for the same 18g dose and 36g yield. Measure the time. You should be closer to your 30-second target. Continue making small, incremental adjustments to the grind size until you consistently hit your target time. Once your numbers are in the ballpark, you can finally taste it. If it’s too sour, try a slightly finer grind for a longer extraction. If it’s too bitter, try a slightly coarser grind for a shorter one.
Troubleshooting common puck and prep problems
Sometimes, even when your grind setting seems right, your shots are inconsistent or taste off. The issue often lies not with the grinder itself, but with how you prepare the coffee puck. An unevenly prepared puck can lead to a phenomenon called channeling, where water finds a path of least resistance and over-extracts parts of the coffee while under-extracting others, resulting in a shot that is both sour and bitter.
Distribution is everything
Clumps in your coffee grounds are the enemy of a good extraction. When you grind your coffee, especially on a very fine setting, the grounds can clump together. If you tamp these clumps down, they create dense spots, while the areas around them are less dense. Water will naturally rush through the less dense areas, causing channeling. To fix this, use a simple distribution tool (like a WDT tool or even a straightened paperclip) to break up clumps and evenly distribute the grounds in your portafilter before tamping.
Tamping pressure and levelness
While the exact pressure of your tamp is less important than consistency, ensuring you tamp on a level surface and apply even pressure is critical. An unlevel tamp will create a sloped puck, where one side is thinner than the other. Water will, again, exploit this weak spot, leading to an uneven extraction. Aim for a firm, level tamp every single time. Using a self-leveling tamper can help build muscle memory and ensure perfect results.
Maintaining consistency and logging your results
Congratulations, you’ve pulled a great shot! But the work isn’t over. Dialing in is not a one-time setup. It’s an ongoing process. Every time you open a new bag of beans, even if it’s the same type you used before, you will likely need to adjust your grind setting. Factors like the age of the beans (they tend to require a finer grind as they get older) and roast level all affect how they extract.
To make this process easier and more scientific, consider keeping a simple coffee log. Tracking your variables allows you to see patterns and quickly reference the settings that worked for a particular bean. This saves time and coffee in the future. A small notebook or a spreadsheet works perfectly.
Here is a simple table you can use as a template:
| Date | Coffee Beans | Dose (g) | Grind Setting | Yield (g) | Time (s) | Notes (Taste) |
|---|---|---|---|---|---|---|
| 10/26 | Happy Mug Bigfoot | 18.0 | 12.5 | 37.1 | 22s | Too fast, sour. Grind finer. |
| 10/26 | Happy Mug Bigfoot | 18.0 | 11.0 | 36.5 | 31s | Balanced, sweet, nutty. Good. |
Conclusion: The rewarding ritual of dialing in
Dialing in a new coffee grinder for espresso can seem like a daunting and technical task. However, by breaking it down into a methodical process, it becomes an approachable and even enjoyable ritual. Remember the core principles: establish a consistent baseline with your dose and yield, use time as an indicator, and make small, singular adjustments to your grind size to hit your targets. Pay close attention to your puck preparation to avoid issues like channeling, as even the perfect grind can be ruined by a poorly prepared puck. While numbers and scales provide the road map, your palate is the ultimate destination. With a little patience and practice, the process of dialing in will become second nature, empowering you to unlock the full potential of your grinder and every bean you put through it.


 No products in the cart.
