How to calibrate the dosage strength on the Gaggia Anima
For the home barista who has graduated from automated presets, calibrating a super-automatic machine like the Gaggia Anima is a critical step toward achieving espresso that rivals a manual setup. The dosage strength function, often called “Optiaroma” on Gaggia models, is one of the most direct controls you have over the final taste and body of your shot. While it seems simple, this setting interacts dynamically with grind size and bean characteristics. Understanding how to manipulate it methodically is key to unlocking the machine’s full potential. This guide provides a technical framework for calibrating the Anima’s dosage strength, allowing for precise, repeatable results tailored to your specific coffee and taste preferences.
Understanding the Optiaroma function
The Gaggia Anima’s dosage strength setting, adjustable via the aroma strength button, does not alter pump pressure or water temperature. Its sole function is to control the amount of ground coffee used for each brewing cycle. The machine accomplishes this by adjusting the run time of the built-in grinder. A lighter setting runs the grinder for a shorter duration, dosing less coffee, while a stronger setting extends the run time, dosing more.
The Anima typically offers three to five levels of adjustment, often represented by coffee bean icons. Each step corresponds to a specific, albeit unstated, gram-weight range. For example:
- Light (1 bean): Approximately 7–8 grams
- Medium (2 beans): Approximately 9–10 grams
- Strong (3 beans): Approximately 11–12 grams
These weights are estimates and will vary based on the density and roast level of your coffee beans. Darker, oilier beans are less dense and may result in a slightly lower dose by weight for the same volumetric setting. Therefore, direct measurement is essential for precise calibration.
A systematic approach to calibration
To calibrate your dosage, you need a coffee scale with 0.1-gram precision. The goal is to establish a consistent, measurable baseline that you can adjust with intention. The process involves isolating the dose variable while keeping others, like grind size and output volume, constant.
First, set your machine to a middle dosage strength. Next, disable the brewing process to measure the dry grounds. On the Anima, this can be done by selecting the pre-ground coffee option (spoon icon), which allows the machine to cycle without dispensing water. Then, press the brew button and catch the dry puck in the dreg drawer for measurement. This bypasses the brew unit, giving you the pure dose weight.
Repeat this measurement three to four times to ensure consistency, discarding the grounds each time. Note the average weight. This number is your baseline for that specific strength setting. Follow the same procedure for the other strength settings to understand the exact dose each one delivers.
The interplay between dose and grind size
Dosage strength and grind size are intrinsically linked. You cannot adjust one without impacting the other. A common mistake is to change both simultaneously, which makes it impossible to isolate the cause of any change in flavor.
A finer grind setting increases the surface area of the coffee particles, which slows down the flow of water. If you increase your dose (more coffee) without coarsening the grind, you risk choking the machine, resulting in a slow, over-extracted shot. Conversely, a lower dose with a coarse grind may lead to a fast, under-extracted shot that tastes sour and thin.
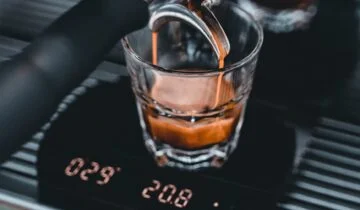
The correct method is to first dial in your dosage for a specific strength profile and then adjust the grind to achieve the desired extraction time. For a standard espresso, aim for a 1:2 ratio (e.g., 10 grams in, 20 grams out) in about 25–30 seconds. If your shot runs too fast with your chosen dose, make the grind finer. If it runs too slow, make it coarser.
Interpreting the results in the cup
Once you have established a consistent dose and dialed in the grind size, taste becomes the final arbiter. The dosage strength directly influences the body and intensity of the espresso. A higher dose will generally produce a heavier, more viscous shot with a richer crema and more pronounced flavor. This is ideal for coffees intended to stand up to milk in lattes or cappuccinos.
A lower dose, on the other hand, will result in a lighter-bodied shot with more clarity and delicate acidity. This can be preferable for single-origin coffees where you want to highlight nuanced floral or fruit notes. Use your calibrated settings to experiment. Pulling shots at different calibrated doses—for example, a 9-gram shot versus an 11-gram shot—will reveal how the coffee’s character changes, empowering you to tailor the brew to the specific bean you are using.
Conclusion
Calibrating the dosage strength on the Gaggia Anima is a methodical process that elevates it from a simple automatic machine to a precise brewing instrument. By moving beyond the abstract “bean” icons and grounding your adjustments in measurable weights, you gain repeatable control over the final shot. The key is to isolate the dosage variable, understand its relationship with grind size, and use taste as your ultimate guide. This technical approach allows the experienced barista to consistently produce high-quality espresso that is tailored to specific coffees and personal preferences. For those seeking to refine their workflow, various precision tools that aid in consistency are available at papelespresso.com.


 No products in the cart.
