Why your Gaggia Classic espresso tastes sour and how to fix it
The Gaggia Classic is a legendary machine, capable of producing fantastic espresso that rivals what you’d find in a high-end cafe. So, it can be incredibly frustrating when you pull a shot, take a sip, and are met with a sharp, sour taste that makes you wince. This unpleasant, lemony flavor is a common problem for home baristas, but the good news is that it’s almost always fixable. Sourness is a clear signal from your coffee, telling you that something is off in your brewing process. It points directly to a phenomenon called under-extraction. In this guide, we’ll explore exactly what that means and walk you through the key variables to adjust, from grind size to water temperature, to transform your sour shots into sweet, balanced, and delicious espresso.
Understanding sour espresso: The science of under-extraction
Before you can fix the problem, it’s crucial to understand why it’s happening. In the world of coffee, sourness is the primary indicator of under-extraction. When hot water flows through your coffee puck, it acts as a solvent, dissolving various flavor compounds from the grounds. This process happens in a specific order.
First, the acids and fats are extracted. These compounds are highly soluble and dissolve quickly. If you stop the brewing process too early, your cup will be dominated by these acidic flavors, resulting in that sour taste. Next to be extracted are the sugars, which bring sweetness and balance. Finally, the more bitter compounds are extracted. The goal of a perfect shot is to stop the extraction right in the “sweet spot,” after the acids have been balanced by the sugars but before the unpleasant bitter compounds take over. A sour shot simply means the water didn’t have enough time or energy to extract those crucial sugars, leaving the acids to dominate the flavor profile.
Dialing in your grind and dose
The most common cause of under-extraction is water flowing through the coffee puck too quickly. Your primary tools for controlling this flow rate are your grinder and your coffee scale. These two elements work together to create the right amount of resistance inside the portafilter.
Grind size: If your coffee grind is too coarse, there will be large gaps between the coffee particles. Water will rush through these channels with little resistance, failing to extract enough flavor compounds. This results in a fast, watery, and sour shot. The solution is to adjust your grinder to a finer setting. This increases the surface area of the coffee and compacts the grounds more tightly, forcing the water to work harder and flow more slowly, allowing for proper extraction.
Dose: The dose is the weight of dry coffee grounds you put in your portafilter. An incorrect dose can also lead to sour shots. Too little coffee in the basket leaves too much empty space (headspace), which can prevent the machine from building adequate pressure and lead to a fast, under-extracted shot. For the standard double-shot basket that comes with the Gaggia Classic, a good starting point is between 16 and 18 grams. Using a scale with 0.1g accuracy is essential for consistency. A consistent dose is your foundation; once it’s set, you can focus on adjusting the grind size to control the shot time.
Mastering temperature and shot time
Once your dose is consistent and your grind is in the right ballpark, you need to manage the two most important brewing parameters: water temperature and time. For a machine like the Gaggia Classic with its small boiler, temperature management is particularly important.
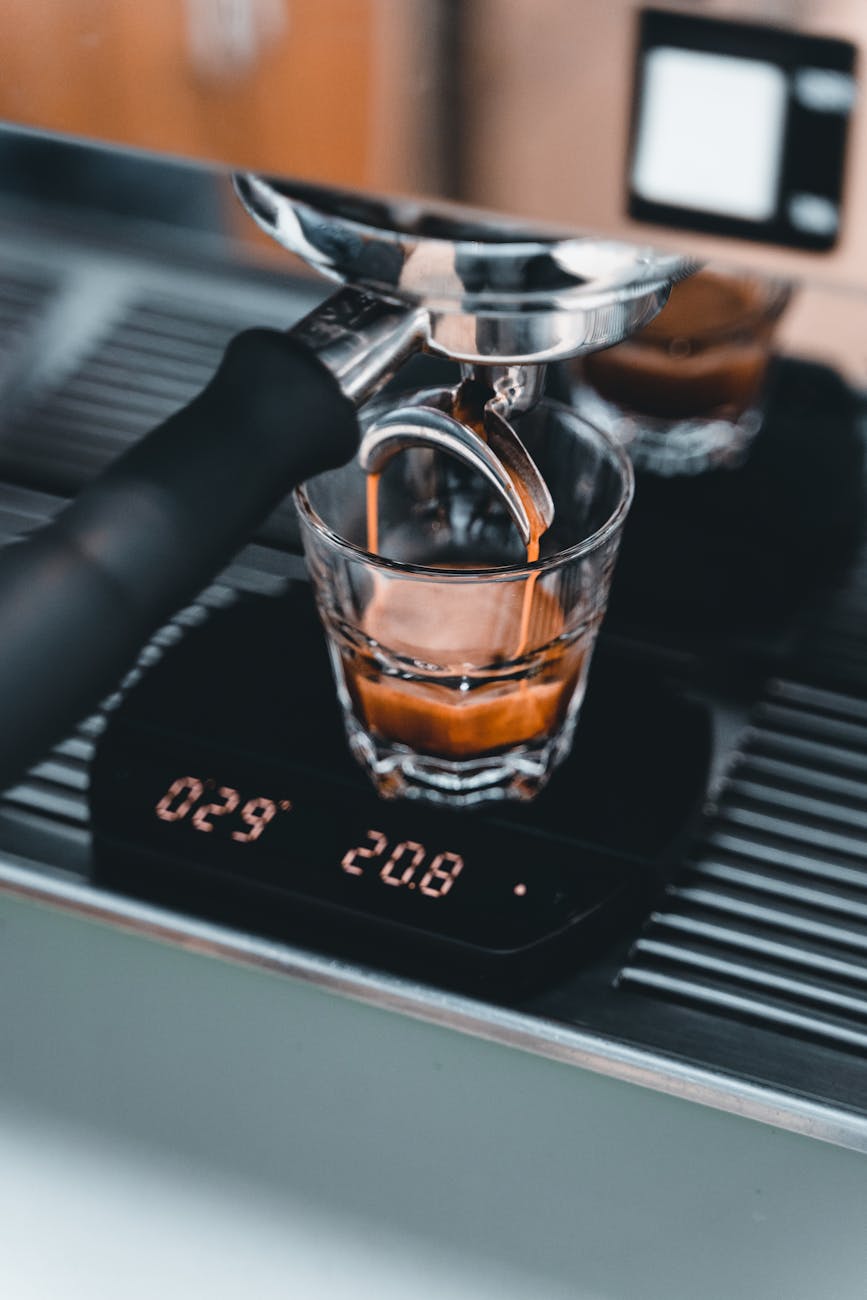
Water temperature: Water that is too cool lacks the thermal energy to properly dissolve the sugars and oils in the coffee, leading directly to sour, under-extracted shots. The Gaggia Classic’s brew light is a guide, but it doesn’t guarantee a perfect temperature. To get more consistent results, you can try a technique called temperature surfing. A simple routine is to flick on the steam switch for about 10 seconds to give the boiler an extra heat boost. Then, place a cup under the group head and run water through it until the brew-ready light turns off and then back on. Once it comes back on, you are at the top of the heating cycle and ready to pull your shot. This helps ensure your brew water is hot enough every time.
Shot time and yield: This is how you measure your success. The gold standard for a traditional espresso is a brew ratio of 1:2 in about 25-30 seconds. This means for every 1 gram of coffee you put in, you want 2 grams of liquid espresso out. So, if you start with an 18-gram dose, you should aim for a 36-gram shot. Use a scale under your cup to weigh the output and a timer. If your 36-gram shot comes out in 15 seconds, it’s under-extracted and will taste sour. The fix is to go back to your grinder and adjust it finer. If it takes 45 seconds, it will likely be over-extracted and bitter, so you would need to grind coarser.
Troubleshooting your sour shot
| Symptom | Likely Cause | Primary Solution |
|---|---|---|
| Shot runs very fast (<20 seconds for a 1:2 ratio) and tastes sour. | Under-extraction | Grind finer. This is the most important adjustment. |
| Espresso looks pale and thin (weak crema). | Under-extraction / Low Temperature | Grind finer and ensure the machine is properly preheated. Try temperature surfing. |
| You’ve ground finer, but the shot is still a bit sour and weak. | Incorrect Dose or Channeling | Check your dose is correct (e.g., 17g). Improve puck prep with a distribution tool (WDT). |
| Shot tastes both sour and bitter at the same time. | Channeling | Focus on puck preparation. Distribute the grounds evenly and apply a level tamp. |
Beyond the basics: Puck prep, beans, and maintenance
If you have your grind, dose, and time dialed in but are still struggling with inconsistency, a few other factors could be at play. Excellent puck preparation is key to preventing channeling, which occurs when water finds a path of least resistance through the coffee puck. This results in some parts of the coffee being under-extracted (sour) and other parts being over-extracted (bitter) simultaneously. Using a simple tool like a WDT (Weiss Distribution Technique) tool to break up clumps and evenly distribute the grounds before tamping can make a world of difference. Always finish with a firm, level tamp.
Finally, consider your coffee beans. Very light roasts are naturally higher in acidity and more difficult to extract. If you are new to espresso, starting with a medium or medium-dark roast can be more forgiving. Most importantly, use fresh beans. Coffee is best within a few weeks of its roast date. Old, stale beans from the supermarket will be impossible to dial in and will always produce a disappointing shot, regardless of your technique.
Eliminating sour espresso from your Gaggia Classic is a process of systematic troubleshooting. By understanding that sourness is a symptom of under-extraction, you can address the root cause. The journey begins with establishing a consistent dose and then making small, deliberate adjustments to your grind size to control the flow rate. Your goal should be to achieve a balanced extraction, typically a 1:2 brew ratio in 25-30 seconds. Don’t forget to manage the Gaggia’s brew temperature and focus on good puck preparation to avoid channeling. It may seem like a lot to juggle, but each variable is a tool at your disposal. Be patient, change only one thing at a time, and taste everything. With practice, you’ll develop the skills to diagnose any shot and transform your sour espresso into the rich, sweet, and syrupy shots your Gaggia Classic is capable of.
 No products in the cart.