
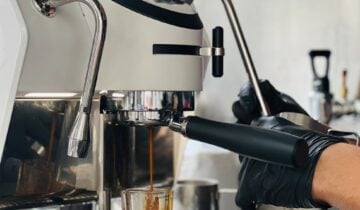
The Cafelat Robot is a marvel of manual espresso making, celebrated for its simplicity, durability, and the exceptional quality of shots it can produce. Central to this process is the art of puck preparation, and a critical step is tamping. A perfectly level and evenly compacted coffee bed is the foundation of a balanced extraction, preventing issues like channeling that lead to sour or bitter flavors. The Robot comes with a high-quality, non-self-leveling stock tamper. While effective, its basic design presents a learning curve. This guide is dedicated to helping you master the technique of achieving a consistently level tamp with the standard tamper, ensuring you get the most out of every single pull on your Cafelat Robot.
Understanding your tools: The robot’s basket and tamper
Before diving into technique, it’s crucial to understand the equipment you’re working with. The Cafelat Robot’s system is unique. Its filter basket is a deep, straight-walled, 58mm professional-style basket. Unlike many home machine baskets that are tapered, the Robot’s design promotes a very even water flow through the entire coffee puck. However, its depth can make it visually tricky to judge if your coffee bed is level before and after tamping.
The stock tamper is a solid piece of stainless steel, precisely machined to fit this basket. It feels substantial and does its job well, but it lacks any guiding features. There’s no built-in spring for calibrated pressure or a collar to ensure it enters the basket perfectly straight. This puts the responsibility for achieving a level surface squarely on you, the user. This combination of a deep basket and a non-guided tamper is why developing a reliable technique is so important. An uneven tamp will create dense and loose spots in the coffee bed, leading directly to channeling and a poorly extracted, disappointing shot of espresso.
Essential pre-tamping preparation
A successful tamp doesn’t start when the tamper touches the coffee. It begins with creating a uniform and level bed of grounds to work with. Rushing this stage will make a level tamp nearly impossible, no matter how good your technique is. Your primary goal here is to eliminate clumps and distribute the coffee grounds evenly throughout the basket.
- Distribution with WDT: The Weiss Distribution Technique (WDT) is your best friend. After grinding your coffee into the basket, the grounds will likely be clumpy and piled in the center. Use a WDT tool, which can be anything from a professional needle-based tool to a simple DIY cork with fine needles or straightened paper clips. Gently rake the tool through the entire bed of coffee, from bottom to top, to break up all clumps and create a light, fluffy, and evenly distributed mass.
- Settling the grounds: After WDT, the surface will be fluffy but probably uneven. To create a flatter surface for your tamper, give the basket a few gentle vertical taps on your countertop or a tamping mat. This will collapse the air pockets and settle the grounds into a more compact and level bed. Avoid aggressive side-tapping on the portafilter, as this can cause grounds to separate by density, creating another form of unevenness.
By investing a moment in proper distribution and settling, you present the tamper with a flat surface, making the final press significantly easier and more effective.
Mastering the tamping technique
With a well-prepared bed of coffee, you are now ready for the main event. This is where muscle memory and sensory feedback come into play. A consistent routine is key to achieving a level tamp every time.
First, focus on your form. Stand comfortably over the basket, placed on a firm, level surface. Hold the tamper with a “doorknob” grip, with your palm on top and fingers steadying the base. Keep your wrist straight and align your elbow and shoulder directly over the tamper. This ergonomic position allows you to apply pressure vertically, without accidentally tilting the tamper.
Next comes the most crucial trick for ensuring a level press: the fingertip technique.
- Rest the tamper lightly on top of the settled coffee grounds. Do not apply pressure yet.
- Extend the tips of your thumb and index finger to form a caliper shape.
- Feel the gap between the top rim of the tamper’s base and the top rim of the filter basket.
- Gently move your fingers around the circumference. If the gap is wider on one side, the tamper is tilted. Adjust it until the gap feels perfectly even all the way around.
- Once you feel it’s level, apply firm and consistent pressure straight down. Aim for a pressure of around 20-30 lbs, but more importantly, focus on being consistent from shot to shot.
- Once fully compressed, release the pressure and lift the tamper straight up. A slight, gentle polishing twist at the end is optional, but avoid a forceful twist as it can fracture the puck’s surface.
Checking your work and troubleshooting
How do you know if your technique is working? The feedback loop is essential for improvement. You can assess your tamp both before and after you pull the shot.
Immediately after tamping, perform a quick visual inspection. The surface of the coffee should look perfectly flat and polished. Check the distance from the top of the puck to the rim of the basket; it should be consistent all the way around. During the extraction, watch the bottom of the basket. The espresso should begin to appear as even beads across the surface, coalescing into a single, steady stream in the center. If you see spurts of fast-flowing, blonde coffee (channeling), it’s a clear sign of an uneven puck.
Finally, inspect the spent puck after the shot. It should be firm, relatively dry, and knock out of the basket in one piece. A soupy or cracked puck can indicate problems. Use this information to refine your process. Below is a simple guide to help you troubleshoot.
| Problem | Likely Cause | Solution |
|---|---|---|
| Espresso spurts out from one side (channeling) | Tilted tamp or poor distribution | Focus on WDT and meticulously use the fingertip technique to ensure the tamper is level before compressing. |
| Shot is both sour and bitter | Uneven extraction from channeling | Improve your entire puck prep routine, from distribution to tamping, to promote an even flow of water. |
| Spent puck is cracked or has a hole in it | Uneven pressure application or a forceful twist after tamping | Ensure you are pressing straight down with your body. Avoid the final twist or make it extremely gentle. |
| Top of the tamped puck is visibly sloped | Applying pressure at an angle | Correct your stance. Make sure your wrist is straight and your elbow is directly above the tamper. |
Mastering a level tamp with the Cafelat Robot’s stock tamper is a rewarding skill that places you in full control of your espresso quality. It is a journey that begins not with the tamp itself, but with meticulous puck preparation. By focusing on thorough distribution with a WDT tool and settling the grounds, you create the ideal foundation. From there, adopting a proper stance and utilizing the tactile feedback of the fingertip technique will transform your tamping from a guess into a precise, repeatable action. Remember to analyze your shots and spent pucks to diagnose any issues. While aftermarket self-leveling tampers exist, proving your mastery over the stock tool is a testament to true barista skill. Consistency, not pressure, is the ultimate goal.

 No products in the cart.