The Best Way to Clean a Super-Automatic Brew Group for Consistent Shots
The magic of a super-automatic espresso machine lies in its promise of a perfect, hassle-free coffee at the touch of a button. You invest in one for consistency, day in and day out. But over time, you might notice your shots becoming bitter, watery, or just plain disappointing. The culprit is often hiding in plain sight: a dirty brew group. This intricate component is the heart of your machine, responsible for tamping the grounds and extracting your espresso. When neglected, it accumulates old coffee oils and grounds, directly impacting flavor and performance. This guide will walk you through the essential cleaning processes, distinguishing between different types of brew groups and providing a clear maintenance schedule to restore your machine and ensure every shot is as delicious as the first.
Why a clean brew group is the secret to great coffee
Before diving into the how, it’s crucial to understand the why. The brew group is the internal barista of your super-automatic machine. It receives the freshly ground coffee, tamps it into a perfect puck, forces hot water through it for extraction, and then ejects the used grounds into a waste container. This entire process happens in a warm, wet environment, making it a prime location for buildup.
This buildup consists of two main enemies of good coffee:
- Rancid coffee oils: Coffee beans are full of natural oils (caffeol) that are essential for flavor and crema. However, when these oils are left behind, they oxidize and turn rancid, imparting a bitter, stale, and unpleasant taste to your fresh coffee.
- Old coffee grounds: Microscopic particles of old grounds get trapped in the brew group’s mesh screen and crevices. These old grounds over-extract with every new shot, adding more bitterness and muddling the flavor profile.
Ignoring this buildup doesn’t just ruin the taste of your coffee. It can lead to mechanical failures, causing watery shots, blockages, and error messages as the moving parts struggle to operate. More alarmingly, the damp environment can become a breeding ground for mold and bacteria. Therefore, regular cleaning is not just about taste; it’s about hygiene and protecting the longevity of your machine.
Cleaning removable vs. fixed brew groups
Super-automatic machines are generally designed with one of two types of brew groups: removable or fixed. Your cleaning approach will depend entirely on which type your machine has. It’s essential to know your machine’s design before you start.
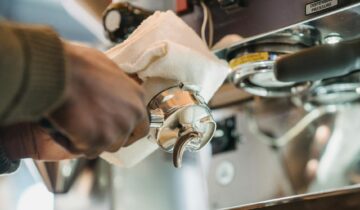
Removable brew groups, common in brands like Saeco, Gaggia, and De’Longhi, are designed for easy manual cleaning. The process is straightforward:
- Power down the machine completely.
- Open the side service door and locate the brew group.
- Press the release button or levers (check your manual) and gently pull the unit out.
- Rinse it thoroughly under lukewarm running water. Do not use soap or detergent, as it can strip away essential lubricants and leave a residue.
- Use a soft brush to gently scrub the mesh filter and hard-to-reach areas to dislodge fine coffee particles.
- Allow it to air dry completely before reinserting it.
Fixed brew groups, found in machines from brands like Jura and Krups, cannot be removed. These systems are engineered for internal cleaning cycles. The machine will prompt you when it’s time to clean, typically after a set number of brewing cycles. The process is automated: you simply drop a manufacturer-approved cleaning tablet into the designated chute (often the pre-ground coffee bypass) and run the cleaning program. These tablets are powerful degreasers that dissolve coffee oils and residue from the brew group and the coffee path, flushing them out internally.
The deep clean: degreasing and lubrication
While a simple water rinse or a standard tablet cycle handles day-to-day maintenance, a periodic deep clean is necessary for peak performance. This involves more intensive degreasing and, for removable units, lubrication.
Degreasing is the process of chemically breaking down the stubborn, caked-on coffee oils that water can’t remove. For fixed brew groups, the automated tablet cycle is the deep clean. For removable brew groups, you have two options. You can either run a cleaning cycle with a degreasing tablet before removing the unit for rinsing, or you can soak the brew group in a solution made from a specialized coffee equipment cleaning powder. This powerful soak will dissolve years of buildup, but always check your manufacturer’s guidelines to ensure this method is safe for your specific model.
Lubrication is a critical step that applies only to removable brew groups. The moving parts of the brew group, like its pistons and guide rails, require lubrication to operate smoothly. Without it, friction can cause parts to wear down, squeak, or even break. After cleaning and thoroughly drying your removable brew group, apply a very thin layer of food-safe silicone grease to the main O-rings and along the tracks or rails. This should be done every month or two, or roughly every 500 shots, to keep the mechanism functioning flawlessly.
Recommended cleaning schedule
| Task | Removable Brew Group | Fixed Brew Group |
|---|---|---|
| Basic Clean | Weekly rinse with water | N/A (handled by tablet cycle) |
| Deep Clean (Degrease) | Monthly cleaning with a tablet or soaking solution | As prompted by the machine (approx. every 200 shots) |
| Lubrication | Every 1-2 months with food-safe grease | N/A (internally lubricated) |
Final steps for a perfect result
Properly reassembling and preparing your machine after cleaning is just as important as the cleaning itself. For a removable brew group, the single most critical rule is to ensure it is completely dry before reinserting it. Placing a damp unit back inside the dark, warm interior of your machine is an open invitation for mold. Let it air dry for several hours or overnight.
Once dry, slide the brew group back into the machine until you hear a confident “click,” ensuring it’s locked in place. If it doesn’t feel right, don’t force it. Remove it and try again. After reinserting the unit or completing a tablet-based cleaning cycle, it’s always a good practice to run a rinse cycle or brew one “throwaway” shot of espresso. This primes the system, ensures everything is seated correctly, and flushes out any residual cleaning agents, guaranteeing your next coffee is pure, fresh, and delicious.
By integrating these steps into your routine, you are not just cleaning your machine—you are preserving the quality of your coffee and the health of your investment.
In conclusion, the path to consistently great coffee from your super-automatic machine is paved with regular, thorough maintenance. The brew group, as the central component of the brewing process, demands your attention. Understanding whether you have a removable or fixed unit is the first step in applying the correct cleaning method. For removable groups, a weekly water rinse combined with a monthly deep clean and lubrication will keep it in prime condition. For fixed groups, faithfully following the machine’s prompts for tablet cleaning cycles is non-negotiable. Neglecting this crucial task leads to bitter coffee, poor machine performance, and potential hygiene issues. A few minutes of simple, consistent care will reward you tenfold, ensuring your machine continues to deliver that perfect, cafe-quality shot you love, every single time.
 No products in the cart.