
The allure of a perfect cappuccino is undeniable: a rich, bold shot of espresso topped with a thick, velvety layer of sweet, steamed milk. While it may seem like an art form reserved for skilled baristas, creating this delightful beverage at home is entirely achievable. The secret lies not just in a good espresso shot, but in mastering the technique of steaming microfoam. Many home enthusiasts struggle, often ending up with either overly bubbly, dry foam or simply hot milk. This guide is designed to demystify the process. We will walk you through every step, from selecting the right milk to the final, satisfying pour, empowering you to steam silky, delicious microfoam on your home espresso machine.
The essentials: Milk, pitcher, and machine prep
Before you even turn on the steam wand, setting yourself up for success is crucial. The foundation of great microfoam rests on three key elements: your milk, your pitcher, and your machine’s readiness. Think of this as the mise en place for your cappuccino. The type of milk you choose has the biggest impact on the final texture and taste. Proteins create the foam’s structure, while fats contribute to its rich, creamy mouthfeel. For this reason, whole cow’s milk is the easiest and most forgiving for beginners, consistently producing excellent results.
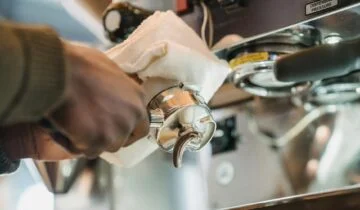
However, plant-based milks have come a long way. Look for “barista series” versions, as they are specifically formulated with added proteins or stabilizers to improve their steaming performance. Your pitcher is also more than just a container; it’s a tool. A stainless steel pitcher is ideal because it allows you to feel the temperature of the milk with your hand. Ensure it’s the right size—you should fill it to just below the base of the spout, about one-third to one-half full, to give the milk room to expand. Finally, always purge your steam wand by turning it on for a couple of seconds before and after each use. This clears out any condensed water and residual milk, ensuring clean, dry steam for optimal texturing.
| Milk type | Steaming difficulty | Foam quality | Flavor profile |
|---|---|---|---|
| Whole milk | Easy | Rich, creamy, and stable | Sweet and classic |
| Oat milk (Barista edition) | Easy-Medium | Creamy and stable, great for art | Naturally sweet, oaty |
| Soy milk | Medium | Can be stable but may curdle | Distinct, beany |
| Almond milk | Hard | Thin and separates quickly | Nutty but can be watery |
The steaming process: Positioning and aeration
With your cold milk in a cold pitcher, it’s time for the main event. This process happens in two distinct but seamless phases: aerating (stretching) and texturing. First, focus on your positioning. Submerge the tip of the steam wand just below the surface of the milk, positioning it slightly off-center. Holding the pitcher at a slight angle will help encourage the milk to spin. Now, turn the steam on to full power. In this first phase, you are introducing air. You should hear a gentle but consistent hissing sound, like paper tearing. This is the sound of aeration. For a cappuccino, which requires a thicker layer of foam than a latte, you’ll want to keep the tip near the surface for about 6-8 seconds, allowing the milk to expand in volume by about 30-50%.
Once you’ve introduced enough air, it’s time for the second phase: texturing. Smoothly raise the pitcher slightly, submerging the steam wand deeper into the milk. This stops the hissing sound and halts the introduction of air. The goal now is to create a powerful vortex. The spinning motion will break down any large, undesirable bubbles and fold them into the milk, creating the silky, uniform texture of microfoam. Continue to let the milk spin until it reaches the correct temperature, which is the final critical component of the process.
Getting the temperature right
Temperature is not just about making your drink hot; it’s about chemistry. The perfect temperature unlocks the natural sweetness of the milk and creates the ideal foam structure. If your milk is underheated, it will taste flat. If you overheat it, or “scald” it, the proteins will break down completely, destroying the foam and giving the milk a burnt, unpleasant taste. The sweet spot for perfectly steamed milk is between 140-155°F (60-68°C). In this range, the lactose (milk sugar) is at its sweetest, and the foam is stable and luscious.
How do you know when you’ve hit the mark? There are two reliable methods. For beginners, the touch method is very intuitive. Place your free hand flat on the side of the stainless steel pitcher. As the milk heats, you will feel the pitcher get progressively warmer. When it becomes too hot to comfortably keep your hand on it for more than a second, it’s ready. Turn off the steam immediately. For those seeking more precision and consistency, a clip-on barista thermometer is an excellent investment. It removes the guesswork and helps you hit that perfect temperature every single time.
Finishing touches: Polishing and pouring
You’ve turned off the steam, but you’re not quite done. The moments after steaming are crucial for perfecting the milk’s texture before it meets the espresso. First, immediately wipe the steam wand with a damp cloth and purge it again to keep it clean. Now, look at your pitcher of milk. You might see a few larger bubbles on the surface. To eliminate them, give the bottom of the pitcher a firm tap or two on the countertop. Next, and most importantly, is to polish the milk. Hold the pitcher by the handle and swirl the milk with a confident wrist motion. This action fully incorporates the liquid milk with the foam, creating a homogenous, glossy texture that looks like wet paint. If you let the milk sit, it will begin to separate, so this step is vital.
Now for the pour. For a classic cappuccino, tilt your cup of espresso and begin pouring the steamed milk into the center from a slight height. This allows the milk to dive under the crema. As the cup fills, bring the pitcher’s spout closer to the surface of the drink. This will cause the thick, glossy foam to float on top, forming the iconic white cap. A traditional cappuccino has a balanced ratio of roughly one-third espresso, one-third steamed milk, and one-third foam, resulting in a rich and airy final cup.
Creating cafe-quality microfoam at home is a skill that blends science and technique. By following these steps, you can transform your morning coffee routine. Remember to start with the right foundation: cold whole milk and a properly sized pitcher. Focus on the two key phases of steaming—a short period of aeration followed by creating a vortex to build silky texture. Always be mindful of hitting that sweet spot of 140-155°F to maximize flavor and foam quality. Finally, don’t forget to polish your milk by tapping and swirling before you pour. More than anything, remember that practice is essential. Your first few attempts may not be perfect, but don’t be discouraged. With each try, you’ll build muscle memory and a better feel for the process, bringing you one step closer to that perfect, velvety cappuccino.


 No products in the cart.