
Dial in espresso faster: A guide for the Gaggia Classic with a PID
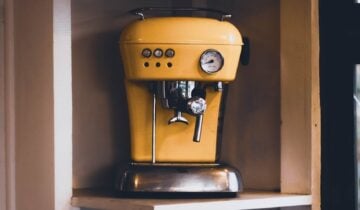
The Gaggia Classic is a legendary machine, but every owner knows the struggle of dialing in that perfect shot of espresso. You pull one great shot, and the next is a sour disappointment. The culprit is almost always temperature instability. This is where a PID (Proportional-Integral-Derivative) controller transforms your experience. It replaces the Gaggia’s imprecise stock thermostat with a digital brain, giving you pinpoint control over brew temperature. This guide is for those who have made this crucial upgrade. We will walk you through a systematic process that leverages the power of your PID, eliminating the guesswork and helping you dial in new coffee beans faster and more consistently than ever before.
Why your PID is the key to consistency
Before installing a PID, brewing on a Gaggia Classic often involves a ritual known as “temperature surfing.” This means flushing water and timing your shot to try and catch the heating element at the right point in its cycle. Why? The standard thermostat has a massive temperature swing, sometimes as much as 10-15°C (20-30°F). This huge variance is the primary source of inconsistency. One shot might be brewed at 96°C, making it bitter, while the next drops to 88°C, resulting in a sour, under-extracted mess.
A PID controller completely eliminates this problem. It uses a smart algorithm to learn your machine’s heating behavior, making tiny, rapid power adjustments to the boiler to hold your chosen temperature with incredible accuracy, often within a single degree. By turning temperature from a wild, unpredictable variable into a locked-in constant, you can finally focus on the elements you can control: your dose, grind, and yield. This stability is the foundation for a faster, frustration-free dialing-in process.
Your new pre-shot workflow
With a PID, your routine becomes simpler and more repeatable. Gone are the days of complex temperature surfing rituals. Here is a straightforward workflow to ensure your Gaggia is perfectly prepared for every shot.
First, set your target temperature. A great starting point for most medium-roast espresso blends is 93°C (200°F). For darker, more traditional roasts, you might start a little cooler, around 90-91°C (194-196°F), to reduce bitterness. For very light, fruity single origins, you might go hotter, up to 95°C (203°F), to aid extraction.
Next, and this is crucial, allow for a proper warm-up. While your PID display might show the boiler is at temperature in just a few minutes, the rest of the machine, especially the heavy brass group head and portafilter, is still cold. A cold group head will instantly sap heat from your brew water. Give your machine a solid 15-20 minutes to heat soak with the portafilter locked in. This ensures every part of the water path is thermally stable.
Finally, perform a quick pre-shot flush. Just before you lock in your coffee-filled portafilter, run the pump for 2-3 seconds. This clears any stale water from the group head and, most importantly, stabilizes the temperature right at the brew screen. You’ll see the PID temperature dip and then quickly recover. Pulling your shot as the temperature returns to its set point ensures maximum accuracy.
A systematic approach to dialing in
Now that your temperature is rock-solid, you can dial in your espresso with scientific precision. The key principle is to only change one variable at a time. With temperature locked in by the PID, the primary variable you will adjust is your grind size.
Start with a baseline recipe. A great place to begin is a 1:2 brew ratio. For example:
- Dose: 18 grams of coffee in your basket.
- Yield: 36 grams of liquid espresso in your cup.
- Time: Aim for a total shot time of 25-30 seconds (from the moment you hit the pump switch).
Use a scale to weigh your dose and your yield; don’t rely on guesswork. Once you’ve pulled your first shot using this baseline, taste it and look at the time. The shot time tells you what to do next. You are now using grind size to control the flow rate and, therefore, the time it takes to reach your target yield.
| Shot Time | Likely Taste | Action Required |
|---|---|---|
| Under 25 seconds | Sour, thin, acidic | Grind finer. This increases resistance, slowing the shot down. |
| Over 30 seconds | Bitter, harsh, burnt | Grind coarser. This reduces resistance, speeding the shot up. |
| 25-30 seconds | Balanced, sweet | You’re in the right ballpark! Now you can fine-tune. |
Because your PID has eliminated temperature swings, you can be confident that a fast, sour shot is purely a result of the grind being too coarse, not a cold boiler. This clarity is what allows you to dial in a new bag of beans in just two or three shots.
Fine-tuning flavor with temperature
Once you have your dose, yield, and time locked in (e.g., 18g in, 36g out, in 28 seconds), you can use the PID for its ultimate purpose: flavor manipulation. Now, you will make small, deliberate adjustments to the brew temperature to nudge the flavor profile in your desired direction. This is the final 10% of the process that turns a good shot into a great one.
Taste your balanced shot carefully. Is it just a little too bright or acidic for your preference? The coffee might be slightly under-extracted. Increase your brew temperature by 1°C (or 2°F). This will increase the extraction, bringing out more sweetness and body, and taming that acidity.
Conversely, does the shot have a hint of excessive bitterness or a “roasty” flavor that you’d like to dial back? This suggests you might be slightly over-extracting. Decrease your brew temperature by 1°C (or 2°F). This will mellow out the extraction, reducing bitterness and allowing more delicate, sweet notes to shine through.
By making these tiny, incremental changes to temperature *after* your other variables are set, you can precisely steer the final taste of your espresso, a level of control that is simply impossible without a PID.
In essence, upgrading your Gaggia Classic with a PID controller is the single most impactful change you can make for espresso quality and consistency. It elevates the machine from a capable hobbyist tool into a precise instrument. By removing temperature instability from the equation, you are empowered to follow a clear, logical process: establish a repeatable pre-shot routine, use grind size to control your shot time, and then leverage precise temperature control to perfect the final flavor. This systematic approach demystifies the dialing-in process, saving you time, coffee, and frustration, and ultimately rewarding you with the ability to pull delicious, cafe-quality espresso from your home machine, shot after shot.
 No products in the cart.