Investing in a high-end, commercial-style espresso machine is a significant step toward achieving café-quality coffee at home or in your business. However, the machine itself is only one part of the equation. Without a correctly calibrated grind size, even the most advanced equipment will produce a disappointing shot. This process, known as “dialing in,” is the most critical skill for any barista to master. It is the art and science of adjusting your coffee grinder to achieve the perfect extraction, balancing sweetness, acidity, and bitterness for a truly exceptional espresso. This guide will walk you through the fundamental principles and a step-by-step process to calibrate your grind size, transforming your good espresso into an unforgettable one.
Understanding the fundamentals of espresso extraction
Before you touch your grinder, it’s essential to understand what you’re trying to achieve. Espresso is created by forcing hot, pressurized water through a compact puck of finely ground coffee. The size of these coffee grounds dictates the resistance the water meets. This interplay between grind size, time, and pressure is the core of extraction.
Think of it like a dam. If the dam is made of large boulders (a coarse grind), water will rush through it quickly. In espresso, this leads to under-extraction. The water doesn’t have enough contact time with the coffee to pull out the desirable sugars and oils, resulting in a shot that tastes sour, weak, and thin. Conversely, if the dam is made of fine sand (a fine grind), water will struggle to pass through. This causes over-extraction, where the water spends too much time with the coffee, pulling out unwanted bitter and astringent compounds. The resulting shot will taste harsh, bitter, and dry.
The goal is to find the sweet spot, a balanced extraction where you capture the rich sweetness and complex acidity of the bean without the negative flavors. Your grinder is the primary tool you will use to control this balance.
The essential tools and your starting recipe
Consistency is key in espresso, and you need the right tools to achieve it. Trying to dial in without them is like navigating without a compass. Here’s what you absolutely need:
- A quality burr grinder: High-end espresso machines demand high-end grinders. A burr grinder provides the uniform and precise grind size necessary for a good extraction. Blade grinders are not suitable for espresso.
- A digital scale (0.1g accuracy): You need to measure your dose (the dry coffee grounds) and your yield (the liquid espresso) precisely. Eyeballing is not an option.
- A timer: This can be on your scale, your phone, or the espresso machine itself. Shot time is a critical indicator of extraction.
- Freshly roasted coffee: Coffee is best between 5 and 21 days after its roast date. Older coffee will behave differently and is harder to dial in.
With your tools ready, you need a starting recipe. An espresso recipe is defined by three variables: dose, yield, and time. A great starting point for most coffees is a 1:2 brew ratio. This means for every 1 gram of dry coffee, you want 2 grams of liquid espresso. A common recipe is:
- Dose: 18 grams of dry coffee grounds.
- Yield: 36 grams of liquid espresso in the cup.
- Time: Aim for 25-30 seconds, starting the timer when you start the pump.
This recipe provides a solid baseline. By keeping the dose and yield constant, you can isolate the grind size as the main variable you will adjust to hit your target time.
The step-by-step dialing in process
Now we get to the practical part. This process requires patience and a methodical approach. Remember to only change one variable at a time, and in this case, it will be your grind setting.
Step 1: Set your starting grind. If you’re unsure where to start, many grinder manuals offer a suggestion for espresso. If not, start with a setting that feels fine to the touch, but not quite a powder. You will adjust from here.
Step 2: Dose your coffee. Using your scale, weigh out exactly 18 grams of whole beans. Grind them into your portafilter. You may need to weigh the portafilter again to ensure the dose is accurate, as some grinders have retention.
Step 3: Prepare your puck. Distribute the grounds evenly in the portafilter for a level bed. Tamp the coffee with firm and consistent pressure. The goal is a level, compact puck, which prevents water from channeling through weak spots.
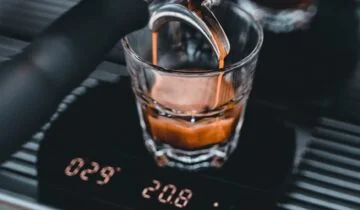
Step 4: Pull the shot. Place your cup on the scale and tare it to zero. Lock the portafilter into the machine, and immediately start the shot and your timer. Watch the scale closely and stop the shot right as it reaches your target yield of 36 grams.
Step 5: Analyze and adjust. Now, look at your two key metrics: time and taste.
- If the shot took less than 25 seconds: Your grind is too coarse. The water flowed through too quickly. Make your grind finer to increase resistance and slow the shot down.
- If the shot took more than 30 seconds: Your grind is too fine. The water struggled to get through. Make your grind coarser to decrease resistance and speed the shot up.
Discard the shot, adjust your grinder by one small step in the correct direction, and repeat the entire process from Step 2. Continue making small, incremental adjustments until you consistently hit your target yield in the 25-30 second window.
Refining for taste and troubleshooting common issues
Hitting the 25-30 second window is a huge milestone, but it is not the final destination. Time is a proxy for taste, but your palate is the ultimate judge. Once your time is in the correct range, start tasting the espresso. Is it perfectly balanced? Or is it leaning slightly sour or bitter?
This is where you can break the time “rule” to perfect the flavor. If your 28-second shot tastes a little sour, try adjusting the grind slightly finer to extend the extraction to 31 or 32 seconds. This extra contact time might be just what you need to bring out more sweetness. Conversely, if a 28-second shot is a touch bitter, try a slightly coarser grind for a faster shot of 25-26 seconds to reduce the extraction. Every coffee is different, and some may taste best outside the traditional time window.
Here is a table to help you diagnose and fix common issues after your initial dialing in:
| Problem | Taste Profile | Likely Cause | Solution |
| Shot flows very fast and is blond | Sour, acidic, lacking sweetness, thin body. | Grind is too coarse; Dose is too low; Uneven tamping (channeling). | Make grind finer; Ensure correct dose; Focus on even puck preparation. |
| Shot drips slowly and is very dark | Bitter, harsh, astringent, dry finish. | Grind is too fine; Dose is too high. | Make grind coarser; Ensure correct dose. |
| Shot is balanced but a little weak | Good flavor but lacks body or intensity. | Brew ratio might be too high (e.g., 1:2.5). | Try a tighter ratio like 1:1.8 (e.g., 18g in, 32g out). Adjust grind to hit time target. |
Mastering grind size calibration is a journey, not a one-time setup. It is the most fundamental skill for unlocking the potential of your high-end espresso machine and specialty coffee beans. By understanding the theory of extraction, using the proper tools for consistency, and following a methodical process, you can move from guesswork to precision. Remember the workflow: establish a recipe with a fixed dose and yield, adjust the grind to reach your target time, and then refine based on taste. This process will need to be repeated every time you get a new bag of coffee, but with practice, it becomes a quick and intuitive ritual. The reward is a consistently delicious cup of espresso that truly justifies your investment.


 No products in the cart.