How to dial in a new bag of beans on the Gaggia Anima
Opening a new bag of coffee beans brings both anticipation and a challenge. For the experienced home barista using a super-automatic machine like the Gaggia Anima, the process of “dialing in” is a methodical pursuit of flavor. It is a departure from the granular control of a manual setup, requiring a nuanced understanding of the machine’s specific parameters. This process is not about finding a single perfect setting, but rather about developing a systematic approach to unlock the potential of any coffee. This guide provides a technical framework for Gaggia Anima users to move beyond factory presets and achieve consistently excellent espresso tailored to each new bag of beans.
Understanding the core parameters of the Anima
Unlike a fully manual espresso setup, the Gaggia Anima simplifies the process by consolidating variables into a few key settings. Mastering the machine begins with understanding what these controls do and how they interact. The three primary adjustments you will work with are grind size, aroma strength (dose), and temperature.
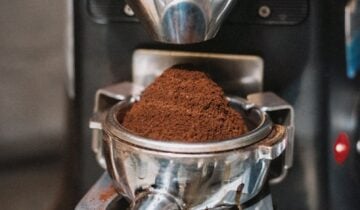
- Grind size: The Anima is equipped with a 5-step ceramic burr grinder. The grind setting is the most impactful variable, directly influencing extraction time and flavor. A finer grind increases the surface area of the coffee, slowing water flow and increasing extraction. A coarser grind does the opposite. It is critical to adjust the grinder only while it is operating to prevent damage.
- Aroma strength (Optiaroma): This function controls the dose, or the amount of coffee ground for each shot. The Anima typically adjusts the dose from approximately 6.5 to 11.5 grams. A higher setting increases the coffee dose, leading to a more intense and full-bodied shot, while a lower setting produces a lighter result.
- Temperature: The machine offers three temperature settings (Low, Medium, High). Temperature plays a crucial role in solubility. Higher temperatures extract more from the coffee, which can be beneficial for lighter roasts, while lower temperatures can temper bitterness in darker roasts.
These three controls are your toolkit. The art of dialing in on the Anima is learning to use them systematically to find the right balance for your specific beans.
Establishing a consistent baseline
Before making adjustments, you must first establish a consistent and repeatable starting point. This baseline shot serves as the control against which you will measure all subsequent changes. For best results with a super-automatic machine, begin with a medium roast coffee that does not have an overly oily surface, as this can sometimes interfere with the grinder mechanism.
Set the machine to its middle parameters to create a neutral starting point:
- Grind setting: Set to 3 (the middle setting of the 1-5 range).
- Aroma strength: Choose the middle dose setting (e.g., three out of five beans).
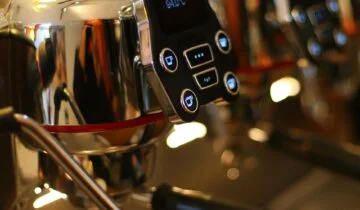
- Temperature: Select the Medium setting.
- Volume: Use the factory default for the espresso button for now.
Pull a shot with these settings and taste it carefully. Evaluate it for the primary sensory markers: acidity, sweetness, and bitterness. Is the shot overwhelmingly sour and thin? This suggests under-extraction. Is it harsh, hollow, and overly bitter? This points to over-extraction. This initial taste provides the critical information needed to make your first adjustment.
The primary adjustment: dialing in the grind
The grind size is the most powerful tool for correcting major flavor imbalances. Based on your evaluation of the baseline shot, you will now adjust the grind. Remember the core principle: change only one variable at a time. For this step, keep the dose and temperature at their medium settings.
If the baseline shot was sour, with a thin body and a quick finish, the coffee is under-extracted. To fix this, you need to adjust the grinder to a finer setting (e.g., from 3 to 2). A finer grind slows the water flow, allowing for more contact time and a higher extraction, which will convert sharp acidity into more desirable sweetness.
If the shot was excessively bitter, with a dry, chalky aftertaste, the coffee is over-extracted. In this case, adjust the grinder to a coarser setting (e.g., from 3 to 4). This will allow water to flow through the puck more easily, reducing the extraction of bitter compounds.
After making an adjustment, it is essential to pull and discard at least two shots. This purges the grinder chute of any retained grounds from the previous setting, ensuring the shot you taste accurately reflects the new grind size. Taste again. Repeat this process until the harsh sour or bitter notes are minimized and the shot has a balanced character.
Refining with dose and temperature
Once the grind is in the right range, you can use the aroma strength (dose) and temperature settings to refine the shot’s character. The grind setting has corrected the major flaws; these adjustments are for fine-tuning body and flavor nuances.
Consider adjusting the dose first. If the espresso is balanced but lacks intensity or body, increasing the aroma strength setting will use more coffee, adding depth and texture. Conversely, if a coffee tastes slightly muddled or heavy even with the correct grind, reducing the dose can create a cleaner, more articulate flavor profile.
Next, evaluate temperature. The medium setting is a reliable default, but certain beans benefit from a change. For light roasts, which are denser and less soluble, the high temperature setting can help increase extraction and bring out more sweetness and complexity. For very dark, developed roasts, switching to the low temperature setting can be beneficial. It helps prevent the extraction of ashy, bitter flavors that can emerge at higher temperatures.
Programming shot volume and ratio
The final step is to set the output volume to match your dose and extraction. This is where you can apply the principles of brew ratios from manual espresso. While the Anima doses by its internal system, you control the beverage weight (or volume) in the cup. Using a small coffee scale is highly recommended for this step to achieve precision.
A common starting point for a standard espresso is a 1:2 brew ratio (e.g., for a 10-gram dose, you would aim for a 20-gram beverage). To program the volume, place your cup on a scale, tare it to zero, and then press and hold the espresso button. The machine will begin brewing and enter programming mode. When the scale reaches your target output weight, release the button. The Anima will save this volume for all future shots from that button.
Adjusting this ratio can be a final refinement. A shorter, more concentrated shot (e.g., 1:1.5) will be more intense, while a longer one (e.g., 1:2.5) will be more diluted but may reveal different flavors.
Conclusion
Dialing in a new coffee on the Gaggia Anima is a systematic process of refinement. By establishing a baseline and adjusting one parameter at a time—starting with the grind, then refining with dose and temperature, and finally setting the volume—you can move beyond the machine’s default capabilities. This methodical approach transforms the Anima from a simple convenience into a tool for exploration. It respects the unique characteristics of each coffee and rewards the user with a superior cup of espresso. Understanding these fundamentals is key, and for those refining their coffee station, supplementary tools can be found at papelespresso.com.

 No products in the cart.