The La Peppina is a marvel of mid-century design, a vintage lever espresso machine cherished by enthusiasts for its simplicity and the exceptional shots it can produce. However, many new owners, and even some seasoned users, struggle with a common problem: the first shot of the day is often disappointingly sour and thin. This isn’t a flaw in the machine but a misunderstanding of its thermal properties. The key to unlocking its potential from the very first pull lies in a proper preheating routine. This article will guide you through the essential steps and advanced techniques on how to preheat the La Peppina, ensuring your first shot is as rich and balanced as your last.
Understanding the thermal challenge of the La Peppina
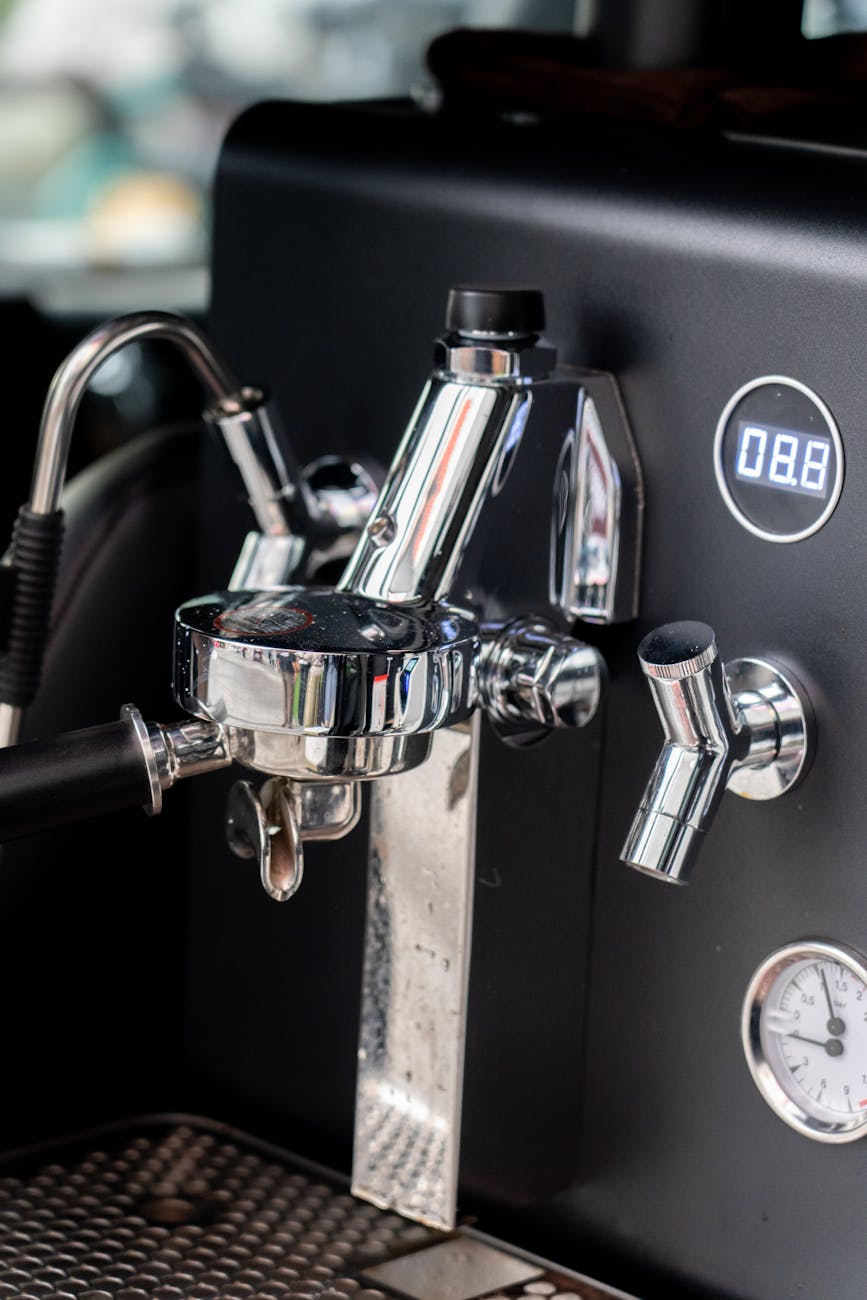
To master the La Peppina, you must first understand its design. It’s an open-kettle machine, meaning the water is heated directly in the boiler you fill from the top. While this water can easily reach boiling, the real action happens in the large, heavy brass group head where the piston sits. Brass is excellent at holding heat, but it’s also a significant thermal mass that takes time to warm up. When you pull your first shot on a cold machine, the hot water from the kettle hits the cold brass of the group head and piston.
This contact causes a dramatic temperature drop in the brew water right before it hits the coffee grounds. Espresso extraction is incredibly sensitive to temperature; water that is too cool will fail to properly extract the sugars and oils from the coffee, resulting in a classic under-extracted shot. This is why your first attempt often tastes sour, acidic, and lacks body. The goal of any preheating routine is to transfer enough heat from the kettle water into the group head, stabilizing its temperature to an optimal range (typically 90-95°C or 195-203°F) before you introduce your coffee.
The foundational technique: Pumping and flushing
The most common and effective way to preheat the La Peppina is by actively circulating hot water through the group head. This method, often involving a series of half-pulls sometimes called the “Fellini move,” is the foundation for getting great first-shot results. It’s a simple process that uses the machine’s own mechanics to heat itself.
Follow these steps for a basic preheating cycle:
- Step 1: Fill the kettle with fresh, cold water to your desired level and turn on the heating element.
- Step 2: While the water is heating, you can prepare your coffee puck. Wait until you see steam rising from the kettle. You don’t need a rolling boil.
- Step 3: With no portafilter locked in, raise the lever all the way to the top. This draws hot water from the kettle up into the piston chamber inside the group head.
- Step 4: Hold the lever at the top for 5-10 seconds. You are now actively transferring heat to the piston and the internal chamber walls.
- Step 5: Slowly push the lever down, expelling the now slightly cooler water back into the kettle or into a drip cup.
- Step 6: Repeat this process 3 to 5 times. With each cycle, you are bringing fresh hot water into the group and increasing its overall temperature. You’ll feel the exterior of the group head go from cold to warm, and finally, to hot to the touch.
This series of pumps, or flushes, is the most critical part of your workflow. Forgoing this step is the number one reason for a poor first shot. It ensures the entire brew path is at a stable temperature, ready for an even extraction.
Advancing your routine for ultimate consistency
Once you are comfortable with the basic flushing routine, you can introduce a few more techniques to gain even greater control and consistency over your brew temperature. These methods help you move from “hot enough” to a more precise temperature, which is especially important for lighter roast coffees that are more sensitive to under-extraction.
One powerful tool is a simple adhesive thermometer strip, the kind often used for milk frothing pitchers. By placing one on the front of the group head, you take all the guesswork out of preheating. Instead of relying on feel, you can now perform your flushing cycles until the strip reads your target temperature. This is a small investment that pays huge dividends in shot quality.
Another technique is to perform a full, powerful flush right before you lock in your portafilter. After your initial series of heating pumps, do one final full pull, raising the lever all the way and then pushing it down firmly to flush a stream of water through the shower screen. This ensures the very last part of the brew path is hot and purges any slightly cooler water, creating the most stable thermal environment for your shot.
A sample preheating workflow
Let’s combine these concepts into a complete, step-by-step workflow for a perfect first shot. This routine ensures that both the machine and your coffee are ready simultaneously, creating an efficient and repeatable process.
The table below outlines a sample routine, comparing a basic approach with a more advanced, temperature-controlled one. Both are effective, but the advanced method offers superior precision.
| Step | Basic Routine | Advanced Routine (with temp strip) |
|---|---|---|
| 1. Preparation | Fill kettle and turn on the machine. | Fill kettle, turn on, and place thermometer strip on the group head. |
| 2. Initial Heating | Once water is steaming, perform 4-5 half-pulls (Fellini move). | Perform half-pulls until the temp strip reads ~85°C (185°F). |
| 3. Puck Prep | While group heats, grind beans and prepare the portafilter. | Grind beans and prepare the portafilter. |
| 4. Final Flush | Feel the group head. If hot, perform one full flush into a cup. | Perform one final full flush. Check temp strip to ensure it’s at your target (e.g., 92°C / 198°F). |
| 5. Extraction | Immediately lock in the portafilter and pull your shot. | Immediately lock in the portafilter and pull your shot. |
This structured approach transforms your morning coffee from a game of chance into a reliable ritual.
Conclusion
Taming the La Peppina is a rewarding journey, and it all begins with understanding the importance of temperature. The machine’s large brass group head is both its greatest strength for in-shot stability and its biggest hurdle for the first shot of the day. By implementing a consistent preheating routine, you directly address this challenge. Mastering the basic technique of pumping hot water through the group is non-negotiable for good results. For those seeking perfection, incorporating tools like a temperature strip and adding a final clearing flush will provide unparalleled control. Investing these few extra minutes to properly preheat the La Peppina doesn’t just prevent a bad first shot; it unlocks the machine’s true potential for producing sweet, balanced, and delicious espresso every single time.

 No products in the cart.