Mastering the perfect shot: Consistent tamping for CBTL espresso grounds
There’s nothing quite like the rich aroma and complex flavor of a well-made espresso using your favorite The Coffee Bean & Tea Leaf grounds. Yet, for many home baristas, recreating that signature café-quality shot can be a frustrating exercise. Often, the missing piece of the puzzle isn’t the machine or the beans, but a small, crucial step: tamping. This vital technique is about more than just compacting coffee; it’s the art of creating a perfect canvas for extraction. This guide will walk you through the essential tamping techniques needed to achieve consistency. We will explore why it’s so important, how to prepare your grounds correctly, and how to master the physical motion to pull a balanced, delicious CBTL espresso every single time.
Why tamping matters for your CBTL coffee
Before we can perfect the how, we must understand the why. Tamping is the act of compressing loose coffee grounds into a tight, evenly dense puck inside your espresso machine’s portafilter. The primary goal is to create uniform resistance against the hot, pressurized water from the machine. When water is forced through the grounds, it naturally seeks the path of least resistance. If your coffee puck is uneven, with dense spots and looser spots, water will rush through the weak areas. This phenomenon, known as channeling, is the number one enemy of a good espresso shot.
Channeling leads to a disastrously uneven extraction. The areas where water flows too quickly will be under-extracted, lending sour, weak flavors. To compensate, the areas with higher density will be over-extracted, contributing bitter and harsh notes. The final result is a muddled, unbalanced cup that fails to capture the nuanced flavor profile of CBTL’s carefully roasted beans. A consistent tamp ensures water flows through the entire coffee bed at the same rate, extracting all the desirable oils and solids evenly for a rich, sweet, and aromatic shot.
The pre-tamp ritual: Preparing your portafilter
A perfect tamp can’t save a poorly prepared bed of coffee. What you do in the moments before you even pick up your tamper is arguably just as important as the tamp itself. This pre-tamp ritual is all about creating a uniform foundation.
It starts with two key steps: dosing and distribution.
- Consistent dosing: Always use the same amount of coffee for your shots. The best way to achieve this is with a small digital scale. Eyeballing the dose will introduce a major variable that makes consistency impossible. A consistent dose ensures the puck has the proper headspace in the portafilter basket.
- Even distribution: After grinding, CBTL grounds can be clumpy and unevenly settled in the portafilter. Simply leveling it with your finger will compact the top layer while leaving the bottom loose. To fix this, use a distribution technique. A simple method is to gently tap the side of the portafilter with your hand to settle the grounds. For even better results, consider using a distribution tool like a WDT (Weiss Distribution Technique) tool, which uses fine needles to break up clumps and evenly distribute the grounds.
Only when you have a fluffy, level, and evenly distributed bed of coffee are you truly ready to tamp.
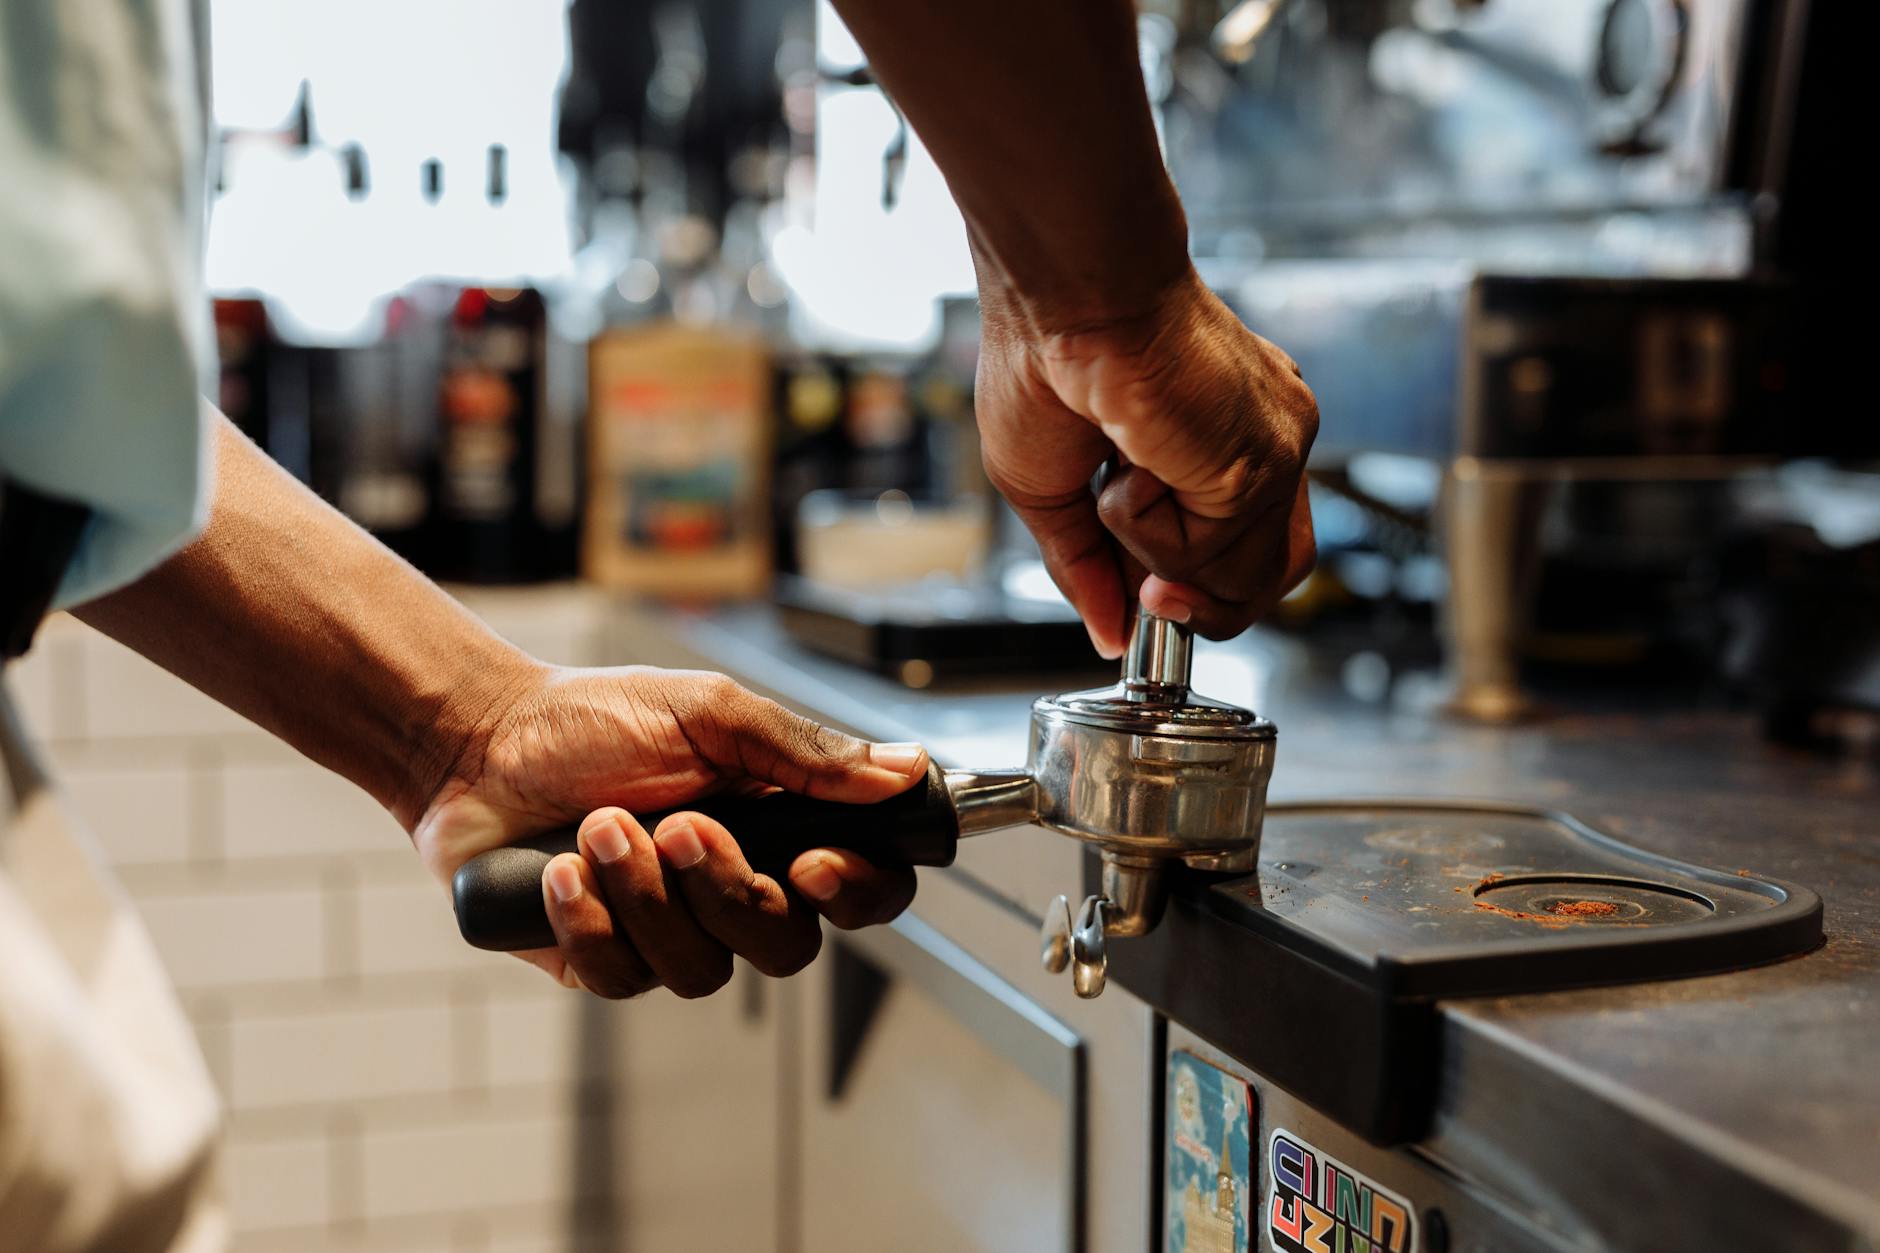
The art of the consistent tamp: Pressure and posture
With your grounds perfectly distributed, it’s time to focus on the physical act of tamping. The goal here is consistency, not brute force. While you may have heard you need to apply exactly 30 pounds of pressure, it’s far more important to apply the same pressure every time and to do it correctly.
Your posture and grip are fundamental:
- Positioning: Place your portafilter on a flat, sturdy surface. A tamping mat is ideal as it prevents slipping and protects your counter.
- Grip: Hold the tamper handle in your palm as if you’re holding a doorknob. Extend your index finger and thumb down to touch the base of the tamper. This helps you feel if the tamper is level.
- Posture: Keep your wrist straight and your elbow bent at a 90-degree angle, directly above the portafilter. This allows you to use your body weight, not just your arm strength, for a more consistent and less strenuous tamp.
- The push: Lean in and press straight down firmly and evenly until you feel the coffee bed is fully compressed. The key is to keep the tamper perfectly level throughout the push. Once compressed, you can perform a gentle “polish” by spinning the tamper on the surface without any downward pressure. This smooths the surface, but be careful not to unseal the edges of the puck.
- The finish: Lift the tamper straight up, being careful not to knock the portafilter or disturb the perfectly prepared puck.
By focusing on a straight wrist, a level tamper, and consistent body pressure, you’ll create a repeatable technique that is the cornerstone of great espresso.
Diagnosing your shot: What the puck tells you
Your work isn’t done after the shot is pulled. The spent espresso puck is a fantastic diagnostic tool that tells a story about your dosing, distribution, and tamping. Learning to read it can help you fine-tune your technique for the next shot.
After knocking out the puck, take a moment to observe its condition. It should ideally come out in one solid, firm piece. If it doesn’t, here’s a guide to what might be wrong and how your tamping could be the cause.
| Puck Observation | Potential Cause | Tamping-Related Solution |
|---|---|---|
| Soupy or muddy puck | Water is left standing on top of the puck. This is often due to an insufficient dose of coffee (under-dosing). | While primarily a dosing issue, ensure you are tamping firmly enough to achieve full compression. |
| Holes or small cracks on the surface | This is a clear sign of channeling, where water has drilled through a weak spot in the puck. | Focus on better distribution before tamping and ensure your tamp is perfectly level, not angled. |
| Puck is fractured or breaks apart easily | The puck integrity is weak. This can happen if you hit the portafilter after tamping or lift the tamper at an angle. | Handle the portafilter gently after tamping. Ensure a clean, straight lift-off with the tamper. |
| Puck looks good but shot was too fast | The water flowed through too quickly, leading to under-extraction (sourness). | If tamping was firm and level, the issue is likely your grind size. You need a finer grind. Tamping harder cannot fix a grind that is too coarse. |
By paying attention to these visual cues, you can move beyond guessing and start making informed adjustments, bringing you one step closer to that perfect CBTL espresso.
Conclusion
Mastering the art of tamping is a journey of precision, not power. It transforms a routine step into a deliberate craft that has a profound impact on the final taste in your cup. We’ve seen that a successful tamp begins before the tamper even touches the grounds, with meticulous dosing and distribution to create a uniform foundation. The tamping motion itself relies on proper posture and a level, consistent pressure to eliminate weak spots and prevent channeling. Finally, by learning to read your spent espresso puck, you can diagnose issues and continually refine your technique. By integrating these consistent tamping methods into your workflow, you’ll unlock the true potential of your CBTL espresso grounds, consistently pulling balanced, flavorful shots that rival your favorite café.

 No products in the cart.