
The allure of a fully automatic coffee machine lies in its promise of convenience: a perfect, cafe-quality espresso or coffee at the mere touch of a button. However, many owners find themselves disappointed when the drink in their cup is bitter, sour, or disappointingly weak. The culprit is often not the machine or the beans, but a small, overlooked setting: the internal grinder. Adjusting the grind size is the single most impactful change you can make to elevate your coffee from mediocre to magnificent. This guide will demystify the process, walking you through why the grind matters, how to safely adjust it on your machine, and how to troubleshoot your brew to achieve the perfect extraction every single time.
Why grinder settings matter for your coffee
To understand how to fix your coffee, you first need to understand the concept of extraction. Extraction is the process of hot water dissolving flavors, oils, and acids from ground coffee beans. The size of these coffee grounds, determined by your grinder setting, plays the leading role in this process. Think of it like this: finer grounds have more surface area than coarser grounds. This directly impacts how long the water is in contact with the coffee and how much flavor it can pull out.
- Fine grind: With more surface area and smaller gaps between particles, water flows through the coffee puck more slowly. This increased contact time leads to a higher level of extraction. If the grind is too fine, it results in over-extraction, producing a bitter, harsh, and often burnt taste.
- Coarse grind: With less surface area and larger gaps, water rushes through the coffee puck quickly. This reduced contact time leads to a lower level of extraction. If the grind is too coarse, it results in under-extraction, producing a coffee that tastes sour, acidic, and weak or watery.
Finding the sweet spot between these two extremes is the key to a balanced, flavorful cup. Your machine’s default setting might be close, but adjusting it to suit your specific beans is what unlocks its true potential.
Finding and understanding your machine’s grinder adjustment dial
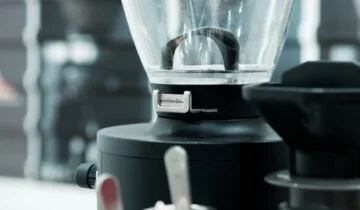
Before you can make any changes, you need to locate the adjustment mechanism. On almost all fully automatic machines, the grinder adjustment dial or knob is located inside the bean hopper. You may need to lift the lid or even remove some beans to see it clearly. The dial is typically marked with numbers (e.g., 1 to 7) or dots of varying sizes. The rule is universal:
- Lower numbers or smaller dots correspond to a finer grind.
- Higher numbers or larger dots correspond to a coarser grind.
Here is the most critical piece of advice for this entire process: Only ever adjust the grinder setting while the grinder is actively running. Attempting to change the setting when the grinder is idle can cause the burrs to jam or lock up, potentially damaging the mechanism. The correct procedure is to start brewing a coffee and make the adjustment while you hear the beans being ground.
The step-by-step process for dialing in your grind
Dialing in your grind is a methodical process that requires a little patience. Don’t expect to get it perfect on the first try. Follow these steps for a controlled and effective adjustment.
- Start with a baseline. Brew a coffee on the current or factory setting. Taste it carefully and identify its main characteristics. Is it bitter? Sour? Watery? This gives you a starting point.
- Prepare to adjust. Go to your machine and select your desired coffee to start the brewing process.
- Make the adjustment. As soon as you hear the grinder start running, reach into the bean hopper and turn the dial. It is crucial to only move it one notch at a time. Making drastic changes will make it harder to find the ideal setting.
- Wait and test. It will take two to three coffees for the new setting to fully take effect. This is because some grounds from the previous setting remain in the grinding chamber and chute. Don’t judge the result after just one cup.
- Repeat if necessary. Brew another cup. Taste it again. Is it better? If your coffee was sour and you moved to a finer setting, it should now taste more balanced. If it’s still a little sour, repeat the process and move one more notch finer. If you overshot and it’s now bitter, move one notch coarser.
Remember to only change one variable at a time. While dialing in the grind, keep the coffee strength and water volume settings consistent to isolate the effect of your adjustments.
Troubleshooting common taste problems with grind adjustments
Once you understand the basic principles, you can use your grinder setting to solve specific taste and appearance issues with your coffee. This table provides a quick reference for diagnosing and fixing common problems.
| Problem (Taste & Appearance) | Likely Cause (Grind) | Solution (Adjustment) |
|---|---|---|
| Coffee tastes sour, acidic, or salty. The puck in the grounds bin looks wet and mushy. | Under-extraction. The grind is too coarse, and water is passing through too quickly. | Adjust the grinder to a finer setting (a lower number). Move one notch at a time. |
| Coffee tastes bitter, harsh, or burnt, with no pleasant sweetness. | Over-extraction. The grind is too fine, and water is in contact with the coffee for too long. | Adjust the grinder to a coarser setting (a higher number). Move one notch at a time. |
| Coffee is weak and watery. The crema is thin and pale. | Under-extraction. The grind is too coarse, preventing a proper brew. | Adjust the grinder to a finer setting (a lower number) to increase resistance and extraction. |
| The machine struggles to dispense coffee, and it comes out in slow drips. | Choking. The grind is too fine, creating too much resistance for the pump to push water through. | Adjust the grinder to a coarser setting (a higher number) immediately to prevent strain on the pump. |
By learning to identify these signs, you can confidently make small adjustments and maintain a perfect brew, even when you change to a new type of coffee bean.
In conclusion, mastering the internal grinder setting transforms you from a passive user into the true barista of your own kitchen. We’ve explored how the simple mechanics of grind size dictate the entire extraction process, directly influencing whether your coffee is sour, bitter, or perfectly balanced. By learning to locate the dial, understanding the critical rule of adjusting only while the grinder is running, and following a patient, step-by-step process, you gain complete control over the final flavor in your cup. Don’t be intimidated by this small dial; embrace it as your most powerful tool. Experiment one notch at a time, taste the results, and you’ll soon be dialing in the perfect shot for any bean, consistently producing coffee that rivals your favorite cafe.

 No products in the cart.