
The Flair Espresso Maker is a marvel of manual coffee brewing, offering unparalleled control and a direct connection to the art of the shot. For the solo coffee enthusiast, it’s a perfect ritual. But what happens when you’re entertaining a guest, or one shot simply isn’t enough? The challenge of producing a second high-quality shot quickly without a significant drop in temperature or a lengthy, clunky process can be daunting. This article is your definitive guide to mastering the back-to-back Flair espresso shot. We will break down an optimized workflow, from preparation to clean-up, ensuring your second shot is just as delicious and consistent as the first. Say goodbye to frustrating delays and hello to a smooth, repeatable, and impressive brewing routine.
The art of preparation: mise en place for your Flair
In cooking, mise en place, or “everything in its place,” is the secret to a smooth service. The same principle is the foundation for successful back-to-back Flair shots. Before you even think about pulling your first shot, your entire station should be prepared for two. This preparation is centered around two key concepts: thermal management and tool accessibility.
First, heat is your most valuable and volatile resource. Your kettle should be filled with more than enough water for two shots, plus extra for pre-heating and rinsing. Pre-heat everything. This includes the brew chamber, the portafilter, and your cups. The goal is to get the brew chamber to a stable, high temperature so it doesn’t act as a heat sink, robbing your brew water of its thermal energy. Submerging it in a bowl of off-the-boil water while you handle other tasks is an effective method.
Second, arrange your tools for a seamless transition. This means:
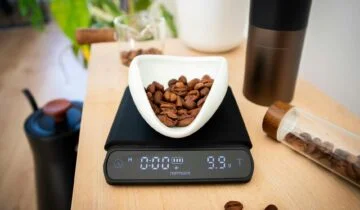
- Pre-dosing your beans: Weigh out the coffee for both shots into separate containers. This is the single biggest time-saver. Grinding the first dose while the chamber heats, then the second dose immediately after, keeps the workflow moving.
- Tools at the ready: Have your scale, WDT tool, tamper, and a dedicated knock box or bin for the spent puck within arm’s reach. Lay out a towel for drying the portafilter between shots. A cluttered workspace leads to a slow, inefficient process.
By front-loading the effort, the actual brewing process becomes a fluid sequence of actions rather than a frantic search for the next tool.
Executing the first shot with the second in mind
With your station prepared, pulling the first shot is business as usual, but with a slight mental shift. Your focus is not just on this single extraction but on how it sets up the next one. As you grind your first dose of beans, ensure your kettle is coming back up to temperature. Follow your standard puck preparation routine: dose, distribute with your WDT tool, and tamp. Assemble the pre-heated brew chamber, add your brew water, and begin the extraction.
The key here is what happens the moment your first shot is complete. Don’t admire your work for too long. The clock is ticking on the residual heat in your brew chamber. Place the finished espresso aside and immediately move into the transition phase. This is where your careful preparation pays off. Your station is clean, your second dose of coffee is waiting, and you know exactly what the next steps are. This disciplined approach prevents the chaos that can derail the quality of the second shot, turning a potentially stressful task into a controlled and elegant process.
The quick turnaround: transitioning to shot two
This is the most critical phase, where seconds matter. A well-rehearsed transition is what separates a lukewarm, rushed second shot from a perfect follow-up. The goal is to clean, dry, and reload the portafilter and brew chamber while retaining as much heat as possible.
Follow these steps immediately after pulling the first shot:
- Disassemble and dispose: Carefully remove the hot brew chamber from the stand. Separate it from the portafilter and knock the spent puck into your bin.
- Rinse and retain heat: Immediately rinse both the portafilter and the brew chamber under a stream of very hot water from your kettle. This is not just for cleaning; it’s a crucial step to boost the temperature back up before the second shot. Avoid using cool tap water at all costs.
- Dry and dose: Quickly dry the portafilter basket with a towel you laid out earlier. Place it on your scale and add your pre-weighed second dose of coffee grounds.
- Re-assemble and pull: Perform your puck prep (WDT, tamp), place the brew chamber back on, fill with fresh boiling water, and pull your second shot.
Because you pre-dosed your coffee and had your tools ready, this entire sequence can be completed in under a minute. This rapid turnaround minimizes heat loss, ensuring the brewing conditions for your second shot are nearly identical to the first, leading to exceptional consistency.
Advanced techniques and gear for ultimate efficiency
Once you have mastered the basic back-to-back workflow, you can incorporate advanced strategies and equipment to elevate your efficiency even further. For the Flair enthusiast who frequently makes multiple shots, investing in a second portafilter and brew chamber is the ultimate upgrade. This allows you to prepare the second puck completely while the first shot is still pre-infusing or pulling. The moment the first shot is done, you simply swap the entire assembly, add water, and go. This virtually eliminates any downtime and guarantees maximum thermal stability.
To further refine your process, consider using a temperature strip on your brew chamber. This gives you visual data, allowing you to start your pull at the exact same temperature every time for unparalleled consistency.
Let’s compare the workflows in a simple table to see the time savings:
| Task | Standard workflow (unprepared) | Optimized workflow (prepared) |
|---|---|---|
| Weigh & grind dose 2 | ~45 seconds | 0 seconds (done during prep) |
| Clean & prep portafilter | ~60 seconds | ~30 seconds |
| Re-heat brew chamber | ~90 seconds | ~15 seconds (hot water rinse only) |
| Total transition time | ~3 minutes 15 seconds | ~45 seconds |
Note: Times are approximate and vary by user.
As the table illustrates, a prepared workflow doesn’t just feel smoother; it dramatically cuts down the time between shots, which is the key to maintaining the quality of that second espresso.
In conclusion, mastering back-to-back shots on a Flair Espresso Maker is not about rushing, but about efficiency and intelligent preparation. By embracing the principle of mise en place, you transform a potentially chaotic process into a deliberate and graceful ritual. The keys to success are thorough pre-heating, pre-dosing your coffee, and organizing your tools for an effortless transition. Executing a rapid, heat-retaining rinse-and-reload cycle is the critical link between your first and second shot. As you become more comfortable, investing in a second portafilter can elevate your routine to professional-level speed and consistency. Ultimately, an optimized workflow removes the stress from making multiple shots, allowing you to focus on the craft and share exceptional manual espresso with others without compromise.
 No products in the cart.