The pursuit of the perfect espresso is a journey filled with rewarding highs and frustrating lows. One of the biggest hurdles for any home or professional barista is inconsistency. You dial in your grinder, pull a beautiful, syrupy shot, and then the very next one chokes the machine or gushes out in seconds. This frustrating experience often points to issues in grind quality and puck preparation. While many factors can contribute, the way we feed beans into our grinder plays a surprisingly critical role. This guide will explore the concept of slow feeding, a simple yet powerful technique to troubleshoot inconsistent espresso shots. We’ll delve into why it works, how to implement it, and the tangible results you can expect in your cup.
Understanding the root cause of inconsistent shots
Before we can fix a problem, we must understand its origin. In espresso, inconsistency is most often a symptom of channeling. This occurs when water, under immense pressure, finds a path of least resistance through the coffee puck instead of saturating it evenly. This results in an uneven extraction: some parts of the coffee are over-extracted, lending bitter and harsh flavors, while other parts are under-extracted, tasting sour and weak. The final cup is a muddled, unbalanced mess.
What creates these weak spots in the puck? The primary culprits are:
- Clumping: When coffee grounds stick together due to static electricity or moisture, they create dense boulders within the puck. It’s difficult to break these up, and they resist water flow, forcing it to go around them.
- Uneven Particle Distribution: A mix of very fine particles (fines) and larger grounds can also lead to uneven density when tamped.
Many high-quality espresso grinders, especially when single dosing, can produce significant clumping and static. When you dump an entire dose of beans into the grinder at once, the burrs are placed under a heavy, inconsistent load. This can increase heat, generate more static, and force the grounds through the exit chute in a compacted, clumpy state. Your puck preparation, even with tools like a WDT (Weiss Distribution Technique), becomes a battle to fix a problem that started in the grinder.
What is slow feeding and why does it work?
Slow feeding is the practice of introducing coffee beans into a running grinder gradually, rather than all at once. It’s a simple change in workflow that fundamentally alters the grinding process. Instead of overwhelming the burrs, you are providing them with a steady, manageable stream of beans. This seemingly small adjustment has a cascade of positive effects that directly combat the root causes of inconsistency.
The mechanics behind its success are straightforward. By reducing the load on the motor and burrs at any given moment, the grinder operates more efficiently. The burrs can grind each bean more consistently, leading to a more uniform particle size distribution. More importantly, this gentle process drastically reduces the compaction of grounds as they exit the chute. The result is a significantly fluffier, less clumpy, and more manageable pile of coffee grounds. This “fluffiness” is the key. It makes subsequent puck preparation far easier and more effective, allowing you to create a perfectly homogenous and evenly dense puck, which is the ultimate defense against channeling.
A step-by-step guide to slow feeding your grinder
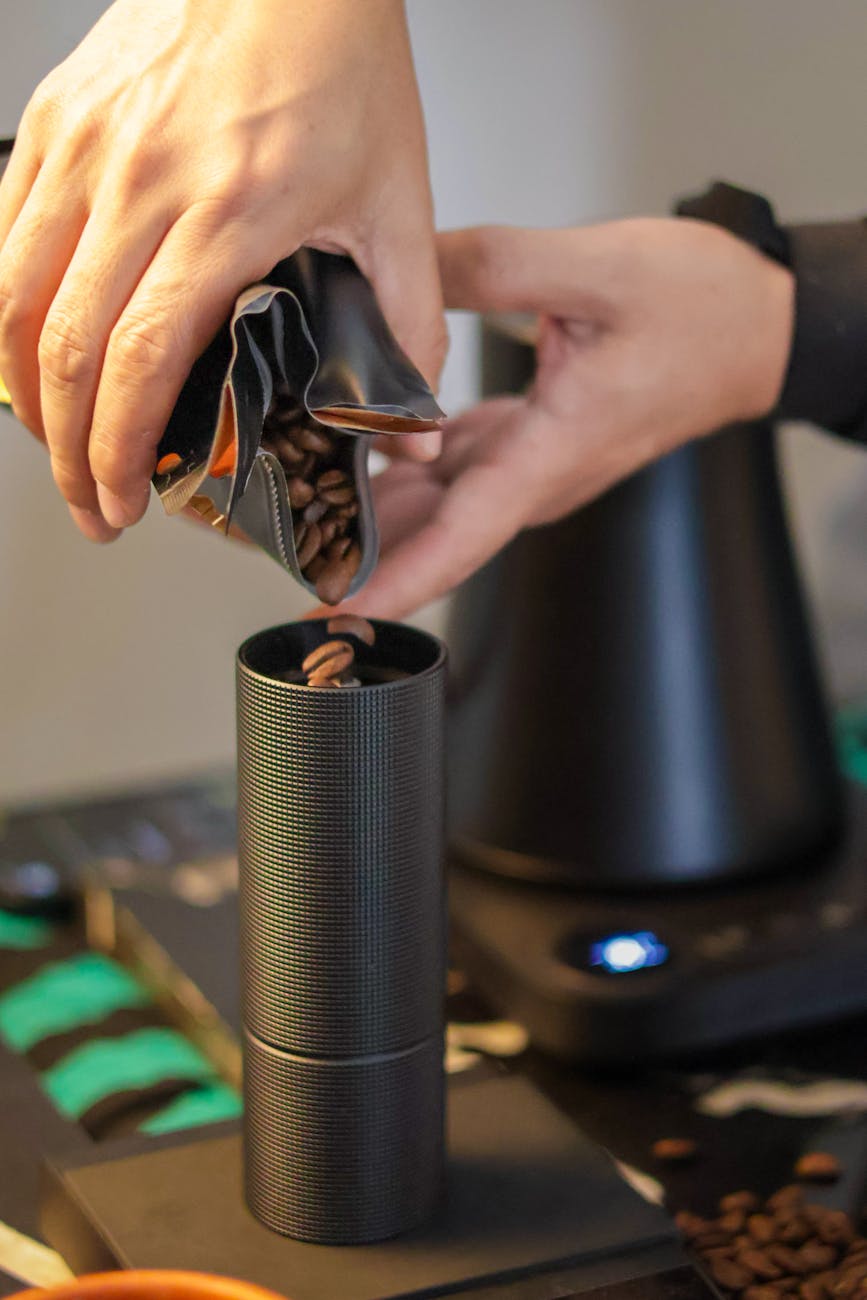
Implementing slow feeding into your espresso routine is easy and requires no special equipment. It works best with single-dosing grinders but can be adapted for others. Here’s how to do it:
- Weigh Your Dose: As with any precise coffee preparation, start by weighing your desired amount of whole beans. This technique is built around single dosing.
- Turn the Grinder On: This is a critical step. The burrs must be spinning at full speed before any beans are introduced. This prevents the motor from stalling and ensures a clean start.
- Feed the Beans Slowly: Take your cup of beans and begin pouring them into the grinder’s hopper or throat. Don’t dump them. Aim for a slow, steady stream. You can gently shake the cup to control the flow. The goal is to hear the grinder maintain a consistent, high-pitched whirring sound, rather than the low-pitched groaning sound of it being under heavy load. The entire process for an 18-gram dose should take about 10-20 seconds.
- Purge the Grinder: Once all the beans are in, let the grinder run for a few more seconds to clear out any remaining grounds. If your grinder has a bellows, now is the time to use it to push out any retained coffee.
- Prepare Your Puck: Distribute the fluffy grounds into your portafilter. You will immediately notice they are easier to work with. Proceed with your usual WDT and tamping routine, which should now be more effective than ever.
By following these steps, you are addressing potential issues at the very beginning of the process, setting yourself up for a much more successful and consistent extraction.
Comparing results: slow feed vs. standard feed
The difference in results between standard grinding (dumping all beans at once) and slow feeding can be dramatic, both visually and in the final taste. Visually, you will see a transformation in your grounds from a clumpy, dense pile to a light, fluffy mound. This difference is not just aesthetic; it directly translates to the quality of your extraction.
In the cup, the most significant change is consistency. Shot times will become much more repeatable. The flavor profile will shift from unpredictable and often flawed (swinging between bitter and sour) to balanced and clear. By promoting an even extraction, slow feeding allows the true flavor notes of your coffee—be they fruity, floral, or chocolatey—to shine through without being masked by extraction defects. The table below outlines the key differences you can expect.
| Metric | Standard Grinding (Dump Feed) | Slow Feeding Technique |
|---|---|---|
| Grounds Texture | Often clumpy, dense, with visible static. | Fluffy, light, separated, minimal clumping. |
| Puck Preparation | Requires intensive WDT to break up large clumps. | Easier to distribute; WDT is for homogenization. |
| Shot Time Variance | Can be high. Shots may choke or gush unexpectedly. | Significantly lower. Shot times become very repeatable. |
| Visual Channeling | More common, visible as spurting or uneven flow. | Less common, leading to a more stable, even extraction. |
| Taste Profile | Inconsistent. Prone to a mix of bitter and sour flavors. | Consistent and balanced. Allows for clearer flavor notes. |
In conclusion, mastering espresso is about controlling variables, and slow feeding is a powerful tool for controlling one of the most crucial: grind quality. By moving away from the “dump and grind” method, you take a proactive step against the core causes of inconsistent shots—clumping and static. This simple, free technique transforms the output of your grinder, producing fluffier, more uniform grounds that are the foundation of an evenly extracted, delicious shot of espresso. It makes puck preparation easier and more effective, leading to repeatable and predictable results. If you are battling inconsistency in your espresso journey, integrating slow feeding into your workflow is one of the highest-impact changes you can make to finally achieve that consistently great cup.


 No products in the cart.