How to use a bottomless portafilter to diagnose extraction issues
The quest for the perfect espresso shot is a journey filled with variables. From bean freshness to water temperature, every detail matters. For home baristas looking to elevate their craft, one of the most powerful tools isn’t a new machine or an expensive grinder, but a simple accessory: the bottomless portafilter. Also known as a naked portafilter, this tool removes the spouts and bottom plate, exposing the filter basket completely. This provides an unfiltered, real-time view of the extraction process. This article will guide you through using this invaluable tool, transforming it from a mere piece of equipment into your personal espresso diagnostician, helping you identify and correct the subtle flaws in your technique to consistently pull beautiful, delicious shots.
What is a bottomless portafilter?
A standard portafilter, the one that typically comes with your espresso machine, has a solid metal base with one or two spouts that guide the espresso into your cup. A bottomless portafilter, by contrast, has the bottom portion completely cut away, leaving the underside of the filter basket exposed. This seemingly simple modification has a profound impact on your ability to understand what’s happening inside that basket when you pull a shot.
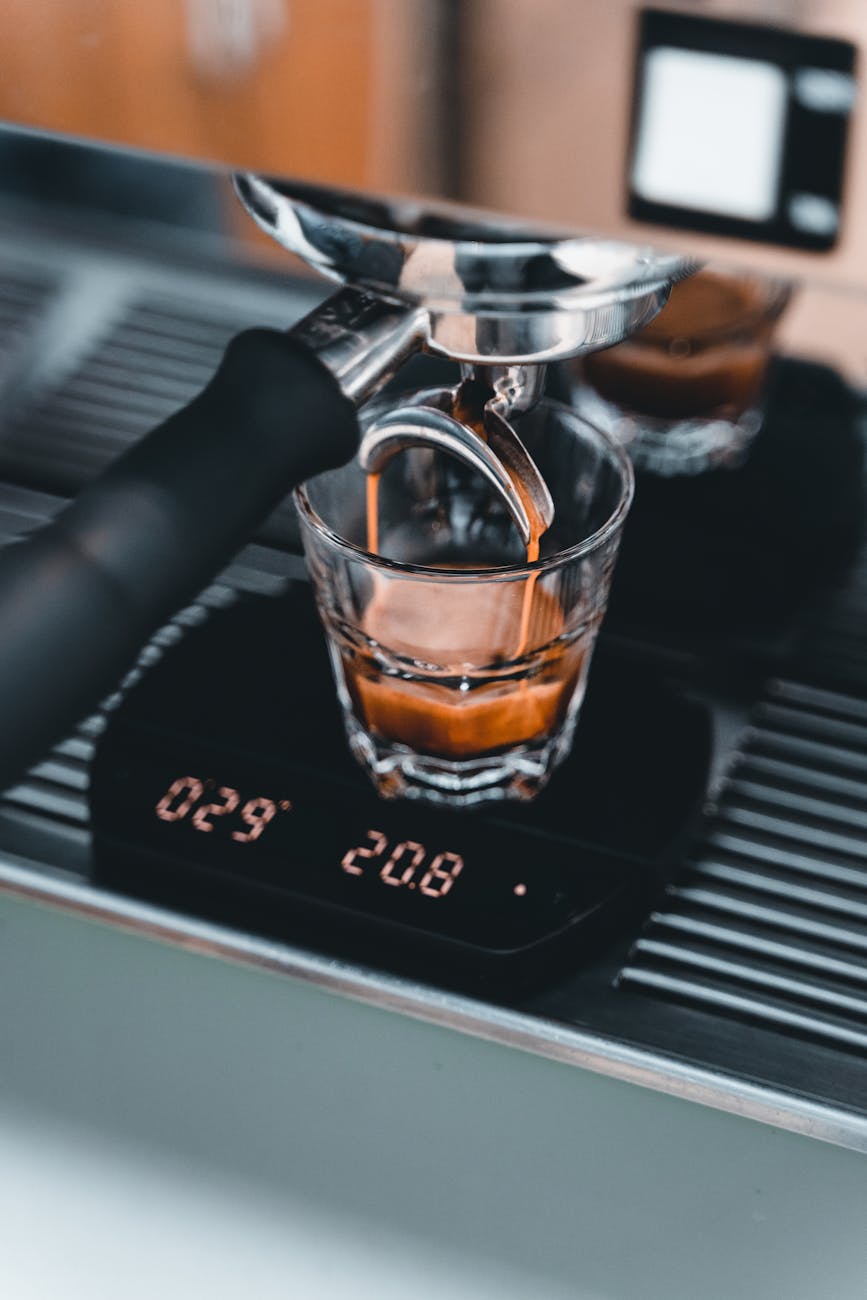
The primary benefit is visual feedback. With a spouted portafilter, the two streams of espresso have already combined and traveled through the spouts before you see them. Any issues with the extraction, like uneven flow or channeling, are hidden from view. The bottomless portafilter lays it all bare. You can see precisely how the water is flowing through the coffee puck, making it an honest and unforgiving teacher. If your puck preparation is flawed, you will see it immediately. Beyond diagnostics, it also offers more clearance for taller mugs and can lead to a slightly richer crema, as the espresso doesn’t make contact with additional metal surfaces on its way to the cup.
Reading the signs of a good and bad extraction
Before you can diagnose problems, you need to know what you’re looking for. Watching a shot pull through a bottomless portafilter is mesmerizing, but the visual cues tell a detailed story. Your goal is to learn to read that story.
The ideal shot:
- Even saturation: After a few seconds of pre-infusion or pressure buildup, you should see dark droplets of espresso begin to form evenly across the entire surface of the basket.
- A single stream: These droplets should quickly coalesce into a single, stable, and centered stream.
- Rich color and striping: The stream should have a deep, reddish-brown color, often featuring beautiful mottling known as “tiger striping.” This indicates a well-developed and balanced extraction.
- Viscosity: The flow should look viscous and syrupy, like warm honey, not watery and fast.
Signs of trouble:
- Channeling: This is the most common issue. You’ll see one or more tiny, high-velocity streams or “spurts” of pale, watery espresso shooting out from the basket. This means water has found a path of least resistance and is bypassing most of the coffee puck, leading to a shot that is both under-extracted and over-extracted (sour and bitter).
- One-sided extraction: Coffee begins to flow from only one side of the basket. The stream never centers and remains off-kilter throughout the shot.
- Dead spots: You’ll notice areas on the basket where no coffee flows at all, while other areas flow heavily.
- Early blonding: The beautiful, rich stream quickly turns a pale, blond color far too early in the shot time, indicating the desirable compounds have been extracted and now you’re just pulling watery, bitter liquid.
Connecting the problem to the cause
Once you’ve identified a visual flaw, the next step is to understand what part of your puck preparation caused it. The bottomless portafilter doesn’t fix your espresso; it tells you what you need to fix. Puck preparation, which is everything you do after grinding your coffee and before locking the portafilter into the machine, is almost always the culprit.
This table breaks down the most common visual problems, their likely causes, and how to address them.
| Visual Symptom | Probable Cause(s) | How to Fix |
|---|---|---|
| Channeling / Spurting | Clumps in the grounds; uneven distribution of coffee; an unlevel tamp. | Use a distribution tool (WDT) to break up clumps. Tap the portafilter gently to settle grounds. Ensure your tamp is perfectly level. |
| One-sided extraction | The coffee bed is not level before tamping; the tamp was applied at an angle; your machine is not on a level surface. | Focus on creating a flat, even bed of coffee before you tamp. Check your tamping form. Use a level to check your counter and machine. |
| Shot runs too fast / Early blonding | Grind size is too coarse; the coffee dose is too low for the basket. | Adjust your grinder to a finer setting. Ensure you are using the correct dose for your basket size (e.g., 18g for an 18g basket). |
| Shot chokes or drips very slowly | Grind size is too fine; the coffee dose is too high. | Adjust your grinder to a coarser setting. Reduce your dose slightly (e.g., from 18.5g to 18g). |
| Multiple streams that never combine | Significant distribution issues or a very coarse grind. | Focus heavily on distribution with a WDT tool. Grind finer. This often indicates multiple channels are present. |
A workflow for perfect puck prep
Preventing these issues comes down to a consistent and meticulous workflow. Integrating the bottomless portafilter into this routine allows you to check your work with every shot you pull.
- Weigh your dose: Consistency starts here. Use a scale to weigh your coffee beans before grinding. This removes a major variable.
- Grind fresh: Grind your coffee immediately before you plan to pull the shot for the best flavor and performance.
- Distribute the grounds: This is arguably the most critical step. After grinding into your portafilter, the coffee grounds will be clumpy and unevenly distributed. Use a WDT tool, which looks like a handle with several fine needles, to stir the grounds in a circular motion. This breaks up clumps and homogenizes the density of the coffee bed.
- Settle and level: After WDT, give the portafilter a firm, vertical tap on the counter to settle the grounds into a flat bed. You can use a grooming or leveling tool for a perfectly level surface, but a careful tap is often sufficient.
- Tamp evenly: The goal of tamping is not to press as hard as you can, but to apply firm, even pressure to create a level and uniformly compressed puck. Ensure your elbow is at a 90-degree angle and press straight down. A slight twist at the end without pressure can “polish” the puck, but avoid grinding the coffee.
Pull your shot and watch closely. Did it start evenly? Did it form a single stream? Use the visual feedback to inform the next shot, adjusting one variable at a time until you achieve that perfect, syrupy extraction.
In conclusion, the bottomless portafilter is far more than just a stylish accessory for your espresso setup. It is an essential diagnostic tool that provides an unparalleled window into the heart of the extraction process. By learning to read the visual cues it offers—from the first drops to the final blonding—you can directly identify flaws in your puck preparation. It forces an honest assessment of your distribution and tamping techniques, guiding you toward the consistency that is the hallmark of great espresso. While the first few shots might be messy and revealing, embracing the feedback from a naked portafilter is the fastest and most effective way to master the variables of extraction and consistently produce a cafe-quality espresso in your own home.

 No products in the cart.