How to steam milk for the perfect flat white at home: A barista’s guide
The allure of a perfect flat white from your favorite coffee shop is undeniable. That rich, intense espresso harmonizing with sweet, velvety milk is a daily ritual for many. But what truly separates a mediocre coffee from a great one is the milk texture. The secret lies in creating silky microfoam, a finely textured milk that integrates seamlessly with the espresso rather than sitting on top like a fluffy cloud. Many home baristas struggle with this, ending up with either scalded, thin milk or stiff, bubbly foam fit for a cappuccino. This guide will demystify the process, walking you through the essential techniques and knowledge to steam milk to the perfect flat white consistency right in your own kitchen.
Choosing your tools and milk
Before you even turn on your espresso machine, your success depends on the foundation you lay. The right milk and the right tools are not just preferences; they are critical components for creating luscious microfoam. Think of them as the canvas and brushes for your coffee masterpiece.
The most important ingredient is, of course, the milk. For beginners, whole dairy milk is the gold standard. The higher fat content provides a rich, creamy flavor, while the proteins are what allow the milk to stretch and hold its structure. The combination of fat and protein makes it forgiving and easier to texture into a stable, glossy microfoam. If you prefer non-dairy alternatives, your best bet is a “barista blend” oat milk. These are specially formulated with stabilizers and proteins to mimic the steaming performance of dairy milk. Soy milk can also work well due to its high protein content.
Your equipment is just as crucial. You will need:
- An espresso machine with a steam wand: This is non-negotiable for creating true microfoam.
- A stainless steel milk pitcher: The size matters. For a single flat white (typically 6-8 oz), a 12 oz (350ml) pitcher is ideal. This gives the milk enough space to expand and swirl without overflowing.
- A thermometer (optional but recommended for beginners): This helps you learn to gauge temperature by feel, preventing you from scalding the milk.
Pro tip: Always start with very cold milk in a very cold pitcher. Keep your pitcher in the refrigerator if you can. This simple step extends your steaming time, giving you more control to properly aerate and texture the milk before it gets too hot.
The two phases of milk steaming
Steaming milk is not a single, brute-force action. It’s a delicate process broken into two distinct phases: aeration and texturing. Understanding and mastering the transition between these two stages is the key to unlocking perfect flat white milk. Get this right, and you’re 90% of the way there.
Phase 1: Aeration (Stretching)
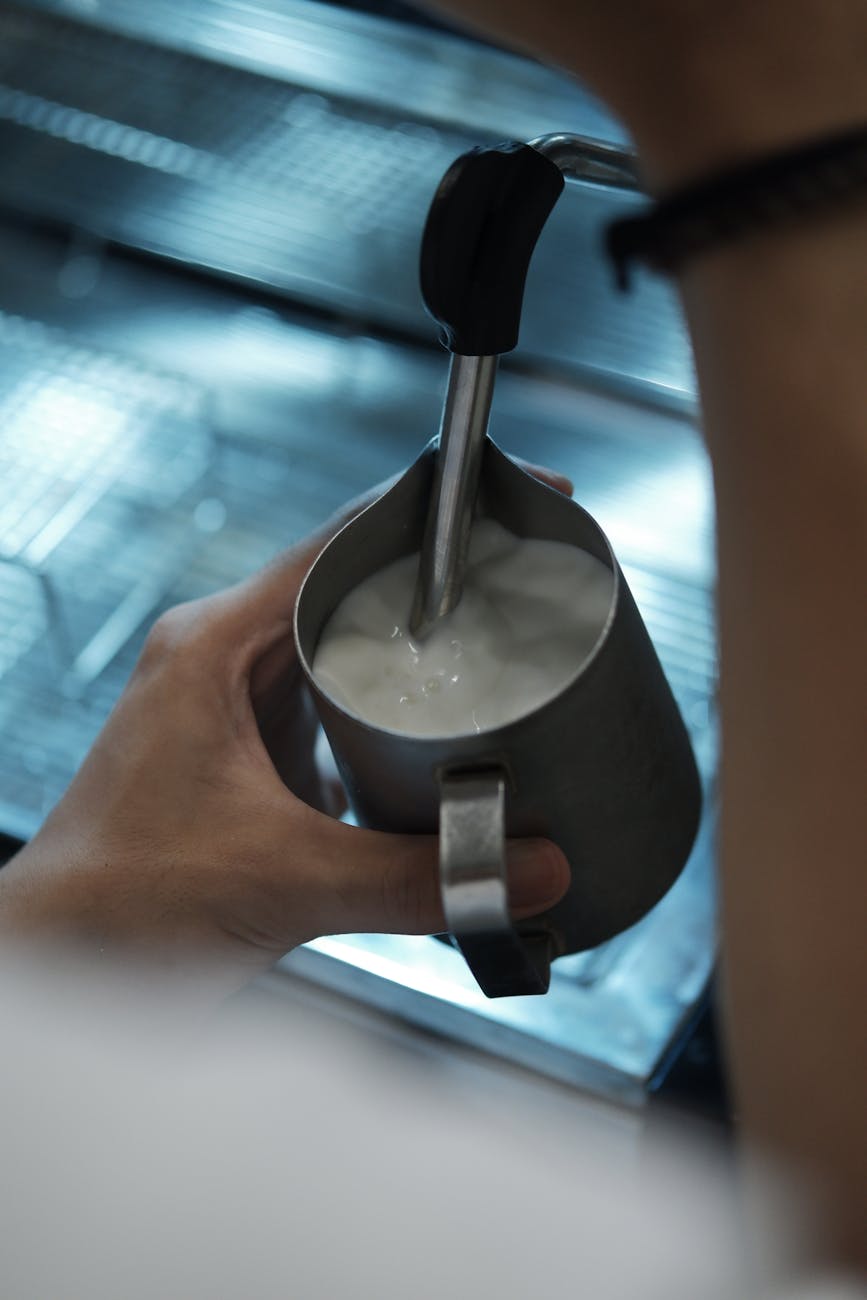
The goal of this first phase is to introduce air into the milk. This is what creates the foam. Begin by submerging the tip of your steam wand just below the surface of the milk, about half an inch from the side of the pitcher. Turn the steam wand on fully. You should hear a gentle hissing or chirping sound, often described as “tearing paper.” This is the sound of air being injected into the milk. This phase is very short. You only want to incorporate air until the milk has expanded in volume by about 20-30%. The side of the pitcher will feel like it’s just starting to warm up, reaching body temperature.
Phase 2: Texturing (The Vortex)
Once you’ve introduced enough air, it’s time to create that silky texture. Submerge the steam wand deeper into the milk, keeping it off-center. The goal now is to stop introducing air and start spinning the milk. This creates a whirlpool or vortex. This motion is critical because it breaks down the larger air bubbles you just created into millions of tiny micro-bubbles, folding them evenly throughout the milk. This is what transforms bubbly foam into a uniform, glossy microfoam. Continue this vortex until the pitcher becomes too hot to comfortably hold for more than a second (around 140-150°F or 60-65°C). Immediately turn off the steam wand before removing it from the milk.
Polishing the milk and the final pour
You’ve done the hard work of steaming, but the job isn’t finished yet. What you do in the 30 seconds after you turn off the steam wand is just as important. This is where you refine the texture and prepare for the perfect integration with your espresso. The milk should look like glossy, wet paint. If it doesn’t, these next steps will help get it there.
First, give the pitcher a firm tap or two on the countertop. This will pop any large, rogue bubbles that may have survived the texturing phase. Don’t be shy; a solid tap is necessary. Next, and most importantly, begin swirling the milk in the pitcher in a smooth, circular motion. This is called polishing the milk. This step keeps the microfoam and the liquid milk combined into one homogenous, silky liquid. If you let the pitcher sit still, the foam will start to separate and rise to the top, creating a distinct layer that you don’t want for a flat white.
With your perfectly polished milk and a freshly pulled shot of espresso, you’re ready to pour. Start by holding the pitcher high above the cup and pouring a thin stream into the center of the espresso. This allows the liquid milk to dive beneath the crema. When the cup is about half to two-thirds full, bring the spout of your pitcher very close to the surface of the drink and increase your pouring speed. This will allow the microfoam to flow out and sit on top, creating that signature white dot or even a simple heart. This final presentation is a testament to the quality of your milk.
Common mistakes and troubleshooting
Even with the right technique, things can go wrong. Don’t get discouraged! Every barista makes mistakes while learning. Identifying the problem is the first step to fixing it. Below is a table of common issues and how to solve them, helping you diagnose your technique and get back on track to steaming perfect flat white milk.
| Problem | Likely Cause & Solution |
|---|---|
| The milk is too bubbly and stiff, like a cappuccino. | You aerated for too long. The “hissing” sound went on for more than a few seconds. Solution: Shorten the aeration phase. Stop incorporating air once the milk has only slightly increased in volume. |
| The milk is hot but thin and watery, with no foam. | You didn’t aerate enough, or the steam wand tip was buried too deep from the start. Solution: Ensure the wand tip is just below the surface to create that “tearing paper” sound at the beginning of the steam. |
| The milk looks separated (foam on top, liquid below). | You either didn’t create a good vortex during the texturing phase, or you let the pitcher sit for too long after steaming. Solution: Focus on a strong vortex and remember to swirl the milk continuously right up until you pour. |
| The milk tastes burnt or “eggy.” | You overheated the milk. Steaming past 160°F (70°C) scalds the milk proteins, destroying the natural sweetness and creating off-flavors. Solution: Stop steaming sooner. Use a thermometer, or practice the “hand-touch” method and stop as soon as the pitcher is too hot to hold. |
Mastering the art of steaming milk for a flat white is a journey of practice and refinement. It transforms your home coffee experience from simply functional to truly exceptional. By starting with cold milk, focusing on the distinct phases of aeration and texturing, and remembering to polish your milk before pouring, you have all the knowledge you need. Don’t be afraid to experiment and waste a little milk; it’s part of the learning process. Before you know it, that silky, perfectly integrated flat white that you used to have to go out for will be a daily pleasure you can create in your own kitchen. It’s a rewarding skill that elevates your coffee ritual to a true craft.


 No products in the cart.