How to scale your espresso recipe for the Cafelat Robot basket size
The Cafelat Robot is a marvel of manual espresso engineering, offering unparalleled control over your brew. However, its unique, deep, straight-walled basket can be a puzzle for baristas accustomed to standard 18-gram recipes. Many find that their usual dose either leaves too much headspace or, with lighter roasts, barely fits at all. This guide is for you. We will demystify the process of adapting and scaling espresso recipes specifically for the Robot’s basket. We’ll explore the fundamentals of dose, yield, and ratio, and then provide a practical, step-by-step method to move beyond generic recipes. By the end, you’ll be able to confidently create custom recipes that make your Cafelat Robot sing, producing consistently delicious espresso every single time.
Understanding the Robot’s unique basket
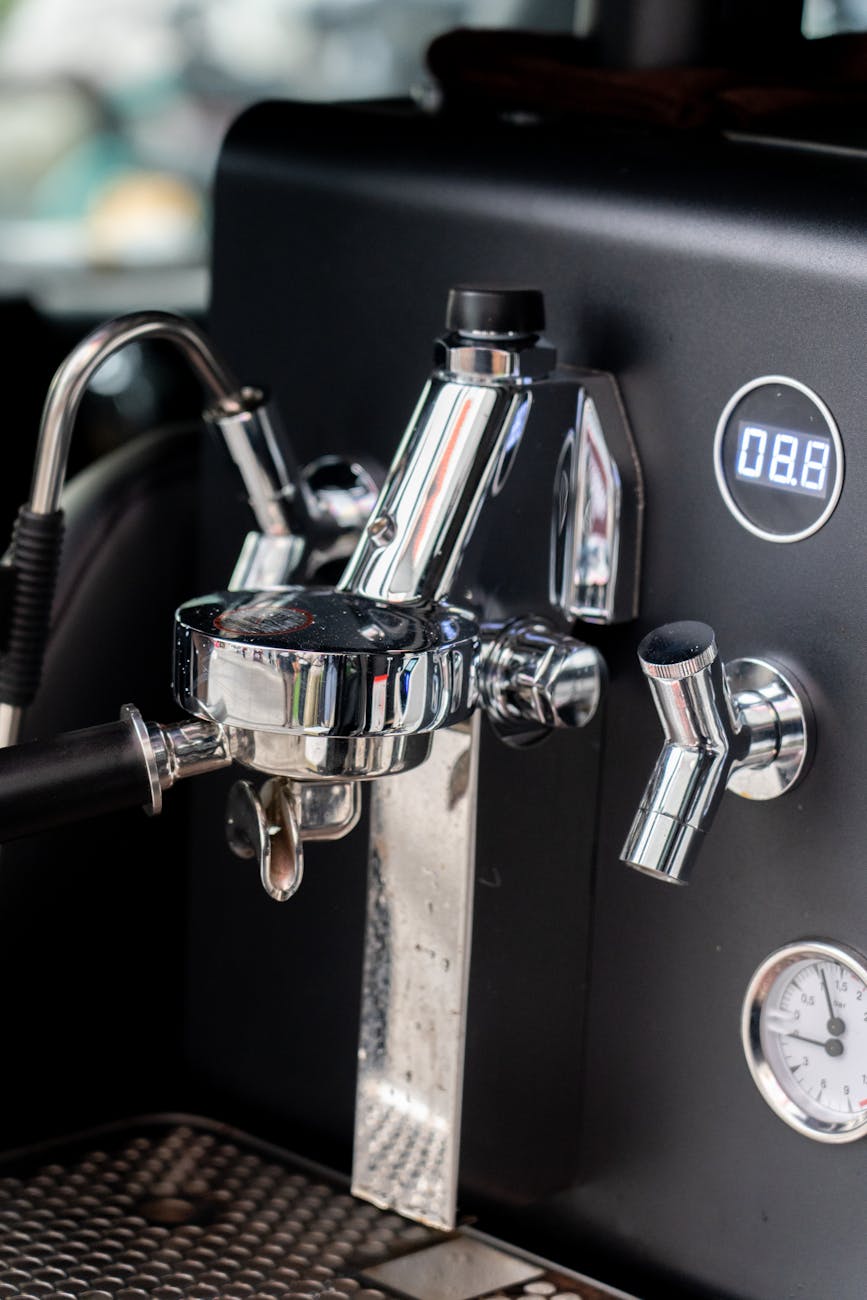
Before we can build a recipe, we need to understand our foundation: the Cafelat Robot’s filter basket. Unlike many home machines that use tapered baskets, the Robot features a 58mm commercial-style, straight-walled basket. This design promotes a more even water flow through the coffee puck, which is a huge advantage for extraction quality. However, its depth is the key variable we need to master.
The primary factor influencing your dose isn’t just weight; it’s volume. Different coffees have different densities. For example, 18 grams of a dense, dark roast will take up less space than 18 grams of a fluffy, light roast. This is why a standard 18g dose might work perfectly for one coffee but prevent you from even inserting the metal screen with another.
The goal is to dose an amount that, after tamping, leaves just enough room for the metal dispersion screen to sit level on the puck without excessive pressure. Too much space (headspace) can lead to a soupy, messy puck and uneven extraction. Too little space forces you to compress the grounds with the screen, which can lead to channeling. The Robot’s genius is its flexibility, comfortably handling doses from 14 grams all the way up to 20 grams or more, depending on the coffee. This flexibility is what we will leverage to build our recipe.
The core principles: Dose, yield, and ratio
To scale a recipe effectively, you must be fluent in the language of espresso. The three most important terms are dose, yield, and ratio. These are the interconnected levers you will pull to dial in the perfect shot on your Robot.
- Dose: This is the starting point. It’s the weight of your dry coffee grounds in the basket. As we discussed, for the Robot, this is determined by finding an amount that fits comfortably for your specific coffee. This will be the independent variable in our recipe equation.
- Yield: This is the weight of the liquid espresso in your cup. You must use a scale to measure this. Volume (e.g., milliliters) is inaccurate because of crema. The yield determines the strength and concentration of your shot.
- Ratio: This is the simple mathematical relationship between the dose and the yield. A 1:2 ratio with a 17g dose means you are aiming for a 34g yield (17 x 2 = 34). Ratios are a powerful way to talk about recipes because they are scalable. Common ratios include Ristretto (1:1-1:1.5), Normale (1:2-1:2.5), and Lungo (1:3+). Changing the ratio is one of the primary ways you will influence the taste of your final shot.
On the Robot, your direct manual control over pre-infusion and pressure makes managing these variables incredibly intuitive. You can feel the puck saturate and decide precisely when and how hard to press to reach your target yield in your target time.
A step-by-step guide to scaling your recipe
Now, let’s put theory into practice. Here is a simple, repeatable process for creating the perfect recipe for any coffee on your Cafelat Robot.
Step 1: Determine your maximum comfortable dose.
Forget what the bag says for a moment. Start grinding and filling your basket. Tamp the coffee and place the metal screen on top. Does it sit flat and stable? If so, this is a good starting dose. If it’s pressing into the coffee, you have too much. If there’s a huge gap, you can add more. Weigh this dose. This is your starting point. For most medium roasts, this will be between 16 and 18 grams.
Step 2: Choose a baseline ratio.
Don’t overthink it. A 1:2.5 ratio is an excellent, modern starting point that works well for a wide range of coffees. It balances body and clarity, making it easier to taste what’s going on.
Step 3: Calculate your target yield.
Multiply your dose from Step 1 by your ratio from Step 2. For example, if your dose is 17g, your target yield is 17g x 2.5 = 42.5g. Place your cup on a scale, tare it to zero, and get ready to pull your shot.
Step 4: Pull the shot and taste.
Focus on a smooth pressure application to reach your target yield in about 25-35 seconds (including a 5-10 second pre-infusion). Now, taste it. This is the most important part. Is it delicious? Great! If not, proceed to the next step.
Step 5: Adjust based on taste.
This is where dialing in happens. Only change one variable at a time.
- If it tastes sour or underdeveloped: You need to extract more. You can do this by grinding finer (which increases extraction time and contact) or by increasing the ratio (e.g., go to 1:2.75, aiming for a 47g yield).
- If it tastes bitter or harsh: You need to extract less. You can do this by grinding coarser (which reduces extraction time) or by decreasing the ratio (e.g., go to 1:2.25, aiming for a 38g yield).
By methodically adjusting from your baseline, you will quickly zero in on the perfect recipe for that specific coffee.
Recipe starting points by roast level
To give you a head start, here are some reliable starting points for different types of coffee. Remember, these are not rules, but well-tested suggestions to begin your experimentation. The dose is a suggestion; adjust it based on what physically fits in your basket for your specific beans.
| Roast level | Suggested dose (g) | Suggested ratio | Example target yield (g) | General tasting notes |
|---|---|---|---|---|
| Light roast | 15 – 17g | 1:2.5 to 1:3 | ~40 – 51g | These coffees need more water to extract their bright, floral, and fruity flavors. A longer ratio prevents sourness. |
| Medium roast | 16 – 18g | 1:2 to 1:2.5 | ~34 – 45g | The classic espresso profile. This ratio provides a great balance of sweetness, acidity, and body. A perfect starting point. |
| Dark roast | 17 – 20g | 1:1.5 to 1:2 | ~27 – 40g | These beans are more soluble and extract easily. A shorter ratio emphasizes body and rich, chocolatey notes while taming bitterness. |
Notice how the dose tends to increase as the roast gets darker. This is because darker roasts are less dense and more brittle, so more grounds (by weight) can fit into the same volume after grinding and tamping.
Mastering recipe scaling on the Cafelat Robot transforms it from a simple coffee maker into a precision instrument for flavor exploration. The key is to break free from the rigid “18 grams in, 36 grams out” mindset. By understanding the unique, flexible nature of the Robot’s basket, you can start your recipe with a dose that physically fits your chosen coffee. From there, the process is logical: apply a standard ratio like 1:2.5 to calculate a target yield, then pull the shot. The final, crucial step is to taste critically and make one small adjustment at a time, either to your grind or your ratio, to steer the flavor. This iterative process of dosing, pulling, and tasting is the heart of the home barista craft, and the Robot gives you the direct, tactile control to do it perfectly.

 No products in the cart.