The pursuit of the perfect espresso is a journey of precision and consistency. For many home baristas, the pressure gauge on their espresso machine is a prominent, yet often misunderstood, feature. Is it just for show, or does that little needle hold the secret to repeatable, delicious shots? The truth is, that gauge is one of the most powerful diagnostic tools at your disposal. Understanding how to read it and interpret its movements provides instant feedback on your puck preparation and grind size. This article will demystify the espresso pressure gauge, guiding you through what it measures, what the ideal pressure curve looks like, and how you can use it to troubleshoot your shots and finally achieve café-quality consistency in your own kitchen.
What the pressure gauge actually tells you
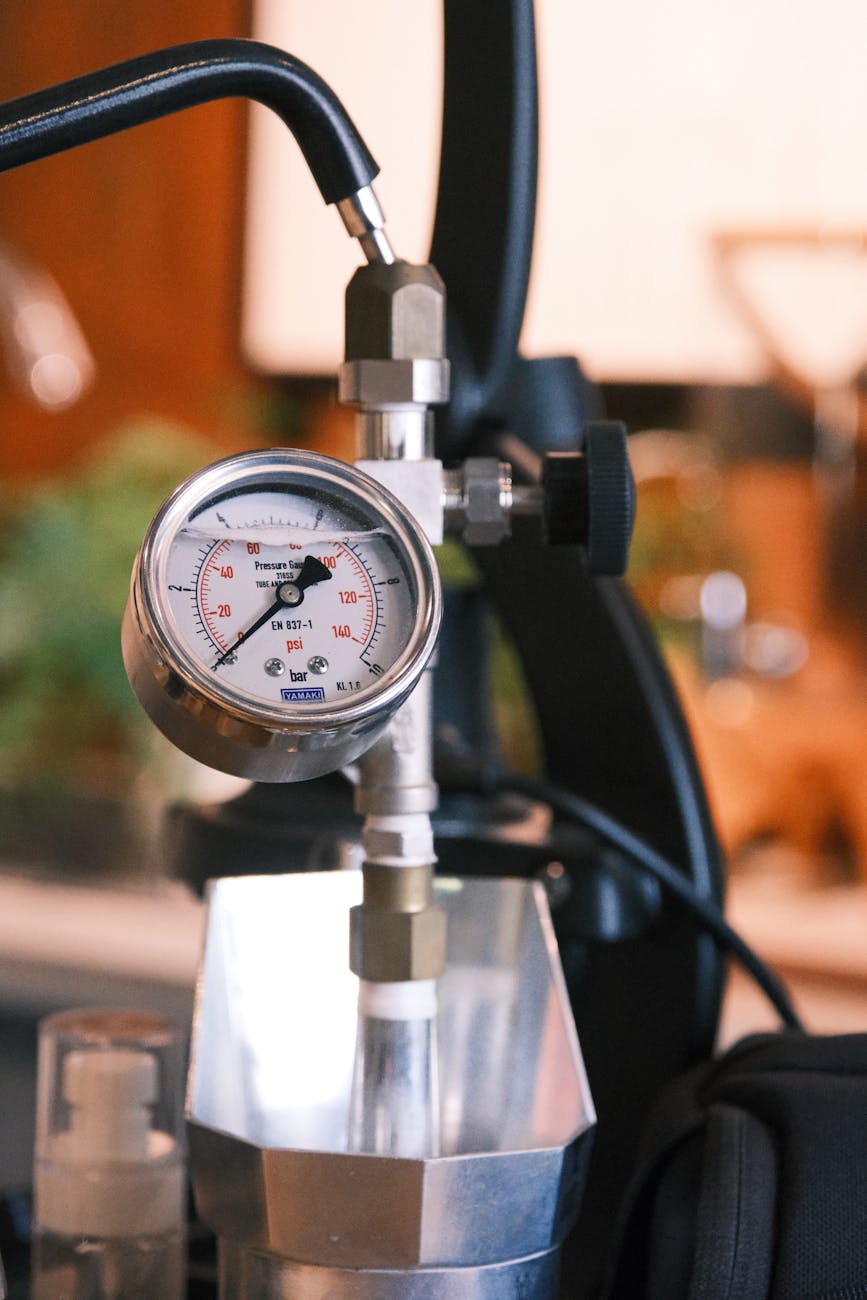
Before you can use the gauge to your advantage, it’s crucial to understand what it’s measuring. On most prosumer and home espresso machines, the brew pressure gauge is connected to the pump or the boiler system. It is not measuring the exact pressure being applied directly to the coffee puck in the group head. There will always be a slight pressure drop between the pump and the puck. However, it provides a very reliable proxy for what’s happening during extraction.
The unit of measurement on the dial is typically bars. One bar is roughly equal to the atmospheric pressure at sea level. The industry standard for espresso extraction is famously 9 bars of pressure. This specific pressure has been found to be the sweet spot for extracting the desirable soluble solids—the sugars and oils that give espresso its rich body and complex flavor—without forcing out the unwanted bitter compounds. While 9 bars is the target, the journey to and from that peak pressure is just as important for the final taste in the cup.
The ideal pressure curve of an espresso shot
A great espresso shot isn’t just about hitting a static 9-bar number. It’s about a dynamic process, a pressure “profile” that unfolds over the 25-35 seconds of the extraction. Watching the needle on your gauge should feel like watching a story unfold. A typical, ideal shot follows a distinct curve:
- Pre-infusion: This is the initial, low-pressure phase of the shot. When you start the pump, the pressure will slowly rise to around 2-4 bars and hold there for a few seconds. The goal of pre-infusion is to gently saturate the dry coffee puck with water. This helps settle the grounds, reduce the risk of channeling (where water punches a hole through the puck), and promotes a more even extraction.
- Ramp-up: After pre-infusion, the pressure will climb steadily and smoothly towards its peak. A smooth ramp indicates that the water is flowing evenly through a well-prepared puck.
- Peak pressure: The needle should reach and hold steady at your target, typically 9 bars. This is where the bulk of the extraction occurs. The puck is providing the perfect amount of resistance to the pump’s force, allowing for a balanced extraction.
- Ramp-down: On some machines, especially those with flow control or lever profiles, the pressure may be intentionally tapered or reduced towards the end of the shot. This can help to minimize the extraction of bitter compounds that tend to be released later in the process.
Understanding this ideal curve gives you a visual benchmark. When you pull a shot that tastes perfect, take note of what the gauge did. That is your new target profile.
Using the gauge to diagnose your shot
This is where the pressure gauge transforms from a passive indicator into an active diagnostic tool. By comparing your shot’s pressure profile to the ideal, you can instantly identify what went wrong and how to fix it. The puck of coffee is what provides the resistance needed to build pressure; therefore, the gauge is giving you direct feedback on your grind size, dose, and puck prep.
Here is a simple table to help you diagnose common issues:
| Gauge reading | Potential cause | Result in the cup | How to fix it |
|---|---|---|---|
| Pressure struggles to reach 9 bars (peaks at 6-7 bars) | Grind is too coarse, dose is too low, or channeling is occurring. The water is flowing through the puck too easily. | A fast-flowing, watery shot. Tastes sour, weak, and under-extracted. | Grind finer. This is the most common solution. If the grind is correct, check your dose weight or improve puck prep (distribution, tamping). |
| Pressure spikes high (10+ bars) and stays there | Grind is too fine or the dose is too high. The puck is too dense, choking the machine. | A very slow, dripping shot that may stop entirely. Tastes bitter, harsh, and over-extracted. | Grind coarser. If the grind seems right, you may need to reduce your dose by a small amount (e.g., 0.5 grams). |
| Pressure needle is jumpy or erratic | Severe channeling. Water is finding weak spots and carving paths through the puck instead of saturating it evenly. | An unpredictable, inconsistent shot that is often both sour and bitter at the same time. | Focus on puck preparation. Use a WDT tool to break up clumps, ensure even distribution, and apply a level, consistent tamp. |
Achieving true espresso consistency
Once you are comfortable diagnosing issues, the final step is to use the pressure gauge to lock in your consistency. The goal is to make every shot taste as good as your best one. The gauge is your key to repeatability.
When you pull that “god shot”—the one with perfect balance, sweetness, and body—don’t just savor the taste. Watch the gauge. Burn that pressure profile into your memory. How many seconds of pre-infusion did it have? How quickly did it ramp to 9 bars? Did it hold steady for the entire shot? This visual data is your recipe for success. For every subsequent shot, your goal is to replicate that exact pressure profile. If a new shot tastes off, a quick glance at the gauge will tell you why. If it ramped up too quickly, you know your grind is slightly too coarse. If it choked, you went a little too fine. This removes the guesswork and allows you to make tiny, informed adjustments, ensuring your next shot is right back in that delicious sweet spot.
In conclusion, the pressure gauge is far more than an aesthetic addition to your espresso machine. It is a real-time data feed that gives you a window into the heart of the extraction. By understanding that it reflects the resistance provided by your coffee puck, you can begin to interpret its story. Learning to recognize the ideal curve—from the gentle saturation of pre-infusion to the steady 9-bar peak—provides a crucial benchmark. More importantly, using the gauge to diagnose shots that are too fast, too slow, or channeling, empowers you to make precise, data-driven adjustments to your grind and technique. Ultimately, mastering your pressure gauge is a fundamental step in moving from a hopeful coffee maker to a confident and consistent home barista.


 No products in the cart.