The Cafelat Robot is a masterpiece of simplicity, offering unparalleled manual control over every aspect of the espresso-making process. Unlike semi-automatic machines that rely on pumps and presets, the Robot puts you, the barista, in complete command. This direct connection, however, means the feedback loop is also entirely manual. How do you know if you’ve pulled a great shot? Is it just about the taste, or are there clues along the way? This guide will walk you through the essential steps to identify a perfect espresso extraction on your Robot, from preparing the puck to the final, crucial sip. We will explore the visual cues during the pull, what your spent puck is telling you, and how to translate it all into a delicious, balanced cup.
Pre-shot checklist: setting the stage for success
A perfect extraction doesn’t begin when you press the lever arms; it begins with meticulous preparation. The Robot is an honest machine, meaning it will faithfully reflect any inconsistencies in your prep work. Before you even add water, focus on three key variables: the dose, the grind, and the puck prep. A consistent dose, measured with a scale accurate to 0.1g, is your first constant. For the Robot’s basket, this is typically between 15-18g, but find what works for your chosen beans.
Next is the grind. Your coffee should be ground fine, like powdered sugar with a slight grittiness. This is the single most important variable you will adjust. Too coarse, and the water will gush through, leading to a sour, under-extracted shot. Too fine, and you’ll struggle to press the levers, choking the machine and creating a bitter, over-extracted coffee. Finally, puck prep is non-negotiable. Use a Weiss Distribution Technique (WDT) tool to break up any clumps and evenly distribute the grounds. Follow this with a level tamp. A level bed of coffee is critical for ensuring water flows through it evenly, preventing channeling and ensuring all the coffee grounds are extracted uniformly.
Visual cues during the extraction
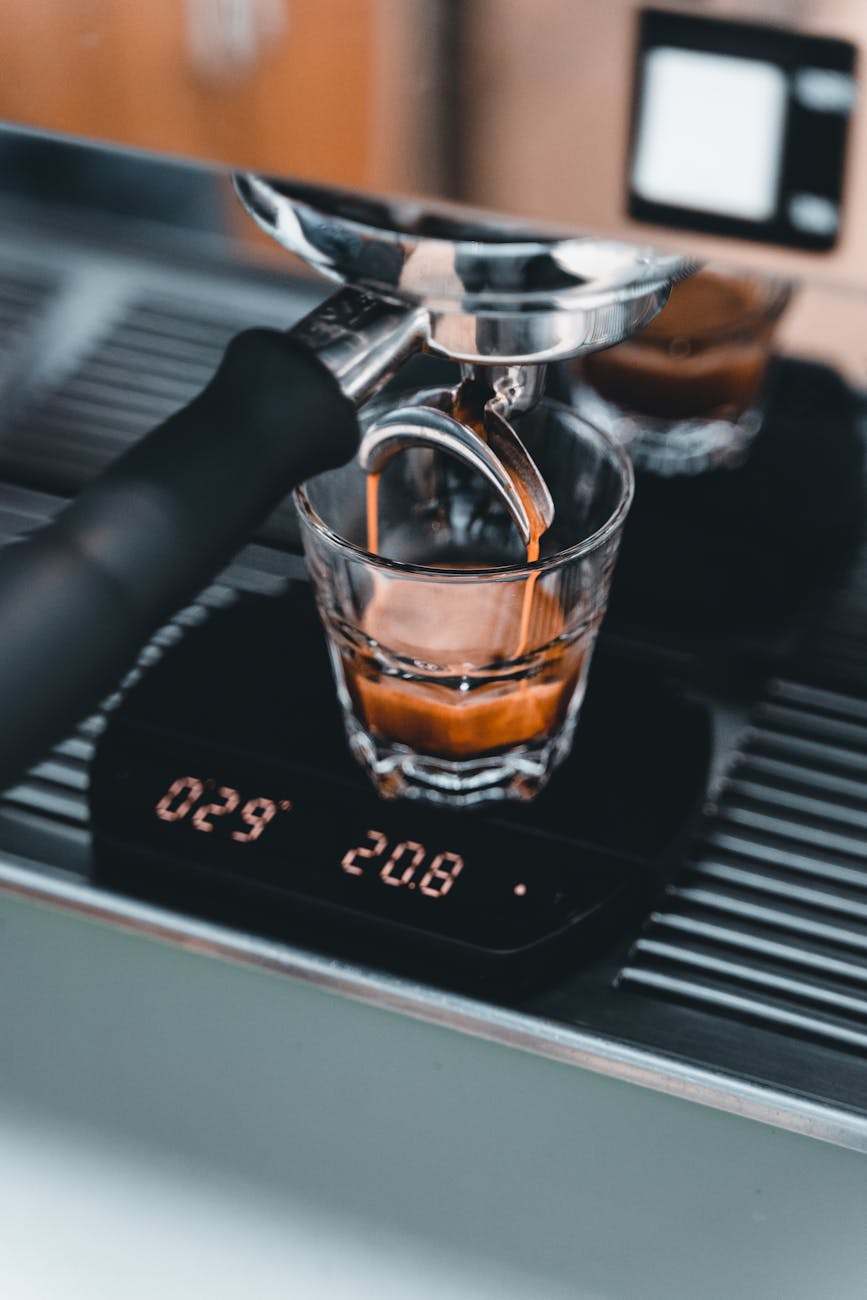
With your puck prepared, it’s time to pull the shot. This is where the Robot provides a wealth of visual feedback. As you begin to apply gentle pressure for pre-infusion (around 2 bar), watch the bottom of the basket. You should see the first few drops of espresso appear as dark, syrupy beads across the entire surface. If coffee jets out from one side, it’s an early sign of channeling.
As you ramp up to full pressure (typically 6-9 bar), these drops should coalesce into one or two steady streams. This is the iconic “mouse tail” that baristas look for. Pay attention to the color and consistency. The flow should be viscous, like warm honey, and display a rich, reddish-brown color, often with “tiger striping.” As the shot progresses, the color will gradually lighten to a caramel, and then a blonde. This blonding is your cue to stop the extraction. A shot that starts blond or flows too quickly is a sign of an under-extraction, likely due to a coarse grind. Conversely, a shot that drips slowly and is very dark for too long is heading towards over-extraction.
Post-shot analysis: decoding the results
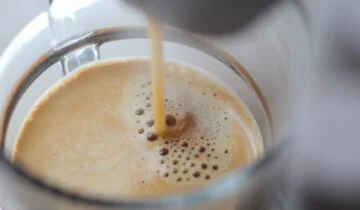
Once you’ve stopped the shot, the analysis continues. Look at the espresso in your cup. The crema should be a persistent, fine-bubbled layer with a hazelnut or reddish-brown color. A very dark, thin crema can indicate over-extraction, while a pale, bubbly crema that dissipates quickly often points to under-extraction or stale beans. Your target brew ratio—the ratio of dry coffee grounds to liquid espresso—is also a key metric. A common starting point is 1:2 (e.g., 16g of coffee in, 32g of espresso out), achieved in about 25-35 seconds. This is a guideline, not a rule, but it provides a solid baseline.
Don’t discard the spent puck without examining it. It’s a fantastic diagnostic tool. A good extraction will leave you with a firm, relatively dry puck that knocks out of the basket in a single, solid piece. This indicates that the water passed through it evenly. If the puck is soupy, your grind might be too coarse. If it has visible cracks or small pinholes, that’s clear evidence of channeling, meaning your puck prep needs refinement.
| Puck characteristic | Potential cause | How to fix |
|---|---|---|
| Dry, firm, and solid | Good extraction | No fix needed. This is the goal! |
| Soupy and wet | Grind is too coarse; water flowed through too fast. | Grind finer. |
| Cracks or pinholes | Channeling from uneven distribution or tamping. | Improve WDT technique and ensure a level tamp. |
| Stuck to the shower screen | Dose is too high for the basket (over-dosing). | Reduce your coffee dose by 0.5-1g. |
The ultimate test: taste and aroma
Ultimately, all the visual cues and technical parameters serve one purpose: to create a delicious-tasting espresso. Your palate is the final and most important judge. A perfect extraction is defined by balance. When you taste the shot, you should experience a pleasant sweetness, a well-integrated acidity (like that of a ripe fruit, not a lemon), and a gentle, complementary bitterness (like dark chocolate, not burnt toast). The body, or mouthfeel, should be full and syrupy, and the finish should be long and pleasant.
If your shot tastes intensely sour or salty with a thin body, it’s under-extracted. This means the water didn’t have enough time or resistance to pull out the desirable sweet compounds. The solution is to grind finer or increase your brew ratio. If your shot is overwhelmingly bitter, astringent, and leaves your mouth feeling dry and hollow, it’s over-extracted. This happens when water pulls too many soluble compounds from the coffee. To fix this, you should grind coarser or shorten your brew ratio. Mastering this taste-based feedback loop is the key to consistently great espresso on the Robot.
In conclusion, identifying a perfect espresso extraction on the Cafelat Robot is a multi-sensory skill. It begins with a consistent and methodical preparation routine, focusing on your dose, grind, and puck prep. During the pull, you must learn to read the visual language of the extraction—the even pre-infusion, the syrupy “mouse tail” flow, and the gradual blonding of the shot. Post-shot analysis of the crema and the spent puck provides further diagnostic data. However, all of these indicators are secondary to the ultimate test: taste. By learning to identify the hallmarks of under-extraction, over-extraction, and that beautiful, balanced middle ground, you transform the Robot from a simple coffee maker into a true instrument of craft espresso.

 No products in the cart.