
Building a better puck prep routine for pressure-profiled shots
For the manual espresso enthusiast, control is everything. Pressure profiling offers the ultimate control over extraction, allowing the barista to manipulate flow rate and contact time to enhance sweetness, texture, and clarity. However, this level of control is a double-edged sword. A fluctuating pressure curve can easily exploit minor flaws in puck preparation, turning a promising shot into a channelled disappointment. To truly leverage the power of pressure profiling, one must first master the art of building a flawless coffee puck. This article explores a puck preparation routine designed to create the uniformity and stability required for dynamic, pressure-profiled extractions.
Understanding the objective: uniformity and permeability
The primary goal of puck preparation is to create a bed of coffee with uniform density and permeability. For a standard 9-bar shot, this is important. For a pressure-profiled shot, it is critical. When you introduce a long, low-pressure pre-infusion, you are gently saturating the coffee. If one area of the puck is less dense than another, water will saturate it faster, creating a path of least resistance. When you later ramp up the pressure, that path becomes a full-blown channel, leading to uneven extraction.
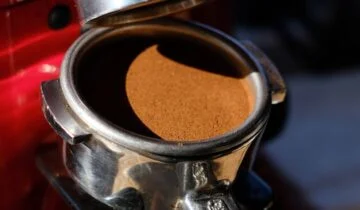
The ideal puck is not simply compressed; it is a homogenous structure. Every particle should be equidistant from its neighbours, with no clumps or air pockets. This ensures that when water is introduced, it flows through the entire coffee bed at an even rate, allowing for a controlled and complete extraction. The focus, therefore, must be on de-clumping, distributing, and tamping in a way that promotes this structural integrity from the bottom of the basket to the top.
Advanced distribution: beyond the basics
Most experienced baristas are familiar with the Weiss Distribution Technique (WDT), but its application deserves refinement for pressure profiling. The objective is not just to break up visible clumps but to fully homogenize the grounds.
- Needle technique: Use a tool with fine-gauge needles (typically under 0.4mm) to avoid creating channels of your own. Your motion should be comprehensive, starting with deep raking motions to address the bottom of the bed, followed by shallower circular motions to integrate the top layer. The goal is a fluffy, evenly distributed mound of coffee.
- Settling the grounds: After distribution, the grounds must be settled into a level bed. Aggressive tapping or banging the portafilter on the counter can cause stratification, where finer particles migrate downwards, creating a dense lower layer that impedes flow. Instead, a few gentle vertical taps on the counter are sufficient to collapse air pockets and create a flat surface for tamping.
Tamping consistency for dynamic pressure
With a perfectly distributed bed of coffee, the tamp’s job is to apply even pressure to create a stable puck. While the debate over precise tamping force continues, for pressure profiling, consistency and levelness are far more important than a specific pressure figure.
A tamp that is even a single degree off-level will create a pocket of lower density along one side of the basket. During a low-pressure pre-infusion, water will saturate this area first. As the pressure increases, this weak spot will give way, causing water to bypass the rest of the coffee bed. The result is a shot that is simultaneously sour and bitter. A firm, repeatable, and perfectly level tamp is the foundation upon which a successful pressure-profiled shot is built. Using a tamper that assists in maintaining levelness can be a significant advantage in achieving this consistency shot after shot.
Reading the signs: post-shot puck analysis
Your work is not done when the shot ends. The spent puck offers valuable data about the quality of your preparation and the dynamics of the extraction. A well-prepared and evenly extracted puck will be firm, relatively dry, and knock out of the basket in one piece. When you break it apart, it should have a uniform colour and consistency.
Conversely, signs of trouble include:
- Pinholes or fractures on the surface: Clear indicators of channeling.
- A soupy or muddy surface: Often suggests incomplete extraction or an issue with headspace.
- Damp sections around the edge: Points to a poor seal between the tamped coffee and the basket wall.
Correlate these visual cues with what you tasted in the cup and observed in the flow. If a shot ran unexpectedly fast and tasted thin, and you then find a small hole in the puck, you have found the cause. This feedback loop is essential for refining your technique and building a more resilient puck.
Conclusion
Building a better puck prep routine for pressure profiling is an exercise in precision and intention. It moves beyond the simple motions of distributing and tamping and into the realm of creating a structurally sound medium for extraction. By focusing on achieving true homogeneity through meticulous distribution, gentle settling, and a perfectly level tamp, you create a puck that can withstand the dynamic forces of a profiled shot. This foundation allows the barista to use pressure as the fine-tuned instrument it is meant to be, unlocking nuanced flavours that a standard extraction curve might leave behind. By refining these manual skills, baristas can achieve exceptional results, and a variety of tools to aid in this process are available from retailers like papelespresso.com.
 No products in the cart.