
Mastering microfoam: A technical guide to the Gaggia Anima Pannarello wand
For the dedicated home barista, the pursuit of cafe-quality microfoam is a critical skill. While many high-end machines feature commercial-style steam wands, popular super-automatic machines like the Gaggia Anima are equipped with a Pannarello wand. Often dismissed as a tool for beginners, the Pannarello presents a unique technical challenge for those aiming to produce foam suitable for latte art. This guide moves beyond basic operation, offering a detailed methodology for experienced users to control the Pannarello wand. By understanding its mechanics and adopting a precise technique, it is possible to create the silky, uniform microfoam necessary for pouring detailed and satisfying latte art, bridging the gap between convenience and craft.
Understanding the Pannarello’s mechanics
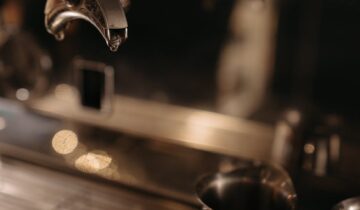
Unlike a single-hole commercial steam wand that gives the user complete control over aeration, the Pannarello is an auto-aerating sheath. It fits over the machine’s underlying steam pipe and features a small air intake hole near the top. When steam is forced through the wand, the venturi effect pulls ambient air through this hole and injects it directly into the milk. This design is engineered to create voluminous, stiff foam with minimal effort.
The primary challenge for latte art is that this process is aggressive by nature, often producing large, visible bubbles rather than true microfoam. The secret to mastering it lies not in fighting its design, but in manipulating it. Success depends on precisely controlling the position of the air intake hole relative to the milk’s surface to limit the aeration phase, followed by a texturing phase to integrate that air correctly.
Foundational elements: Milk and temperature
Before approaching the machine, success is predicated on two variables: the milk itself and its starting temperature. The protein in milk is what creates the foam’s structure, while the fat contributes to its rich flavor and silky texture. For this reason, cold whole dairy milk is the ideal medium for learning, as its high protein and fat content provide a wide margin for error and produce excellent results.
Temperature control is non-negotiable. Begin with milk and a frothing pitcher that are as cold as possible, ideally refrigerated. This cold start extends the time you have to work with the milk before it reaches its final temperature, allowing for distinct aeration and texturing phases. Overheating milk past 70°C (158°F) will denature the proteins, causing the foam to break down and lose its sweetness. A thermometer is an invaluable tool for consistency.
| Phase | Target Temperature Range | Technical Goal |
|---|---|---|
| Stretching (Aeration) | 5°C to 37°C (40°F to 100°F) | Incorporate air to increase volume. |
| Texturing (Vortex) | 37°C to 60°C (100°F to 140°F) | Integrate air and refine texture. |
| Final Temperature | 60°C to 65°C (140°F to 150°F) | Optimal for sweetness and texture. |
The aeration technique: A controlled stretch
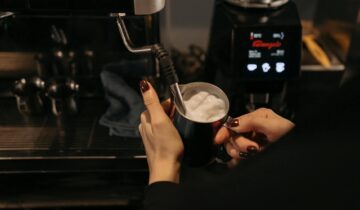
The aeration, or “stretching,” phase is where air is introduced into the milk. With a Pannarello wand, this phase must be deliberate and extremely brief. Begin by purging the wand of any condensed water. Position the pitcher so the wand is submerged just below the surface of the milk, then activate the steam. Immediately lower the pitcher slightly until you hear a subtle, controlled hissing sound. This is the sound of air being drawn through the intake hole.
Your objective is to keep the air intake hole right at the milk’s surface, not the steam tip itself. This gives you nuanced control over the air injection. Allow the milk to aerate for only a few seconds, just long enough to achieve a 20-30% increase in volume. Any longer will create overly stiff foam. Watch the volume, not the clock, and as soon as you see the desired rise, move immediately to the next phase.
The vortex: Integrating and texturing the foam
Once the initial volume is achieved, the aeration phase must stop completely. To do this, raise the pitcher to fully submerge the Pannarello wand deep into the milk. This action drowns the air intake hole, preventing any more air from entering. The goal now is to create a powerful vortex, which will break down larger bubbles and fold the foam into the milk, creating a homogenous, glossy microfoam.
Angle the pitcher and adjust the wand’s position off-center to force the milk into a rapid, swirling motion. The process should become nearly silent. This texturing phase continues until the pitcher becomes too hot to comfortably hold, which corresponds to the target temperature of 60-65°C. Immediately turn off the steam and remove the wand. The final product should have the consistency of wet paint, with no visible bubbles and a brilliant sheen. Swirl the pitcher and tap it on the counter to remove any remaining surface bubbles before pouring.
Conclusion
The Gaggia Anima’s Pannarello wand, while designed for simplicity, does not preclude the creation of high-quality microfoam. Mastery hinges on a technical understanding of its auto-aerating mechanism and a disciplined, two-stage approach. By executing a short, controlled aeration phase followed by a deep, silent vortex to texturing the milk, the experienced barista can overcome the wand’s default tendencies. This technique allows for the consistent production of silky, pourable foam suitable for latte art, proving that user skill remains the most vital ingredient in the espresso workflow. Consistent practice is key, and ensuring you have the right tools for your process, from pitchers to cleaning supplies, can make the process more repeatable. A curated selection of such professional-grade accessories is often available from specialized retailers like papelespresso.com.

 No products in the cart.