How to adjust your Linea Mini or Micra internal brew pressure: a complete guide
The La Marzocco Linea Mini and Linea Micra are revered in the coffee community for their robust build, thermal stability, and the exceptional espresso they produce. They bring commercial-grade quality into the home, offering remarkable consistency right out of the box. However, for the barista looking to push the boundaries of flavor extraction, there’s a powerful variable waiting to be explored: brew pressure. While these machines are factory-set to the industry standard of 9 bars, adjusting this internal pressure can unlock entirely new dimensions in your coffee. This guide will walk you through why you might want to change your brew pressure and provide a safe, step-by-step process for making the adjustment on your Linea Mini or Micra.
Why would you want to adjust brew pressure?
For decades, 9 bars has been the gold standard for espresso extraction. This pressure is highly effective at forcing water through a finely ground, compacted puck of coffee, extracting the oils, solids, and flavors that create classic espresso. It’s a reliable setting that works well for traditional, medium-to-dark roast coffee, producing rich crema and a full-bodied shot. So, why change what works?
The rise of specialty coffee and lighter roast profiles has challenged this single-pressure paradigm. Lighter roasts are less soluble and can taste overly acidic or sharp when extracted at a high pressure. By lowering the brew pressure to a range of 6 to 8 bars, you can achieve a gentler, slower extraction. This often results in a shot with more sweetness, clarity, and nuanced floral or fruity notes, while taming unwanted acidity. It allows the water more contact time with the coffee grounds without channeling, leading to a more even and balanced extraction. Adjusting your pressure is a form of manual profiling, giving you another tool to dial in the perfect shot for a specific bean.
Tools and safety preparation
Before you begin, gathering the right tools and preparing your machine is crucial for a safe and accurate adjustment. Attempting this without the proper equipment can lead to inaccurate readings or damage to your machine. Here’s what you’ll need:
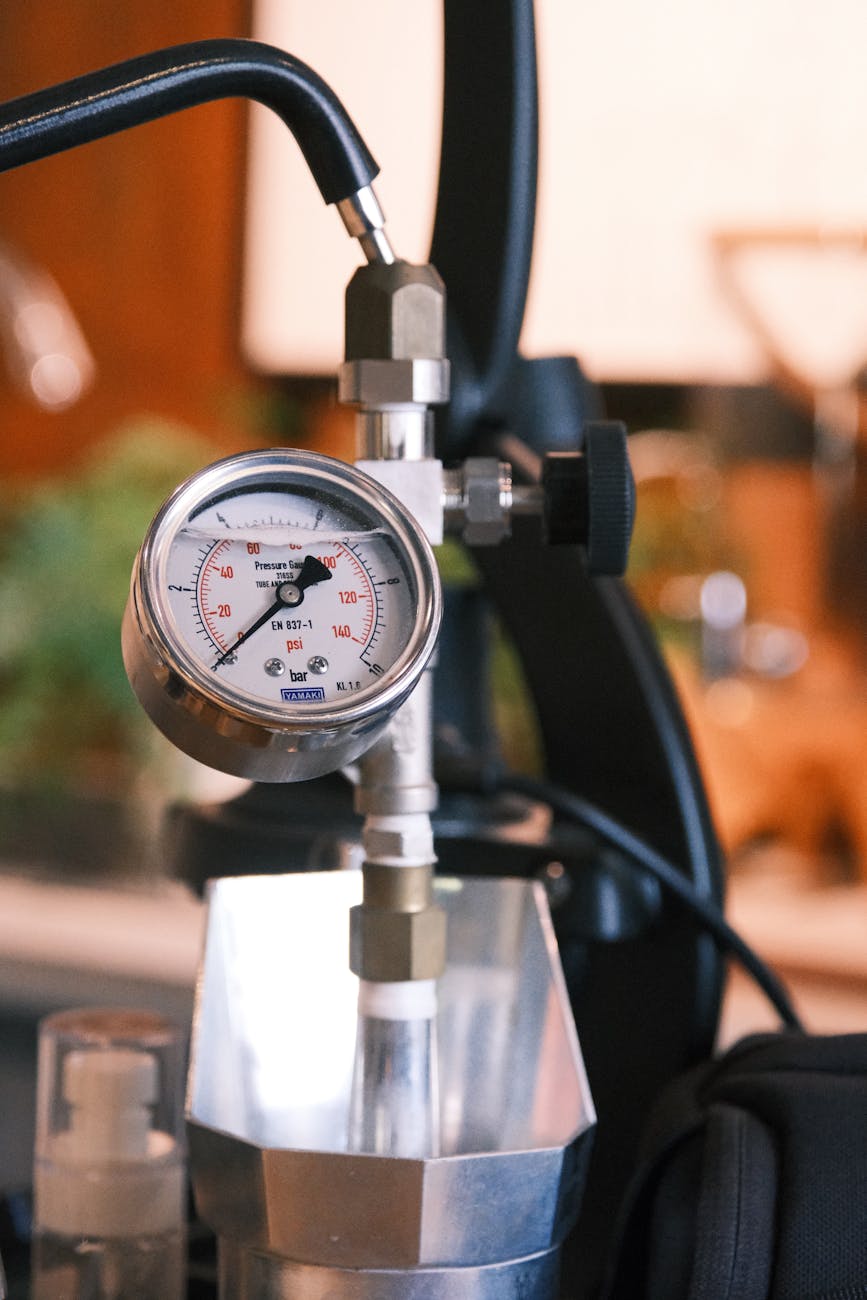
- Portafilter with a pressure gauge: This is non-negotiable. You cannot accurately set your pressure without a tool to measure it. This device, also known as a portafilter manometer, replaces your regular brew basket and displays the pressure at the group head.
- Blind basket: This is a basket with no holes. It’s used with the pressure gauge to create a seal and build up the maximum pressure for an accurate reading.
- Long, thin flathead screwdriver: The adjustment screw is located inside the machine, so a screwdriver with a decent length is necessary to reach it comfortably.
- A towel: Keep a small towel handy to wipe up any water drips and to protect your countertops.
For preparation, first, turn off and unplug your machine. Remove the cup warming tray on top of your machine by lifting it off. This will expose the internal components. It’s also a good idea to empty the drip tray to prevent any spills during the process.
The step-by-step adjustment process
With your tools gathered and machine prepped, you can now proceed with the adjustment. The process is the same for both the Linea Mini and Linea Micra. Follow these steps carefully.
1. Locate the expansion valve: Looking down into the machine from the top, you will see the pump on the left-hand side. The expansion valve (sometimes called the OPV or over-pressure valve) is a brass component connected to the pump. You are looking for a small flathead screw on this valve. This is your adjustment point.
2. Prepare for measurement: Plug the machine back in, turn it on, and allow it to fully heat up. Insert the blind basket into your portafilter pressure gauge and lock it into the group head, just as you would when pulling a shot.
3. Get a baseline reading: Lift the brew paddle to engage the pump. Water will fill the portafilter, and the pressure will build. Watch the gauge and note the maximum pressure it reaches. This is your starting point, which should be around 9-10 bars from the factory.
4. Make the adjustment: With the pump still engaged and the gauge showing a live reading, insert your flathead screwdriver into the expansion valve screw. The adjustment is very sensitive, so make tiny turns.
- To decrease pressure, turn the screw counter-clockwise.
- To increase pressure, turn the screw clockwise.
Make no more than a quarter-turn at a time while watching the gauge. You will see the needle move in real-time. Aim for your target pressure, for example, 8 bars.
5. Verify the setting: Once you’ve reached your target on the gauge, stop the pump. To ensure the setting is stable, run the pump again for a few seconds and confirm the pressure returns to your desired level. Your adjustment is now complete. You can turn the machine off, re-attach the top panel, and get ready to pull a shot.
Dialing in your new pressure setting
Changing your brew pressure will directly affect how your espresso extracts, so you will need to re-dial in your grinder. A lower pressure setting often requires a finer grind to maintain a similar shot time. Don’t be afraid to experiment. The goal is to find the combination of pressure, grind size, and yield that tastes best to you for a particular coffee.
Keep a log of your settings and the flavors you perceive. This will help you understand the relationship between pressure and taste. Below is a general guide, but remember that every coffee is different.
| Brew pressure | Recommended roast level | Potential flavor impact |
|---|---|---|
| 6 – 7.5 bars | Light / Light-Medium | Increases sweetness and clarity, reduces acidity, highlights delicate floral/fruity notes. |
| 8 – 9 bars | Medium / Medium-Dark | Balanced and classic. Good for chocolatey and nutty notes, creates a thicker body and rich crema. |
| 9.5+ bars | Dark / Italian Roast | Intensifies bitterness and body. Can be useful for certain very dark roasts but often leads to over-extraction. |
Remember that adjusting the internal pressure sets the maximum pressure. It doesn’t create a dynamic pressure profile during the shot. However, it’s an incredibly effective way to control a key variable and elevate your home espresso game.
Conclusion
Adjusting the internal brew pressure on your La Marzocco Linea Mini or Micra is a powerful and accessible modification that puts you in greater control of your espresso extraction. While the factory-set 9 bars is a fantastic all-around setting, exploring lower pressures can unlock sweeter, more delicate, and balanced flavors, especially with modern light roasts. By following the steps outlined—gathering the correct tools like a pressure gauge, carefully locating and turning the expansion valve, and making small, incremental changes—you can safely tailor your machine’s performance to your specific taste and the coffee you’re brewing. This simple adjustment transforms your machine from a high-performance appliance into a truly customizable tool, empowering you to experiment and deepen your understanding of espresso.
 No products in the cart.