The La Pavoni lever espresso machine is an icon of design and a testament to the art of manual espresso making. For its devotees, pulling a shot is a rewarding, hands-on ritual. However, this intimate process comes with its own unique set of challenges, chief among them being group head overheating. When you’re aiming to pull multiple shots back-to-back for guests or just a second cappuccino for yourself, that beautifully chromed group can quickly become your worst enemy, turning a perfect coffee puck into a bitter, disappointing mess. This article will serve as your comprehensive guide to understanding, managing, and ultimately conquering overheating issues, ensuring every shot you pull is as delicious as the first.
Understanding the heat source in your La Pavoni
To effectively manage the heat, you first need to understand why La Pavoni machines are so prone to it. The issue is rooted in their elegant, yet thermally volatile, design. Unlike many modern machines with isolated group heads, the La Pavoni features a group head bolted directly to the boiler. This is known as a ‘dipper’ design because the piston ‘dips’ into the water at the top of the boiler to draw it into the chamber.
This design allows for a relatively quick warm-up time, as the massive brass and chrome group acts as a heatsink, drawing thermal energy directly from the boiler. For the first one or two shots, this is perfect. The group reaches an ideal brewing temperature of around 90-95°C (194-203°F). The problem arises during prolonged sessions. With the machine left on, the group continues to absorb heat, far exceeding the optimal range and creeping into temperatures that will scorch the coffee grounds on contact. This is particularly true for pre-millennium models, which have a smaller group that heats (and overheats) faster than the larger, more thermally stable post-millennium versions.
Identifying the signs of an overheated group
Before you can fix the problem, you need to recognize its symptoms. An overheated La Pavoni gives off several tell-tale signs, both in the machine’s behavior and in the cup. Learning to spot these early will save you from wasting precious coffee.
- The ‘dragon’s hiss’: This is the most obvious auditory cue. When you lift the lever on an overheated group, the water entering the chamber is so hot it instantly flashes to steam, creating a loud hissing or sizzling sound.
- Water sputtering from the group: If you lock in your portafilter and water immediately sputters or drips out aggressively before you even start the pull, the water is too hot and is boiling on contact with the air.
- A bitter, acrid taste: The most important sign is in the final product. Over-extracted, burnt, and intensely bitter flavors are a direct result of water that is too hot scorching the coffee grounds. You will lose all the delicate sweetness and nuanced flavors of your beans.
- Poor crema: Instead of a rich, velvety crema, you’ll get a thin, bubbly, and pale layer that dissipates almost instantly.
Paying attention to these signs will shift you from a reactive to a proactive mindset, allowing you to cool the group before you pull a bad shot.
Proactive techniques for effective heat management
Once you’ve identified that your machine is running too hot, it’s time to intervene. Fortunately, the La Pavoni community has developed a host of effective techniques over the years. The key is to find a combination that works for your workflow.
Power management is your first line of defense. The simplest method is to turn the machine off after your first or second shot. This stops the heating element from engaging and allows the boiler and group head to slowly cool down. You can then turn it back on briefly to get back up to pressure for your next shot.
Cooling the group head directly is crucial. Several methods work here:
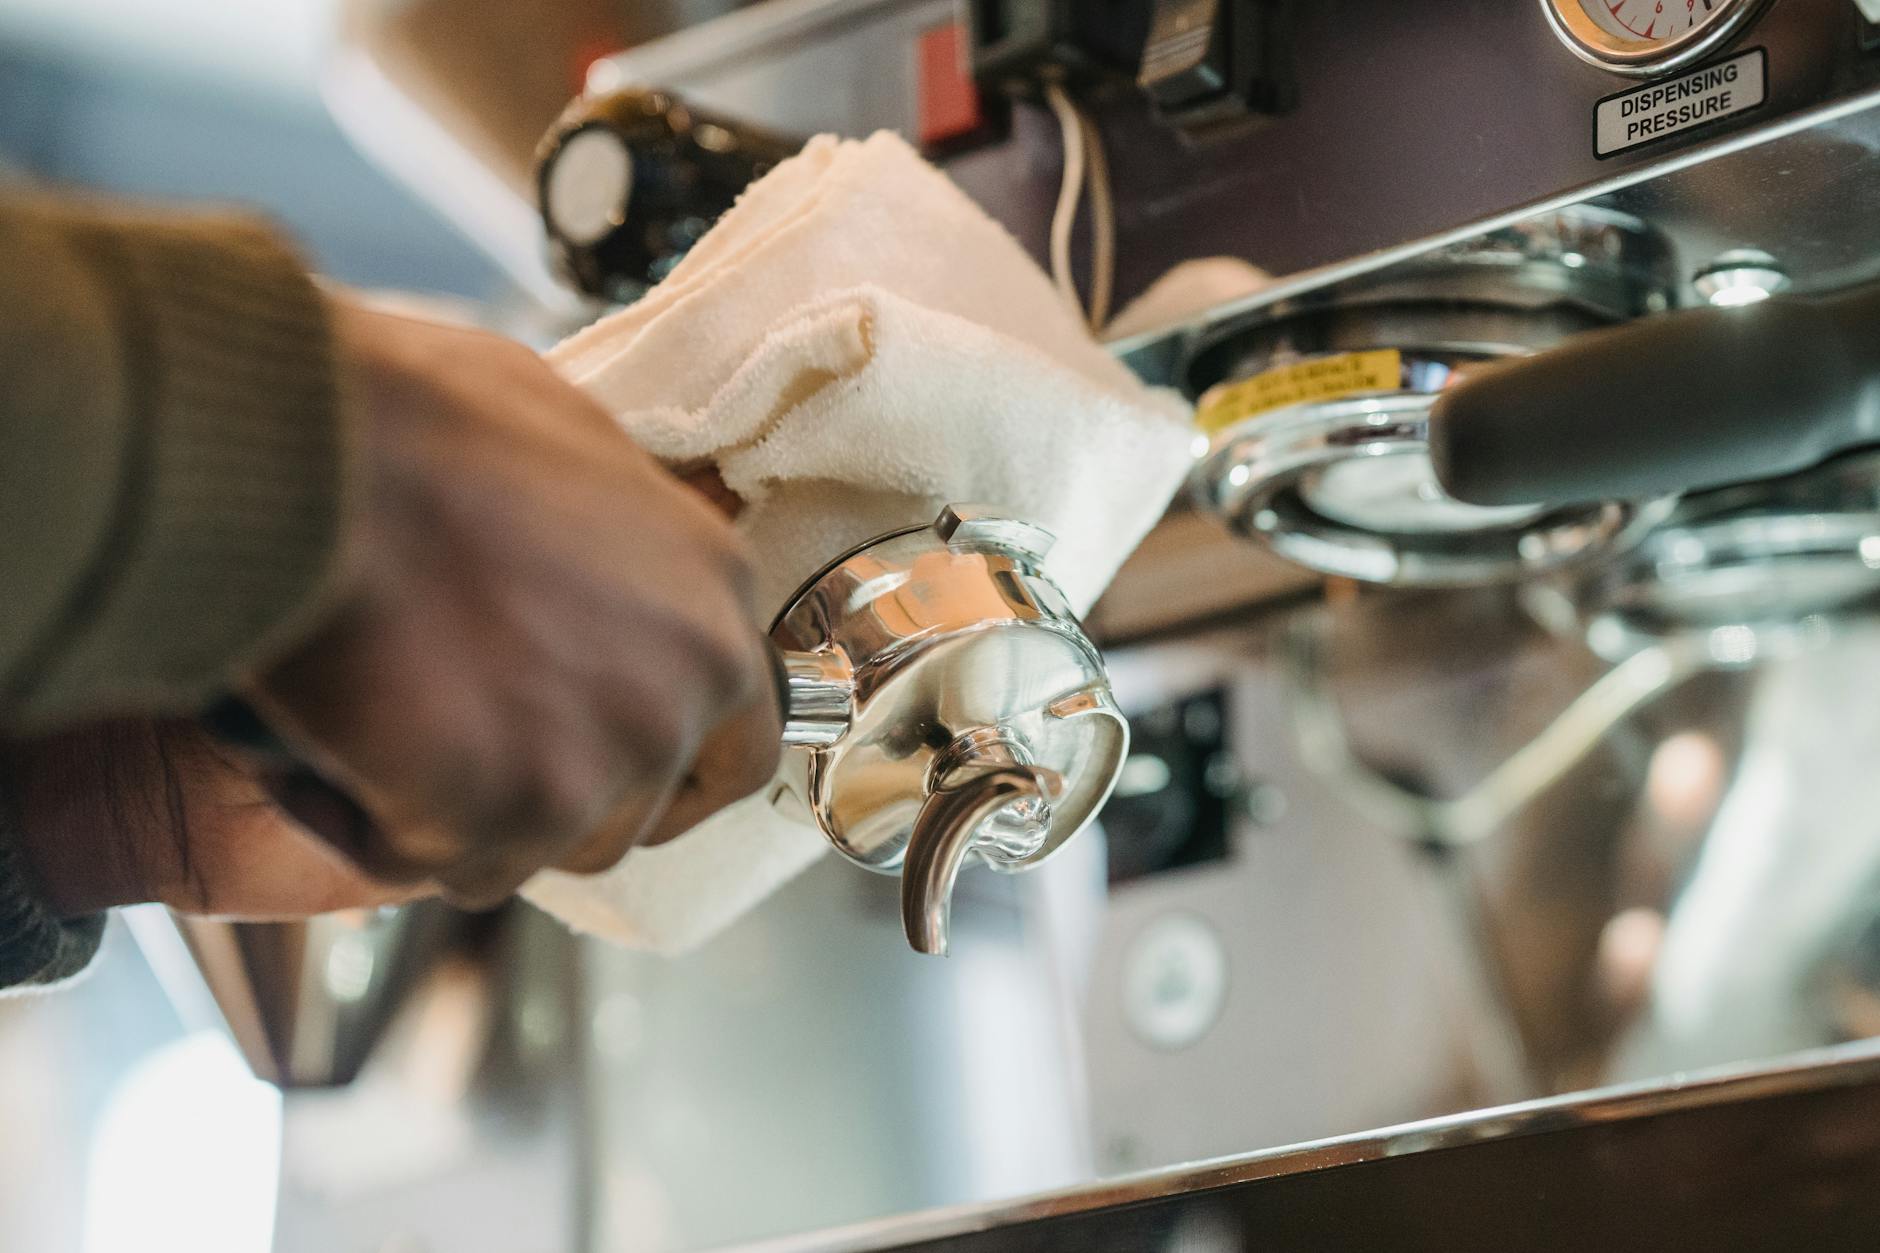
- The wet towel method: Drape a cold, damp cloth over the group head. The evaporating water will efficiently pull a significant amount of heat from the metal. This is a very effective and popular technique.
- Heatsinks: Some users purchase or fashion custom-fit metal heatsinks that attach to the group, increasing the surface area and allowing it to dissipate heat more quickly into the air.
- The cold portafilter sink: A less common but effective trick is to lock in a cold, empty portafilter. The cold, massive piece of metal will act as a heatsink, drawing heat out of the group. You can then flush some water through it (into the drip tray) to cool it further.
Using temperature monitoring tools provides data instead of guesswork. Stick-on thermometer strips (like those used for milk frothing pitchers) placed on the side of the group head can give you a reliable temperature reading, allowing you to know precisely when you are in the ideal brewing range.
Developing a temperature-focused workflow
Combining these techniques into a repeatable workflow will allow you to pull multiple, consistent shots. The goal is to manage the group head temperature so it stays within the optimal range for your chosen coffee roast.
Here is a sample workflow for making two cappuccinos back-to-back:
- Turn on the machine and allow it to fully heat up.
- Bleed false pressure and prepare your first puck.
- Pull your first shot when the group feels hot to the touch (or your thermometer reads the ideal temp).
- Immediately turn the machine off.
- Steam your milk for the first drink. The residual pressure is often enough.
- While you enjoy your first drink, begin cooling the group with a damp cloth. Monitor the temperature as it drops.
- Prepare your second puck of coffee.
- When the group is back in the ideal temperature range, turn the machine on for 30-60 seconds to build pressure again.
- Pull your second shot and turn the machine off again.
This method prevents the group from ever reaching the “scorching” point. For more precise control, an external thermometer is invaluable. Below is a table of approximate ideal temperatures based on roast level.
| Roast level | Ideal group head temp (approx.) | Taste when too hot |
|---|---|---|
| Light roast | 94-96°C (201-205°F) | Loss of acidity, replaced by bitterness |
| Medium roast | 90-93°C (194-199°F) | Burnt, ashy, loss of sweetness |
| Dark roast | 88-91°C (190-196°F) | Extremely bitter, thin body |
The La Pavoni is a machine that demands your attention and rewards your skill. Overheating is not a design flaw but rather a characteristic that must be managed. By understanding why the group gets hot, learning to identify the signs, and implementing a proactive cooling workflow, you can tame the thermal beast. Using simple tools like a switch, a wet towel, and perhaps a thermometer strip, you can move from frustrating, inconsistent sessions to a place of control and repeatability. Mastering the heat is a key step in the journey of mastering the La Pavoni itself, ensuring you can pull beautiful, delicious shots for yourself and your guests, time and time again.


 No products in the cart.