Welcome to the world of home espresso! You’ve got the machine, the grinder, and some beautiful coffee beans. You’re ready to pull that perfect, syrupy shot you’ve dreamed of. But instead, you’re met with a sputtering, watery mess that tastes sour or bitter. The culprit is often found in the few crucial seconds before you lock in the portafilter: your puck preparation. This process of dosing, distributing, and tamping the coffee grounds is a delicate craft. For beginners, it’s a common source of frustration. This guide is here to help you troubleshoot the most frequent puck prep mistakes. We’ll break down each step, help you diagnose what’s going wrong, and guide you toward that delicious, well-balanced shot you’re chasing.
The foundation: Getting your dose and distribution right
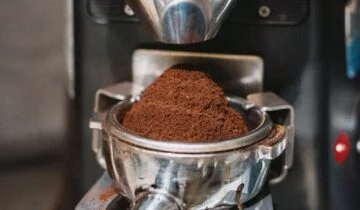
Before you even think about tamping, the success of your shot begins with two fundamental steps: dosing and distribution. Dosing simply means getting the right amount of coffee into your portafilter basket. This isn’t something to guess. The single most important tool for consistency is a digital scale that measures to at least 0.1 grams. Different baskets are designed for different doses (e.g., 18g, 20g). Using the wrong amount can lead to a soupy puck or a shot that chokes the machine.
Once you’ve weighed your coffee, you’ll notice the grounds are often clumpy and piled in a mound. This is where distribution comes in. If you tamp this uneven mound, you create areas of high and low density within the puck. Water is lazy; it will always follow the path of least resistance. This means it will rush through the less dense areas, a phenomenon called channeling. This results in an under-extracted, sour shot. To fix this:
- Level the grounds: Gently tap the side of the portafilter with your hand to settle the grounds into a more even bed.
- Use a WDT tool: A Weiss Distribution Technique (WDT) tool, which looks like a handle with fine needles, is excellent for breaking up clumps and evenly distributing the grounds.
- Consider a distribution tool: These tools sit on top of your portafilter and use a spinning motion to groom the surface of the grounds, ensuring a level starting point for your tamp.
Nailing your dose and distribution creates a uniform coffee bed, which is the essential first step to a great extraction.
The art of the tamp: Pressure, levelness, and consistency
With a perfectly distributed bed of coffee, the next step is tamping. The primary goal of tamping is not to press as hard as you can. The goal is to compact the coffee grounds into a dense, level puck that will provide even resistance to the water from your machine. The two most important factors are levelness and consistency.
A level tamp is non-negotiable. If your tamp is crooked, one side of the puck will be more compressed than the other. Just like with poor distribution, water will rush through the less compressed side, leading to severe channeling and a completely unbalanced extraction. To ensure a level tamp, try to form a 90-degree angle between your arm and the counter. Use your fingers to feel the rim of the tamper against the rim of the portafilter to check for levelness before you apply full pressure.
What about pressure? The old myth of needing exactly 30 pounds of pressure is just that—a myth. What matters is being consistent. You only need to tamp until the coffee stops compressing. Find a comfortable pressure that you can replicate every single time. A calibrated tamper can help with this, as it provides a click or tactile feedback when you’ve reached a set pressure. But you don’t need one to succeed. Focus on a repeatable, level motion, and you’ll eliminate one of the biggest variables in your espresso routine.
Diagnosing the shot: What your puck and pull are telling you
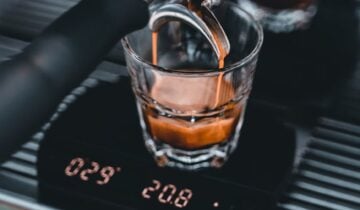
Your espresso machine and the spent coffee puck are constantly giving you feedback. Learning to read these signs is key to understanding what you need to adjust in your preparation. If your shot isn’t tasting right, don’t just dump the puck and try again. Examine the shot as it pulls and inspect the puck afterward. Are there tiny jets of water spraying from the portafilter (channeling)? Does the shot come out way too fast or barely drip? Is the spent puck a soupy mess or dry and cracked?
By connecting these visual cues to your puck prep steps, you can start making targeted adjustments instead of just guessing. Here’s a simple table to help you diagnose common problems:
| Symptom | Likely Puck Prep Cause | Solution |
| Shot pulls too fast (under 20s); tastes sour | Uneven distribution (channeling); too low a dose; tamp was not firm enough. | Use a WDT tool; check your dose with a scale; ensure a consistent, firm tamp. |
| Shot pulls too slow (over 35s); tastes bitter | Dose is too high for the basket; grounds are too fine (a grinder issue, but related to prep). | Ensure your dose is correct for your basket size; adjust your grinder to be a bit coarser. |
| Blonding happens very early in the shot | Severe channeling from an uneven or crooked tamp. | Focus on leveling grounds before tamping; ensure your tamp is perfectly level. |
| Spent puck is soupy and wet | The dose is too low for the basket, leaving too much headspace. | Increase your coffee dose by 0.5g-1g until the puck is firm and dry. |
| Spent puck has cracks or a hole in it | This is a clear sign of channeling where water punched a hole through a weak spot. | Go back to basics: focus on perfect distribution with a WDT tool to remove all clumps. |
Tools of the trade: Improving your consistency
While technique is king, having the right tools can make achieving consistency much easier. You don’t need to spend a fortune, but a few key items can dramatically reduce the variables in your puck prep and help you progress faster. Let’s separate the essentials from the helpful upgrades.
The Essentials:
- A Digital Scale: As mentioned, this is non-negotiable for consistent dosing. Measuring by volume with a scoop is a recipe for failure. Get a scale that measures in 0.1-gram increments.
- A Quality Tamper: The plastic tamper that comes with many machines is often too small and lightweight. Invest in a heavy, flat-bottomed tamper that fits your portafilter basket snugly (e.g., a 58mm tamper for a 58mm basket). This makes achieving a level tamp far easier.
Helpful Upgrades:
- A WDT Tool: This simple tool is one of the most effective upgrades for its cost. By breaking up clumps, it drastically reduces the chance of channeling and is a game-changer for fluffy, even distribution.
- A Dosing Funnel: This sits on top of your portafilter and prevents grounds from spilling while you grind or use your WDT tool. It keeps your workspace clean and ensures your entire dose makes it into the basket.
- A Puck Rake or Distribution Tool: These groom the top layer of coffee to be perfectly flat before tamping. They can help create a very polished, repeatable process, further ensuring an even extraction.
Starting with the essentials and adding upgrades as you identify specific issues in your workflow is a great way to build your home barista toolkit intentionally.
Mastering espresso puck preparation is a journey of patience, observation, and repetition. It’s not about finding one secret trick, but about building a consistent, repeatable routine. By focusing on the fundamentals—a precise dose, even distribution, and a level tamp—you eliminate the most common sources of error. Remember to use your eyes and your taste buds as your guide. A fast, sour shot or a cracked, soupy puck isn’t a failure; it’s valuable feedback telling you exactly what to adjust for your next attempt. Don’t get discouraged by a few bad shots. Embrace the process, pay attention to the details we’ve discussed, and you will be well on your way to consistently pulling delicious, balanced espresso shots right in your own kitchen.
 No products in the cart.