
Achieving a velvety mouthfeel in your home cappuccino recipe
The perfect cappuccino is more than just a coffee; it’s an experience. It begins with the rich aroma of a well-pulled espresso shot, followed by the first sip, where the coffee’s intensity is perfectly balanced by sweet, warm milk. The most coveted characteristic, however, is that luxurious, velvety mouthfeel. This is the texture that separates a mediocre, bubbly coffee from a café-quality masterpiece. It’s a dense, glossy microfoam that feels like liquid silk on the tongue. Many home baristas struggle with this, often ending up with stiff, dry foam or simply hot milk. This guide will demystify the process, providing you with the essential knowledge and techniques to transform your home cappuccino recipe and consistently achieve that sought-after velvety texture.
The foundation: a quality espresso shot
Before we even touch the milk, we must address the base of our cappuccino. A flawless milk texture cannot save a poorly made espresso. The final mouthfeel is a marriage of coffee and milk, and a thin, watery, or bitter espresso shot will undermine your efforts. A great espresso provides the body and crema that the microfoam will rest on and blend with. For a rich foundation, start with freshly roasted, high-quality coffee beans. Grind them just before you brew to preserve their volatile aromatic compounds.
Your grind size is critical. It should be fine, resembling granulated sugar, allowing for an extraction time of around 25-30 seconds. If the shot pulls too quickly (under 20 seconds), it will be sour and weak. If it chokes the machine and trickles out slowly (over 35 seconds), it will be bitter and harsh. Aim for a balanced shot that showcases the coffee’s natural sweetness and body. This robust espresso base is the canvas upon which you will paint with your velvety milk.
Choosing the right milk for microfoam
The type of milk you use is arguably the most important variable in creating microfoam. The magic lies in the milk’s protein and fat content. Proteins create the foam’s structure by trapping air, while fats contribute to a richer, creamier mouthfeel. Not all milks are created equal when it comes to steaming.
Whole dairy milk is the undisputed champion for beginners and professionals alike. Its ideal balance of proteins, fats, and sugars makes it forgiving to work with and results in a stable, sweet, and incredibly creamy foam. While lower-fat milks can create foam, it is often airy, dry, and dissipates quickly. For non-dairy drinkers, the market has exploded with “barista blend” alternatives specifically formulated for steaming. Oat milk is a popular favorite as it closely mimics the creamy texture of whole milk. Here is a simple breakdown of common choices:
| Milk type | Steaming difficulty | Foam quality | Key characteristics |
|---|---|---|---|
| Whole dairy milk | Easy | Excellent: creamy, stable, glossy | The gold standard for its fat and protein content. Very forgiving. |
| Skim dairy milk | Medium | Fair: airy, dry, less stable | Creates large bubbles easily but lacks the fat for a creamy texture. |
| Oat milk (barista blend) | Easy | Very good: creamy, stable | The best dairy-free alternative for a velvety mouthfeel. |
| Soy milk | Medium | Good: can curdle if overheated | Produces a decent foam but requires careful temperature control. |
| Almond milk | Hard | Poor: thin, bubbly, unstable | Low in protein and fat, making it very difficult to create microfoam. |
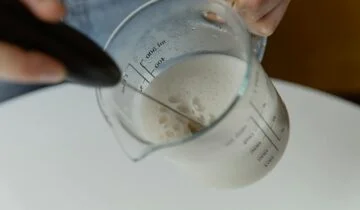
The art of steaming: technique and temperature
Now that you have your perfect espresso and the right milk, it’s time for the main event: steaming. This process can be broken down into two distinct, yet seamless, phases. Always start with cold milk in a cold pitcher.
- Phase one: Stretching (aeration). This is where you introduce air to create foam. Submerge the tip of your steam wand just below the surface of the milk, slightly off-center. Turn the steam on fully. You should hear a gentle hissing or “tearing paper” sound. This is the sound of air being incorporated. Keep the tip near the surface for only a few seconds, until the milk volume increases by about 20-30%. You are building the foam’s volume in this step.
- Phase two: Texturing (the vortex). Once you have stretched the milk enough, plunge the steam wand deeper into the pitcher, still keeping it off-center. This should silence the hissing sound and create a powerful whirlpool or vortex. This motion is crucial. It breaks down any large, undesirable bubbles and folds them into the milk, creating a uniform, silky microfoam. Continue this vortex until the pitcher is hot to the touch, but not so hot you have to let go immediately.
Temperature is your guide. The ideal final temperature is between 140-150°F (60-65°C). Beyond this point, the milk proteins begin to break down, the sweetness is lost, and the beautiful texture you just created is destroyed. Use a thermometer initially, but with practice, you will be able to judge the temperature by placing a hand on the side of the pitcher.
The final pour: bringing it all together
You have a perfect espresso and a pitcher of liquid velvet. The final step is to combine them correctly. Don’t let your milk sit for too long, as it will start to separate. Immediately after steaming, give the pitcher a firm tap on the counter to pop any remaining large bubbles. Then, swirl the pitcher gently to polish the milk, giving it a glossy, wet-paint-like appearance. This ensures the foam and milk are fully integrated.
The pour itself contributes to the final texture in the cup.
- Start by holding the pitcher high above the cup and pour a thin, steady stream into the center of the espresso. This allows the steamed milk to dive underneath the crema, preserving its color.
- Once the cup is about half to two-thirds full, lower the pitcher so its spout is very close to the surface of the coffee.
- Increase your rate of pour slightly. This will cause the white microfoam to emerge and sit on top, creating the classic cappuccino look.
This technique ensures a homogenous mixture in the cup, delivering that consistently velvety mouthfeel from the first sip to the last.
Mastering the perfect home cappuccino is a rewarding journey of sensory refinement. It isn’t about a single secret trick, but rather a holistic approach where each step builds upon the last. It begins with a meticulously prepared espresso shot, which provides the rich and flavorful foundation for your drink. The choice of milk, with whole dairy or a quality barista-blend oat milk being top contenders, is your next critical decision. From there, the heart of the process lies in the steaming technique: a brief, controlled stretch to introduce air, followed by a powerful vortex to texturize it into silky microfoam, all while respecting the crucial temperature limits. Finally, a thoughtful pour integrates these elements into a harmonious final beverage. With attention to these details and a little practice, you can move beyond average coffee and consistently craft a cappuccino with a truly luxurious, velvety mouthfeel right in your own kitchen.


 No products in the cart.