
Mastering pre-infusion on your Gaggia without a PID
The Gaggia Classic Pro is a legendary entry point into the world of home espresso, but its raw power can be a double-edged sword. Without a PID (Proportional-Integral-Derivative) controller, the machine delivers full brew pressure almost instantly, which can lead to channeling and inconsistent extractions. This is where pre-infusion comes in. Pre-infusion is the process of gently wetting the coffee puck at a lower pressure before applying the full nine bars. This simple step helps settle the coffee bed, reduces the risk of channeling, and ultimately leads to a more balanced and flavorful shot. This article will guide you through simple, manual pre-infusion techniques you can master on your stock Gaggia machine to dramatically improve your espresso game.
Why pre-infusion is a game-changer for Gaggia machines
To truly appreciate the value of manual pre-infusion, it’s important to understand what’s happening inside your Gaggia when you flip the brew switch. The machine’s powerful vibratory pump ramps up to its maximum pressure of 9 to 15 bars within a second or two. Hitting a dry, finely ground puck of coffee with this sudden force is like turning a firehose on a sandcastle. The water will seek the path of least resistance, creating tiny tunnels or “channels” through the puck. When this happens, water bypasses most of the coffee, leading to a shot that is simultaneously sour (under-extracted) and bitter (over-extracted from the channels). Pre-infusion acts as a buffer. By allowing the puck to become fully saturated with water at low pressure, it swells and becomes more uniform. This creates a more resistant, evenly dense barrier for the high-pressure water to push through, encouraging a uniform extraction and unlocking a sweeter, more complex flavor profile in your cup.
The steam wand pre-infusion technique
Perhaps the most popular and effective manual method is the “steam wand hack.” This technique cleverly uses the steam wand valve to control the flow of water and pressure to the group head. It gives you a tangible sense of control and, with a little practice, can yield fantastic results. It might sound complex, but the process is quite straightforward.
Here’s a step-by-step guide:
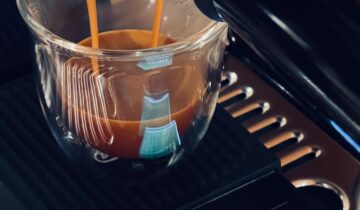
- Prepare your portafilter and lock it into the group head as you normally would. Place your scale and cup underneath.
- Fully open the steam wand valve.
- Flip the brew switch on. Water will now start flowing out of the steam wand instead of the group head.
- Wait about 2-4 seconds, then slowly begin to close the steam wand valve. As you close it, you will see the first drops of espresso begin to form at the bottom of your basket. This is the low-pressure pre-infusion stage.
- Once the basket is fully saturated (you’ll see an even coating of espresso drops), completely close the steam wand valve. You will hear the pump engage fully as it diverts all pressure to the group head to begin the full extraction.
- Proceed with your shot as normal.
The goal is to aim for a pre-infusion phase of about 8-10 seconds before you close the valve completely. This method gives you excellent tactile feedback and allows you to visually confirm that the puck is saturated before hitting it with full pressure.
The brew switch flicker method
If the steam wand technique feels like too many moving parts, the “brew switch flicker” is a simpler alternative that achieves a similar goal. This method leverages the machine’s residual pressure and the slight delay in the three-way solenoid valve to gently wet the puck. It’s a quicker, less hands-on approach that can still significantly reduce channeling and improve the consistency of your shots. While it offers slightly less precise control than the steam wand method, its ease of use makes it an excellent starting point for anyone new to manual pre-infusion.
Here’s how to do it:
- With your prepared portafilter locked in, flip the brew switch on for just 2-3 seconds. This is just enough time for the pump to push water into the group head and begin saturating the puck.
- Flip the brew switch off.
- Wait for 5-8 seconds. During this time, the puck is absorbing the water in a low-pressure environment, allowing it to swell and settle.
- Flip the brew switch back on to engage the pump at full pressure and pull the remainder of your shot.
You may need to adjust the “on” and “off” timings based on your specific coffee and grind size, but this technique is a fantastic way to integrate pre-infusion into your workflow with minimal fuss.
Comparing techniques and finding your flow
Both manual methods will elevate your espresso beyond what a stock Gaggia can produce with a simple on/off approach. Neither is definitively “better;” the best one for you depends on your desired level of control and workflow preference. The steam wand method offers more granular, real-time control, allowing you to watch the saturation and react accordingly. The brew switch flicker is more about timing and repetition, making it faster and potentially more repeatable once you’ve dialed it in. Experimentation is key.
Here is a simple comparison to help you decide:
| Feature | Steam wand technique | Brew switch flicker |
|---|---|---|
| Control | High (manual valve control) | Medium (timing-based) |
| Feedback | Visual and auditory (watching drips, hearing pump) | Primarily based on timing |
| Complexity | More complex, requires coordination | Simpler, fewer steps |
| Best for | Users who enjoy tinkering and want maximum control. | Users who want a simple, fast, and repeatable workflow. |
Regardless of which method you choose, pay close attention to the results in the cup. Are your shots less bitter? More balanced? Are you seeing fewer signs of channeling in your puck after extraction? Use taste as your ultimate guide and don’t be afraid to adjust your timings by a few seconds to see how it impacts the final result. Mastering these techniques will bridge the gap between your home setup and a professional cafe machine.
Conclusion
You don’t need an expensive PID or a brand-new machine to achieve excellent pre-infusion and pull better espresso from your Gaggia. By leveraging the machine’s existing components, you can manually control pressure and saturation to eliminate channeling and unlock more nuanced flavors from your coffee. The steam wand technique offers a high degree of hands-on control, while the brew switch flicker provides a simpler, timing-based alternative. We encourage you to experiment with both methods to see which fits your workflow and preferences best. By integrating one of these simple pre-infusion techniques into your daily routine, you will gain a deeper understanding of espresso extraction and take a significant step forward in your journey as a home barista.

 No products in the cart.