Mastering temperature surfing on the Gaggia Classic for consistent shots
The Gaggia Classic is a legend in the world of home espresso, celebrated for its robust build and potential to produce café-quality shots. However, its single boiler and simple thermostat create a significant challenge: temperature instability. This fluctuation is often the hidden culprit behind shots that swing wildly from sour and under-extracted to bitter and burnt, even when your grind and puck prep are perfect. This is where the art of temperature surfing comes in. It is a manual technique that empowers you, the barista, to tame the Gaggia’s thermal quirks. By understanding and timing your machine’s heating cycle, you can move beyond guesswork and start pulling consistently delicious and repeatable shots of espresso every single time.
Understanding the Gaggia’s heating cycle
Before you can control the temperature, you need to understand why it’s so unruly. The heart of the Gaggia Classic is a small, single boiler responsible for heating water for both brewing and steaming. Its temperature is managed not by a precise computer, but by a simple bimetallic thermostat. Think of it like the thermostat in an old oven; it works within a wide range, not at a single, fixed point.
This thermostat creates a significant temperature “deadband.” For example, it might turn the heating element on when the water drops to 95°C (203°F) and turn it off once it reaches 105°C (221°F). This means the water temperature inside your boiler is constantly rising and falling in a wave-like pattern. The “ready” light on the front of the machine is your only clue. When the light is on, the boiler is actively heating. When the light is off, the boiler has reached the top of its range and is now passively cooling.
Pulling a shot randomly within this 10-degree Celsius swing is a recipe for inconsistency. Brewing when the water is too cool will result in a sour, acidic shot. Brewing when it’s too hot will create a bitter, scorched taste. Temperature surfing is the technique of intentionally starting your brew at the same point in this cycle every time, giving you control over this crucial variable.
The principles of temperature surfing
At its core, temperature surfing is about timing. It’s the process of using the ready light as a starting pistol to begin a countdown, allowing you to pull your shot at a more predictable and repeatable temperature. The goal isn’t necessarily to hit a perfect 93°C, but rather to hit the exact same temperature for every shot, removing it as a variable in your espresso-making process. Once you achieve consistency, you can then adjust your timing to “steer” the temperature up or down to better suit different coffee beans.
There are two primary approaches to surfing, both of which use the ready light as their anchor point:
- Surfing on the rise: This involves initiating a brew shortly after the heating element turns on (light comes on), catching the water temperature as it climbs.
- Surfing on the fall: This method involves waiting for the heating element to turn off (light goes off) and then brewing as the water temperature begins to descend from its peak.
Both methods are valid, but the key is to pick one, master it, and stick with it. You will need a timer (your phone’s stopwatch is perfect) to execute this technique accurately. This simple tool will transform your Gaggia Classic from an unpredictable machine into a precise instrument.
Step-by-step surfing techniques
Let’s get practical. Before you begin, ensure your machine is fully warmed up for at least 15-20 minutes with the portafilter locked in. This ensures all components are at a stable thermal mass. Here is a reliable and popular method for beginners:
The cooling flush method (brewing on the rise)
- Wait until the brew ready light turns off. This confirms the boiler is at its maximum temperature.
- Place a cup under the group head and turn on the brew switch for 3-5 seconds. You are “flushing” a small amount of overly hot water. This has a secondary effect: it introduces cooler water into the boiler, tricking the thermostat into kicking the heating element back on.
- The ready light will turn on. As soon as it does, start your timer.
- During this time, you can dry your portafilter, dose, tamp, and lock it in.
- At a predetermined time on your timer (start with 10 seconds), begin pulling your shot.
The 10-second wait is your starting point. If your shots taste sour, try waiting longer (e.g., 15 seconds) to brew at a higher temperature. If they taste bitter, try waiting for a shorter period (e.g., 5-7 seconds) to brew at a lower temperature. Document your times and taste the results. This is how you dial in your machine for a specific bean.
| Roast level | Suggested wait time (after light on) | Target temperature | Goal |
|---|---|---|---|
| Dark roast | 5 – 10 seconds | Lower | Reduces bitterness and highlights chocolatey notes. |
| Medium roast | 10 – 15 seconds | Medium | A balanced starting point for most beans. |
| Light roast | 15 – 25 seconds | Higher | Extracts delicate floral and fruity notes, tames acidity. |
Beyond surfing: the ultimate upgrade
Temperature surfing is the most effective free modification you can make to your Gaggia Classic workflow. It’s a true barista skill that teaches you to listen to and understand your machine. As you get more advanced, you can even use tricks like a quick “blip” of the steam switch to force the heating cycle to start on your command, giving you even more control.
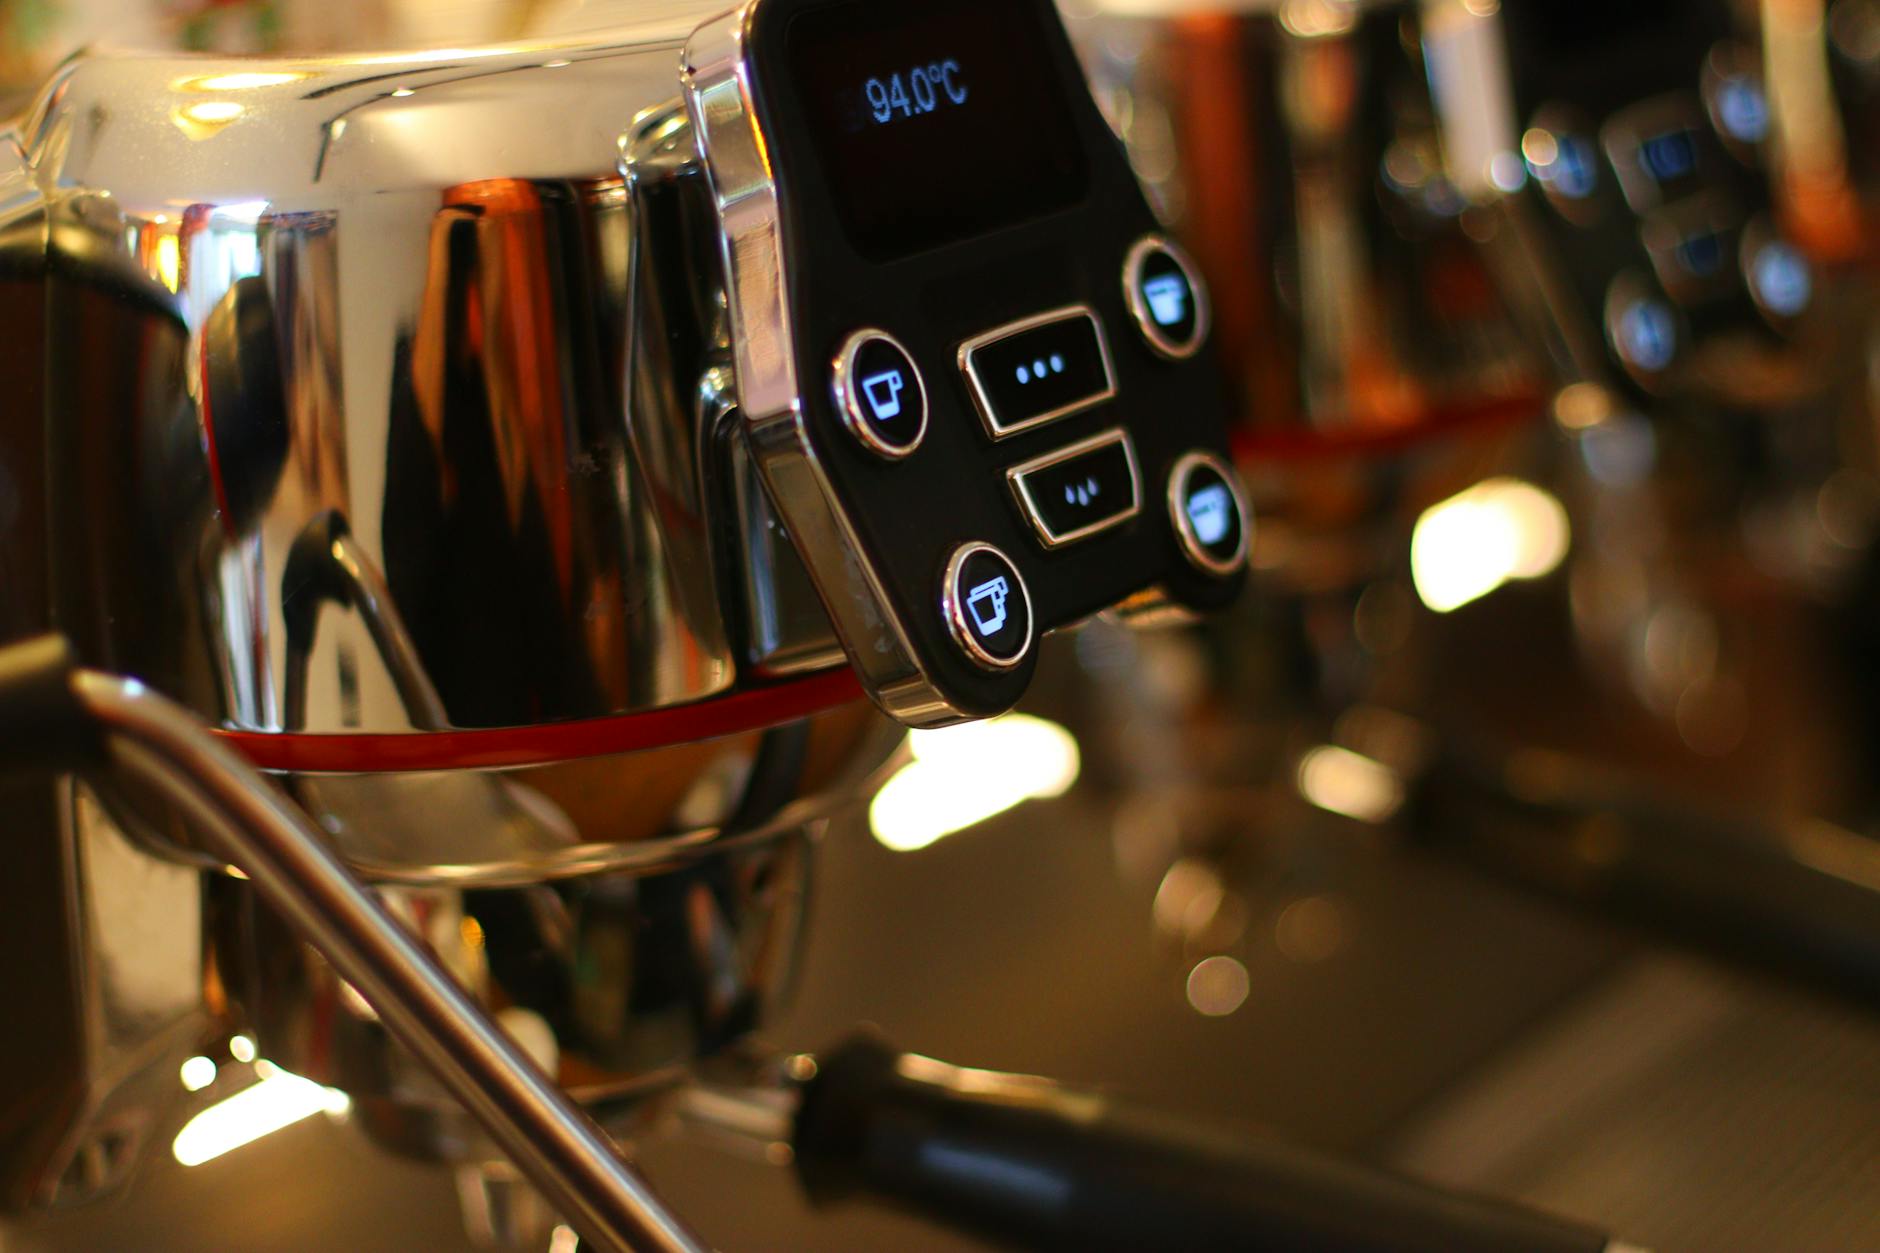
However, for those who want to eliminate temperature as a variable entirely, the ultimate upgrade is a PID (Proportional-Integral-Derivative) controller. A PID is a small digital thermostat that replaces the Gaggia’s rudimentary one. It uses an intelligent algorithm to pulse the heating element, keeping the boiler water stable within a single degree of your set temperature.
Installing a PID effectively ends the need for temperature surfing. You simply set your desired brew temperature (e.g., 94°C) and the machine holds it there with incredible precision. While it requires a bit of technical skill to install and an upfront cost, a PID transforms the Gaggia Classic into a machine that can rival others costing three times as much, providing unparalleled consistency and control.
Conclusion
The Gaggia Classic’s greatest weakness, its temperature instability, can be overcome with knowledge and technique. This guide has shown that the machine’s simple thermostat creates a wide temperature swing, which is the root cause of inconsistent espresso. By embracing the manual art of temperature surfing, you can take control of this variable. Using the ready light and a timer, you can consistently pull shots at a specific point in the heating cycle, tailoring the temperature to your coffee beans. This skill is a rite of passage for every Gaggia owner, elevating your home espresso from a game of chance to a repeatable craft. Mastering it will reward you with consistently fantastic coffee and a deeper connection to the brewing process.
 No products in the cart.