Installing a PID (Proportional-Integral-Derivative) controller on a Gaggia Classic is one of the most significant upgrades an enthusiast can make. It transforms the machine’s notorious temperature swings into a rock-solid, stable brewing environment. However, simply setting your PID to 93°C doesn’t guarantee your coffee is brewing at that temperature. There’s a crucial final step to achieving true precision: programming the brew temperature offset. The PID measures the temperature inside the boiler, but the water loses heat as it travels to the grouphead. This temperature difference, or “offset,” can be several degrees. This article will guide you through understanding, measuring, and programming this vital parameter, unlocking your Gaggia Classic’s full potential for consistently delicious espresso.
Why a temperature offset is crucial for your Gaggia Classic
At its core, a PID controller works by reading the temperature from a sensor (a thermocouple) placed on the boiler and cleverly switching the heating element on and off to maintain a set temperature. The problem is that we don’t brew coffee inside the boiler. The water has to travel from the boiler, through internal tubing, and finally arrive at the brass grouphead before it hits your coffee puck.
During this journey, a significant amount of heat is lost to the surrounding components and the air. The heavy brass grouphead, in particular, acts as a heat sink. This means if your PID is reading a perfectly stable 93°C at the boiler, the water hitting your coffee could be as low as 83-85°C. This discrepancy is the offset. Without accounting for it, you are flying blind. You might be aiming for a modern, light-roast extraction temperature but in reality, you’re brewing at a temperature that will lead to sour, underdeveloped shots. Programming the offset tells the PID to “aim higher” so that the final temperature at the grouphead is exactly what you want it to be.
How to measure your machine’s unique offset
Every Gaggia Classic is slightly different, so you can’t rely on a generic offset value found online. You need to measure your specific machine’s temperature drop. There are two primary methods to do this:
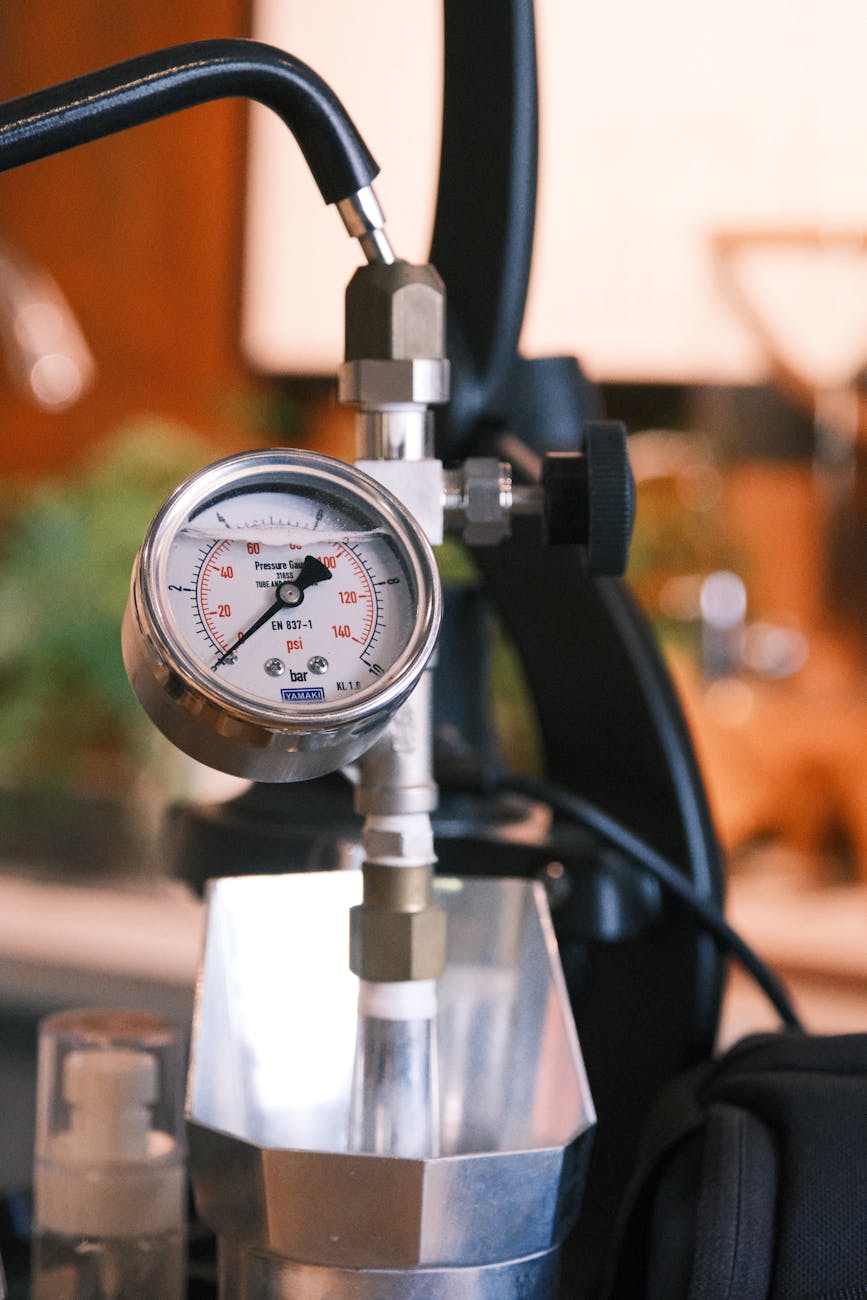
- The professional method: Using a Scace Thermofilter. This is a specialized device that replaces your portafilter and has a built-in, calibrated thermometer that measures the water temperature exactly as it would hit the coffee puck. This is the most accurate method but also the most expensive.
- The DIY method: Using a digital thermometer with a fast-reading thermocouple probe. You can build a simple device by drilling a hole in a spare portafilter basket or using a “bottomless” portafilter and a small styrofoam cup. The goal is to measure the temperature of the water as it exits the shower screen during a simulated shot.
To perform the measurement:
- Set your PID to a known value, for example, 100°C, and let the machine fully warm up for at least 30 minutes.
- Lock in your measuring device (Scace or DIY setup).
- Activate the brew switch and let the water run for about 25-30 seconds, just like a real shot.
- Carefully observe the temperature reading. It will likely fluctuate before settling on a stable value. Note this peak stable temperature.
- The difference between your PID’s set value (100°C) and the measured value at the group (e.g., 88°C) is your offset. In this example, the offset is 12°C.
It’s a good idea to repeat this process 3-4 times to ensure you have a consistent and reliable average.
Accessing and programming the offset on your PID
Once you have your magic number, it’s time to program it into the PID controller. The exact steps can vary slightly depending on the PID kit you have installed (e.g., Auber Instruments, Shades of Coffee), but the general principle is the same. Always refer to your specific PID’s manual first, but here is a typical workflow:
- Enter the programming menu: This usually involves pressing and holding a specific button (often labeled “SET” or “*”) for a few seconds until the display changes to show a parameter code.
- Navigate to the offset parameter: Use the up and down arrow keys to cycle through the various programming parameters. You are looking for a setting often labeled “Offset”, “oFS”, or sometimes “SC” (Sensor Correction).
- Input your value: Once you’ve found the offset parameter, press the “SET” button again to edit its value. Use the arrow keys to enter the offset you measured in the previous step (e.g., 12.0).
- Save and exit: Press and hold the “SET” button again until the display returns to the normal temperature reading. This saves your setting.
Now, your PID is calibrated. When you set it to your desired brew temperature of 93°C, the controller will automatically heat the boiler to 105°C (93°C + 12°C offset) to ensure that the water hitting your coffee is a perfect 93°C.
Putting it all together: Setting temperatures for different roasts
With a calibrated offset, you now have true control over your brew temperature. This allows you to tailor your extractions to the specific coffee you are using, as different roast levels have different ideal brewing temperatures. Lighter roasts generally require higher temperatures to properly extract their delicate and complex flavors, while darker roasts benefit from lower temperatures to avoid bitterness and over-extraction.
Here is a table with some excellent starting points. Remember to use these as a guide and adjust based on taste.
| Roast level | Target brew temperature at grouphead | Example PID setting (with a 12°C offset) |
|---|---|---|
| Light roast | 92°C – 95°C | Set PID to 104°C – 107°C |
| Medium roast | 90°C – 93°C | Set PID to 102°C – 105°C |
| Dark roast | 88°C – 91°C | Set PID to 100°C – 103°C |
By adjusting your PID setting, you are now directly controlling the real brew temperature. This level of precision is the key to unlocking nuanced flavors and achieving shot-to-shot consistency that rivals machines costing many times more.
In conclusion, programming the brew temperature offset is not just a minor tweak; it is the final, essential step in calibrating a PID-modified Gaggia Classic. It bridges the gap between what the controller measures in the boiler and what actually happens at the coffee puck. The process is straightforward: understand that water cools on its way to the group, measure this specific temperature drop with a suitable thermometer, and then program that value into your PID’s settings. By taking the time to do this, you elevate your machine from a powerful tool to a precision instrument. You gain the confidence that when you dial in a temperature for a specific coffee bean, you are delivering exactly that temperature, unlocking its full flavor potential with every single shot.

 No products in the cart.