The art of making Turkish coffee is a ritual steeped in tradition, where every step from grinding the beans to the slow, patient brewing process is critical. Yet, the final, often overlooked act of transferring the coffee from the cezve to the cup holds the key to perfection. This is where the magnificent crown of the coffee, the rich foam known as kaymak, is either preserved or destroyed. A Turkish coffee without its foam is considered incomplete, lacking the very essence of its character. This article delves into the advanced pouring techniques that separate the novice from the master, ensuring that every cup you serve is topped with a thick, velvety layer of foam, sealing in the intense aroma and flavor until the very first sip.
The sanctity of kaymak: Why foam is king
Before we can master the pour, we must first understand what we are trying to protect. The kaymak, or foam, is not merely a byproduct of brewing; it is the soul of the coffee. This dense, creamy layer is formed as the finely ground coffee, water, and sugar (if used) are gently heated in the cezve. As the temperature rises, dissolved gases are released from the coffee grounds, creating tiny bubbles that become trapped in the viscous liquid. The incredibly fine grind, almost like a powder, is essential for creating this stable and long-lasting foam.
But why is it so revered? The kaymak serves several crucial functions:
- Aroma seal: It acts as a lid, trapping the volatile aromatic compounds within the cup. The aroma is only fully released when you take your first sip, creating a powerful sensory experience.
- Temperature insulation: The foam helps keep the coffee underneath hotter for longer, allowing for a more leisurely and enjoyable drinking experience.
- Textural pleasure: The contrast between the light, airy foam and the dense, rich coffee beneath it is a defining characteristic of a well-made Turkish coffee. It provides a uniquely velvety mouthfeel.
In essence, the quality and thickness of the kaymak are direct indicators of a well-brewed coffee. It shows that the coffee was not boiled aggressively and was brewed with patience and care. Preserving it during the pour is the final tribute to this meticulous process.
Preparing for the perfect pour: The setup
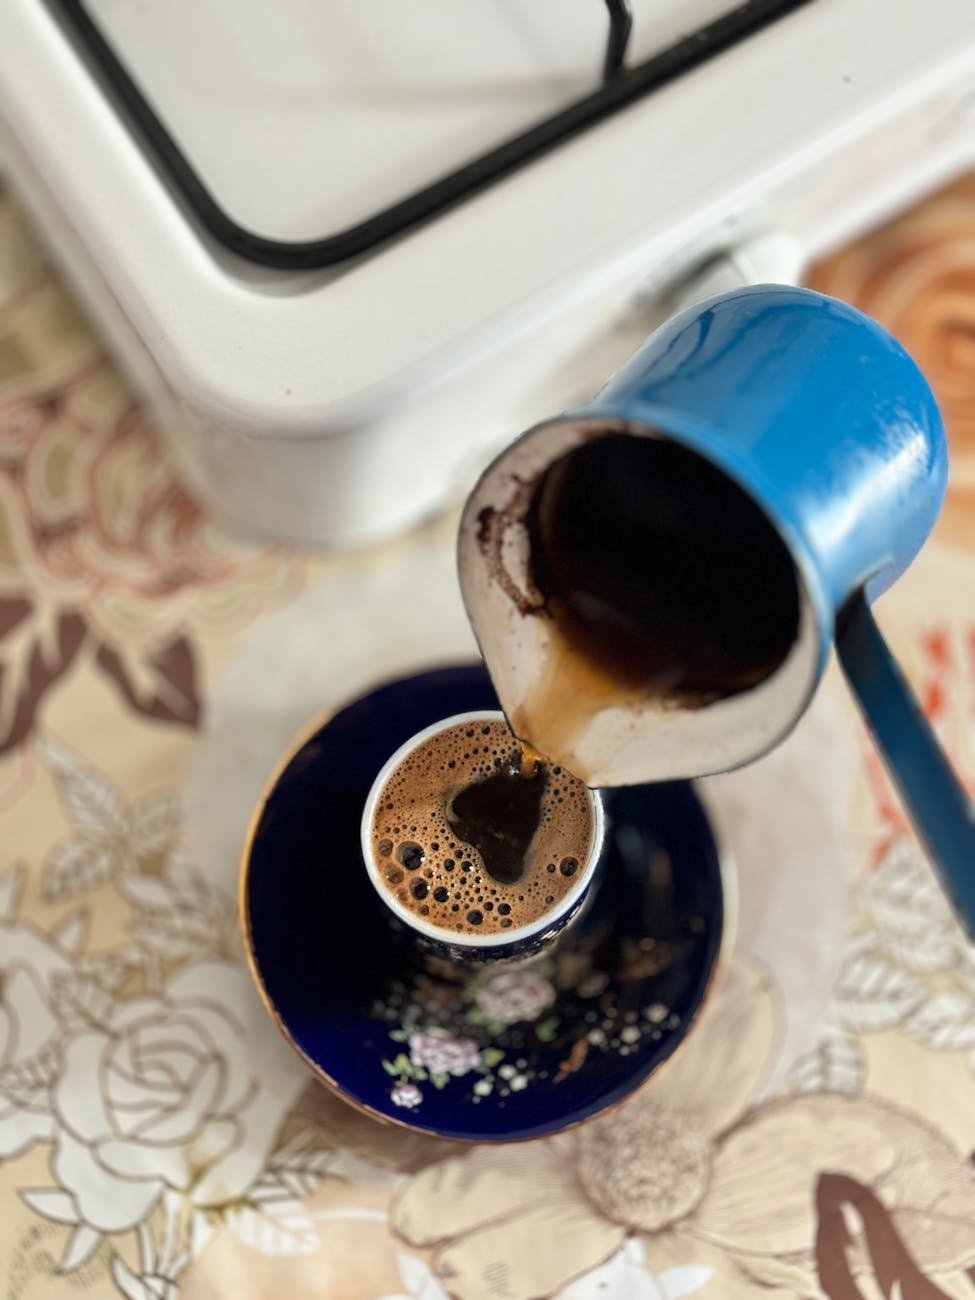
A successful pour begins before any liquid leaves the cezve. The moments immediately after you remove the coffee from the heat are just as critical as the brewing itself. Rushing this stage is the most common reason for a failed, foam-less cup. First, consider your tools. A traditional cezve, with its wide base and narrow neck, is designed specifically to encourage the formation of a rich foam. The narrow opening helps concentrate the foam at the top, making it easier to manage.
Once you lift the cezve from the heat source, just as the foam begins to rise, resist the urge to pour immediately. Instead, let it rest for about 20 to 30 seconds. This brief resting period is vital. It allows the foam to stabilize and become slightly more compact, making it less fragile. It also gives the coarsest of the coffee particles a moment to begin settling toward the bottom, ensuring a cleaner cup and preventing the grounds from disrupting the foam as you pour. While the coffee rests, use this time to ensure your demitasse cups are pre-warmed. Pouring hot coffee into a cold cup can cause a sudden temperature drop, which can shock the delicate foam and cause it to dissipate.
Mastering the pour: Techniques for foam preservation
With your coffee rested and your cups warmed, you are ready for the main event. The goal is to transfer the coffee while disturbing the kaymak as little as possible, allowing it to float serenely on top of the liquid. There isn’t just one way to do this; different situations may call for different techniques.
The tilt and slide method is perhaps the most common and effective technique for a single cup. Start by tilting the demitasse cup at a 45-degree angle. Bring the spout of the cezve very close to the inner lip of the cup and begin pouring in a slow, steady stream. The aim is to have the liquid run down the side of the cup and fill it from the bottom up. By doing this, the liquid coffee slides in underneath the layer of foam, gently lifting it to the top without breaking it. As the cup fills, gradually and smoothly bring it to an upright position.
When serving multiple guests, ensuring everyone gets an equal share of the precious foam is a mark of a great host. For this, the spoon-first method is invaluable. Before pouring any liquid, use a small teaspoon to carefully skim the thickest part of the foam from the top of the cezve and distribute it among the cups. Once each cup has its dollop of kaymak, you can proceed to pour the coffee using the tilt and slide method, filling each cup partway and then returning to top them all off to ensure a consistent strength and flavor for everyone.
Common pouring mistakes and how to avoid them
Even with the best intentions, a few common errors can ruin a perfect foam. Understanding these pitfalls is key to consistently achieving a beautiful cup. Pouring too quickly is the most frequent mistake. An aggressive, fast pour will cause turbulence in the cup, violently mixing the foam into the liquid and causing it to dissolve. The pour must always be gentle and controlled.
Another issue is pouring from too high. While a high pour looks dramatic, it will break the surface tension and destroy the delicate bubble structure of the kaymak. Always start with the spout of the cezve as close to the cup’s rim as possible. Finally, be mindful of the grounds. As you reach the end of the pour, avoid tilting the cezve too far. You want to leave the thick, muddy sediment at the bottom of the cezve, as pouring this “mud” into the cup will not only create a gritty texture but will also disrupt and sink your beautiful foam.
| Mistake | Why it ruins the foam | Solution |
|---|---|---|
| Pouring too fast | Creates turbulence that mixes and dissolves the foam. | Pour slowly and maintain a steady, gentle stream. |
| Pouring from too high | The impact of the liquid breaks the foam’s delicate structure. | Keep the cezve spout close to the lip of the cup. |
| Using cold cups | The temperature shock causes the foam bubbles to collapse. | Pre-warm your demitasse cups with hot water. |
| Pouring out the grounds | The heavy sediment sinks through the foam, breaking it apart. | Stop pouring before you reach the thick “mud” at the bottom of the cezve. |
Mastering the art of Turkish coffee is a journey of small, refined details, and the final pour is the culmination of all your effort. The rich, persistent kaymak is more than just bubbles; it is the seal of quality, the guardian of aroma, and the promise of a truly authentic experience. By understanding its importance, preparing properly with a brief rest and warm cups, and mastering controlled techniques like the tilt and slide, you can ensure this crown jewel is preserved. Remember that patience is the key ingredient from start to finish. A slow, mindful pour is the final, respectful step in this ancient coffee ritual, transforming a simple beverage into a moment of pure, flavorful pleasure. Practice these techniques, and you will unlock the secret to a perfect cup every time.


 No products in the cart.