A complete guide to finding the ideal basket dose for the Gaggia Classic portafilter
The Gaggia Classic is a legendary machine, celebrated for its ability to produce genuine, cafe-quality espresso at home. However, unlocking its full potential requires moving beyond guesswork. One of the most critical, yet often overlooked, variables is the dose: the precise amount of ground coffee you put into the portafilter basket. It’s not just about a heaping scoop; it’s a foundational step that influences every aspect of your shot, from flow rate to flavor. This guide is designed to demystify the process of finding the perfect dose for your Gaggia Classic. We will explore the different types of baskets, the crucial importance of headspace, and a step-by-step method to dial in that perfect dose for consistently delicious espresso.
Understanding your Gaggia Classic basket
Before you can determine your dose, you need to understand the tool you’re using. The Gaggia Classic uses a standard 58mm portafilter, but not all baskets are created equal. The stock baskets that come with the machine are often a starting point, but many enthusiasts quickly upgrade to enhance their espresso game.
There are two main types of baskets to consider:
- Pressurized baskets: These are often included with the Gaggia Classic and feature a double-walled design with a single exit hole. This design artificially creates pressure and crema, making it more forgiving for pre-ground coffee or inconsistent grinds. However, it masks the true quality of the shot and limits your ability to truly dial in.
- Non-pressurized (or single-wall) baskets: This is the standard for specialty coffee. These baskets have a simple mesh of holes at the bottom, meaning the pressure is generated entirely by the finely ground, properly tamped coffee puck. Using a non-pressurized basket gives you complete control and the potential for far superior espresso, but it demands a more precise technique.
Beyond this distinction, you’ll find baskets are rated for a certain capacity, like 15g, 18g, or 20g. It’s important to see this as a recommendation, not a strict rule. A basket’s true capacity is determined by its volume, which is directly related to the next crucial concept: headspace.
The crucial role of headspace
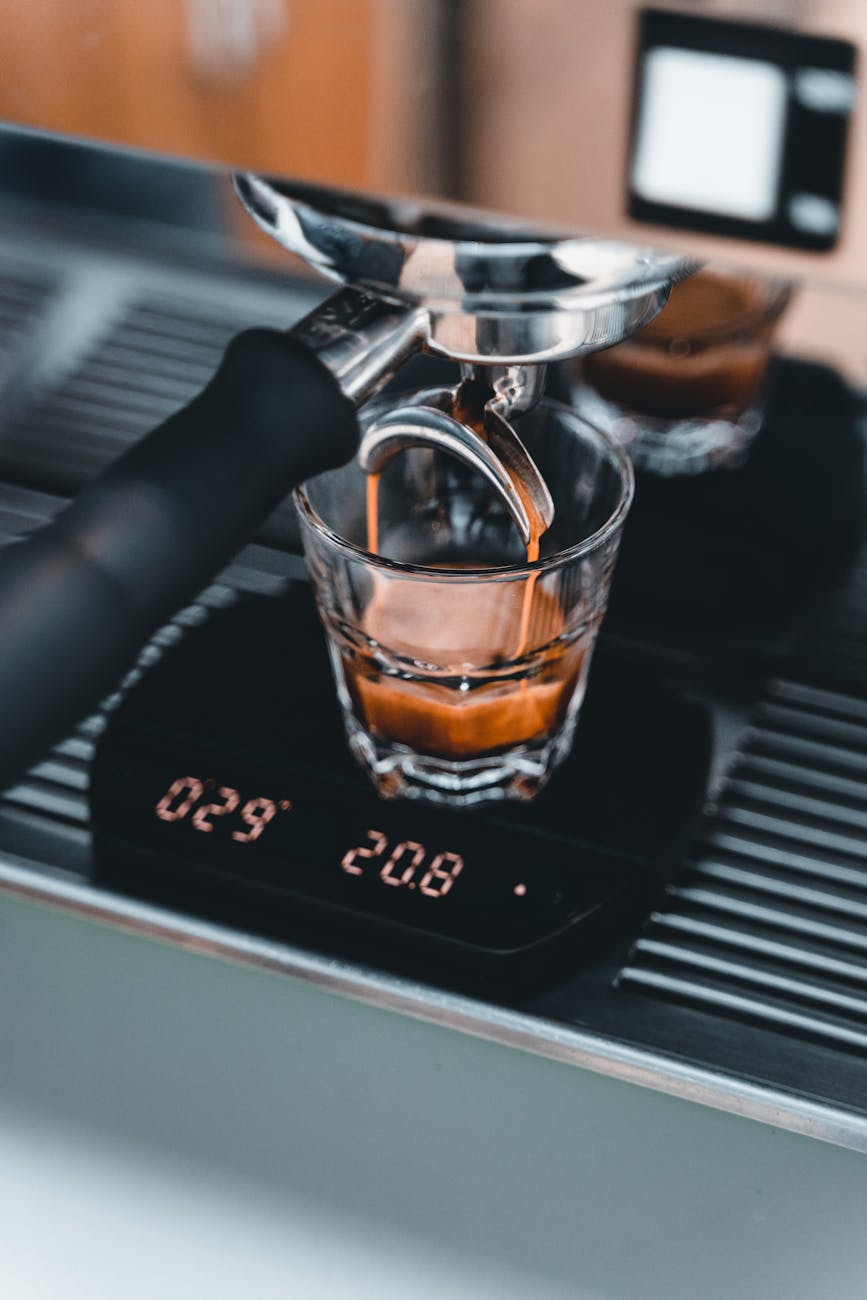
Headspace is the small gap between the top of your tamped coffee puck and the bottom of the shower screen on the Gaggia’s group head. This tiny space is absolutely vital for a good extraction. When you start the pump, this space fills with water, allowing the puck to be pre-infused gently and evenly before the full nine bars of pressure are applied.
Getting the headspace right prevents two common problems:
- Too little headspace: If you overdose the basket, the dry coffee puck will press directly against the shower screen. When water is introduced, the puck expands and is immediately fractured by the screen, leading to severe channeling. Water will rush through these cracks, resulting in a fast, watery, and bitter shot. Your puck will also be a soupy mess afterward.
- Too much headspace: If you underdose, there’s a large void for water to fill. This can cause the water to agitate the surface of the puck before it’s fully saturated, again leading to uneven extraction and potentially sour, weak shots.
A simple and effective way to check your headspace is the “nickel test.” After dosing and tamping your coffee, place a small coin like a nickel flat on the center of the puck. Carefully lock the portafilter into the group head and then immediately remove it. If the nickel has left an imprint on the coffee, your dose is too high. If it’s clean, you have adequate headspace.
A step-by-step guide to finding your dose
Now that you understand the “why,” let’s walk through the “how.” This process aims to establish your dose as a fixed variable, allowing you to use grind size as your primary tool for dialing in.
You will need a digital scale accurate to 0.1g, your Gaggia Classic, a tamper, and fresh coffee beans.
- Choose a starting point: Begin with the manufacturer’s recommended dose for your non-pressurized basket. For an 18g basket, weigh out exactly 18.0g of beans.
- Prepare your puck: Grind the beans and distribute them evenly in the portafilter. Using a Weiss Distribution Technique (WDT) tool can significantly improve consistency. Tamp the grounds so they are level and compact.
- Check your headspace: Perform the nickel test described above. If there is an indentation, your dose is too high. Reduce it by 0.5g (e.g., to 17.5g) and try again. If there is no indentation, you have found your maximum dose for this specific coffee. This is your dose.
- Lock in your dose: Once you’ve found the dose that allows for proper headspace, this becomes your constant. For the rest of your dialing-in process with these beans, you will always use this exact weight.
- Pull a shot and adjust the grind: Now, pull a shot aiming for a classic 1:2 ratio (e.g., 17.5g of coffee in should yield about 35g of liquid espresso). Time the shot. If it runs too fast (under 25 seconds), your grind is too coarse. If it chokes the machine or runs too slow (over 35 seconds), your grind is too fine. Adjust only the grind size, keeping your dose constant, until you hit that sweet spot of 25-35 seconds.
By fixing your dose first based on headspace, you simplify the dialing-in process immensely. You’ve eliminated one major variable, making it much easier to pinpoint the perfect grind size for optimal flavor.
How different coffees affect your dose
You may have noticed we’ve specified “for this specific coffee.” That’s because not all coffee beans are the same. The roast level dramatically affects the beans’ density and, therefore, the volume they occupy when ground. This means your ideal dose will likely change when you switch from a dark roast to a light roast.
Here’s a general guide:
- Dark roasts: These beans are roasted longer, making them less dense, more brittle, and more porous. For the same weight, they take up more volume. You will likely need to dose slightly lower than the basket’s rating (e.g., 17g in an 18g basket) to maintain proper headspace.
- Light roasts: These beans are much denser and less porous. They take up less volume for the same weight. You can often dose at or even slightly above the basket’s rating (e.g., 18.5g or 19g in an 18g basket) without touching the shower screen.
This relationship is crucial for consistency when switching beans. Always re-run the nickel test when you open a new bag of coffee to find your new baseline dose before you start adjusting your grinder.
| Coffee roast level | Relative density | Volume (for same weight) | Typical dose adjustment |
|---|---|---|---|
| Light roast | High | Lower | Dose at or slightly above basket rating (+0.5g to 1g) |
| Medium roast | Medium | Medium | Start with the basket’s rated capacity |
| Dark roast | Low | Higher | Dose slightly below basket rating (-0.5g to 1g) |
Conclusion
Finding the ideal dose for your Gaggia Classic portafilter is not a dark art; it’s a methodical process that pays huge dividends in shot quality and consistency. By understanding your equipment and the fundamental importance of headspace, you can move beyond random scooping and take control of your espresso. Remember the core workflow: select a coffee, use the nickel test to find the maximum dose that fits, and lock in that dose. From there, all your adjustments for taste and flow should come from changing the grind size. This approach transforms a frustrating guessing game into a repeatable science. Mastering your dose is the single most important step you can take to elevate your home barista skills and pull consistently amazing shots from your Gaggia Classic.


 No products in the cart.