
The Gaggia Classic is a legendary entry-point into the world of home espresso. For decades, it has offered aspiring baristas a robust platform to pull genuine, cafe-quality shots. However, its simple design, specifically its single boiler and basic thermostat, presents a significant challenge: temperature instability. The temperature inside the boiler can swing dramatically, leading to inconsistent shots that can taste sour one moment and bitter the next. This is where the art of temperature surfing comes in. This manual technique allows you to gain control over your machine’s heating cycle, ensuring you start your brew at a consistent and appropriate temperature every single time. This article will be your comprehensive guide to mastering this essential skill for your Gaggia Classic.
Understanding the Gaggia Classic’s thermostat and brew cycle
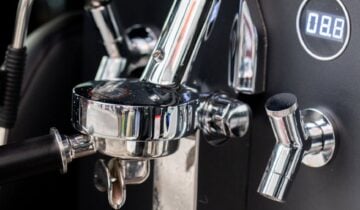
Before you can control the temperature, you need to understand why it’s so wild in the first place. The Gaggia Classic is a single boiler dual use (SBDU) machine. This means it uses one small boiler to heat water for both brewing espresso (around 93°C or 200°F) and creating steam for frothing milk (around 140°C or 285°F). To manage this, it relies on simple bimetallic thermostats, not a sophisticated PID controller found in more expensive machines.
This thermostat operates within a range, often called a “deadband”. It doesn’t keep the water at an exact temperature. Instead, it works like this:
- The heating element turns on, heating the water in the boiler. On the front of the machine, the brew-ready light is on during this phase.
- Once the water reaches the top of the temperature range (e.g., 105°C), the thermostat clicks and turns the heating element off. The brew-ready light also turns off.
- The boiler then begins to cool down naturally.
- When the water temperature drops to the bottom of the range (e.g., 95°C), the thermostat clicks again, and the cycle repeats.
This cycle creates a temperature swing of 10°C or more. If you pull a shot randomly, you could be brewing anywhere within that range, which is the difference between a perfectly balanced shot and a sink shot. The goal of temperature surfing is to start your brew at the same point in this predictable cycle, every time.
The core technique of temperature surfing
Temperature surfing is the act of intentionally manipulating the machine’s heating cycle to start brewing at a consistent temperature. Instead of leaving it to chance, you force the machine into a known state and begin your extraction from that reliable starting point. The most common and repeatable method involves “surfing down” from the peak temperature.
The logic is simple: the peak of the heating cycle, right when the brew light turns off, is the most consistent and identifiable point. The boiler will always reach this same maximum temperature before the heater shuts off. From this peak, the temperature will fall in a relatively predictable way. By waiting a specific amount of time after the light turns off, you can consistently hit a target temperature on the way down.
To do this, you’ll use a technique called purging or flushing. This involves running hot water through the group head to cool the boiler down intentionally. This forces the thermostat to engage the heating element, starting a fresh heating cycle that you can then track and time.
A step-by-step guide to a reliable surfing routine
Consistency in espresso is all about routine. Follow these steps precisely for every shot, and you’ll eliminate temperature as a variable. Make sure your machine has been warming up for at least 20 minutes with the portafilter locked in for best results.
- Prepare your shot. Grind and tamp your coffee into your portafilter, but don’t lock it in just yet. Have your cup and scale ready.
- Start the purge. Place a waste container under the group head and turn on the brew switch. Let the water run until the brew-ready light on the front panel turns on. This indicates the water has cooled enough to trigger the heating element. Immediately turn the brew switch off.
- Wait for the peak. Now, watch that light. The boiler is heating up. The moment the brew-ready light turns off, the boiler has reached its maximum temperature. Immediately start a timer.
- Lock and pull. This is the “surfing” part. During your timed wait, quickly and carefully lock your prepared portafilter into the group head and place your cup and scale underneath.
- Start brewing. At your predetermined time (e.g., after 10 seconds), turn on the brew switch to begin your extraction.
By always starting the brew a fixed number of seconds after the light turns off, you ensure that the water hitting your coffee puck is at a remarkably consistent temperature from shot to shot.
Fine-tuning your timing for different coffees
Now that you have a consistent routine, you can use it to dial in the perfect temperature for different types of coffee beans. Different roast levels extract best at different temperatures. By simply adjusting the length of time you wait after the brew light turns off, you can effectively change your brew temperature.
A shorter wait means a hotter brew, while a longer wait results in a cooler brew. This is a powerful tool for optimizing flavor.
Here are some excellent starting points for your experiments:
| Roast level | Recommended wait time (after light turns off) | Flavor goal |
|---|---|---|
| Light roast | 3-6 seconds | Use higher heat to properly extract bright, fruity, and floral notes and avoid sourness. |
| Medium roast | 8-12 seconds | A balanced starting point that works well for chocolatey, nutty, and caramel notes. |
| Dark roast | 15-20 seconds | Use cooler water to prevent over-extraction, which tames bitterness and highlights deep, roasty flavors. |
Remember, these are just starting points. Let your taste buds be the ultimate guide. If your light roast tastes sour, try a shorter wait time (hotter). If your dark roast is too bitter, try a longer wait time (cooler). Taking notes on your timings and results will quickly help you master your machine.
In conclusion, the Gaggia Classic’s lack of a PID doesn’t have to mean a lack of control. While its simple thermostat creates a wide temperature swing, this fluctuation is predictable and, therefore, manageable. By understanding the machine’s heating cycle, you can implement the technique of temperature surfing to gain impressive consistency. The core routine of purging to initiate a heating cycle, then starting a timer the moment the brew light turns off, gives you a reliable reference point for every shot. Adjusting this timed wait allows you to effectively steer your brew temperature to suit different coffee roasts, unlocking the full potential of your beans. Mastering this skill is a true game-changer, elevating your Gaggia Classic from a simple appliance to a formidable espresso-making tool.

 No products in the cart.