The allure of manual espresso is the control it offers, but this control can often lead to frustration. Why was yesterday’s shot a perfect, syrupy god shot, while today’s is a sour, gushing mess? The answer rarely lies in the machine or the beans alone, but in the small, inconsistent steps of our preparation. Achieving delicious, repeatable espresso at home isn’t about luck; it’s about developing a methodical and precise routine. This article will guide you through building a repeatable workflow, transforming your espresso-making from a game of chance into a predictable and rewarding daily ritual. We will break down the process into manageable stages, from establishing your variables to the critical art of puck preparation and dialing in your shot.
Establishing your foundation: tools and variables
Before you can create a repeatable process, you must first understand and control the elements involved. Consistency starts not with the espresso machine, but with the tools and parameters you set beforehand. Think of this as laying the foundation for a house; without a solid, level base, everything built on top will be unstable. Your primary tools for consistency are a digital scale with 0.1-gram accuracy and a quality burr grinder. A scale is non-negotiable, as it allows you to precisely measure your dose (the amount of dry coffee grounds) and your yield (the weight of the liquid espresso in the cup).
These two measurements, along with time, form the core of any espresso recipe. A typical starting point for a recipe might look like this:
- Dose: 18 grams of coffee
- Yield: 36 grams of liquid espresso
- Time: 25-30 seconds
This 1:2 ratio (18g in, 36g out) is a classic starting point, but it’s just that—a start. By defining these three variables, you create a target. Your entire routine will now be focused on hitting this target consistently. Every other action you take, from grinding to tamping, is in service of making these numbers repeatable, which in turn makes the taste in the cup repeatable.
The pre-shot ritual: meticulous puck preparation
With your recipe defined, the most critical phase for shot-to-shot consistency begins: puck preparation. This is where the majority of espresso issues, like channeling (when water finds a path of least resistance and bypasses the coffee), originate. A flawed puck will ruin a shot before you even press the brew button.
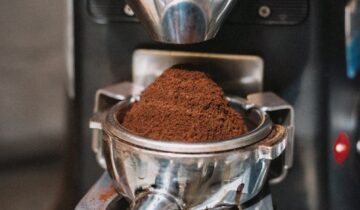
Your puck prep routine should have three distinct steps. First is dosing and distribution. After grinding your precisely weighed beans into the portafilter, the grounds will be clumpy and unevenly piled. Your goal is to create a homogenous, fluffy, and level bed of coffee. The most effective method for this is the Weiss Distribution Technique (WDT), which involves using a tool with very fine needles to stir the grounds and break up clumps. This simple act dramatically improves water’s ability to flow evenly through the entire puck.
Second is tamping. The objective of tamping is not to press as hard as you can, but to compact the grounds into a level and uniformly dense puck. The key word is level. An uneven tamp will encourage water to flow faster on the lower side, leading to an unbalanced extraction. Focus on a consistent pressure and ensuring your tamper is perfectly parallel to the portafilter rim. Third, perform your final checks: wipe any loose grounds from the rim of the portafilter to ensure a tight seal with the group head, and briefly purge water from the group head to stabilize the temperature before locking in.
Pulling the shot and the art of dialing in
Your meticulous preparation is complete. Now it’s time to execute the shot and, more importantly, analyze the result. Place your cup on the scale, tare it to zero, and start your timer the moment you engage the pump. Your focus is singular: stop the shot when the scale reads your target yield (e.g., 36 grams). Now, look at the time. Did it fall within your target window of 25-30 seconds? This is the moment of truth that informs your next move in the “dialing in” process.
Dialing in is the systematic adjustment of one variable to hit your recipe targets. The primary variable you will change is the grind size.
- If your 36g shot took only 20 seconds (too fast), the taste will likely be sour and under-extracted. The water flowed through the puck too easily. To fix this, you need to make your grind size finer. This creates more surface area and a more compact puck, increasing resistance and slowing down the flow of water.
- If your 36g shot took 40 seconds (too slow), the taste will probably be bitter and over-extracted. The water struggled to get through the puck. To fix this, you need to make your grind size coarser. This reduces resistance and allows the water to flow more freely.
The golden rule of dialing in is to only change one variable at a time. If you change both the grind size and the dose, you will have no idea which adjustment affected the outcome. By isolating the grind size, you create a clear cause-and-effect relationship, allowing you to methodically zero in on the perfect extraction.
Logging and refining your routine
You’ve finally pulled a shot that hits your targets: 18g in, 36g out, in 28 seconds, and it tastes delicious. How do you ensure you can repeat this success tomorrow, or with a new bag of coffee? The answer is to log your data. A simple notebook or a spreadsheet is one of the most powerful tools in your espresso arsenal. Recording your parameters turns guesswork into a data-driven process and accelerates your learning curve immensely.
Your logbook creates a historical record of what works. When you start a new bag of beans, you can refer to your notes from a similar coffee to find a much closer starting point for your grind setting. It allows you to see patterns and understand how aging coffee requires you to grind slightly finer over time. This practice elevates your routine from a series of repeated actions to a system of continuous improvement, ensuring that every great shot is not a happy accident, but a predictable result.
Example Espresso Log:
| Date | Coffee | Grind Setting | Dose (g) | Yield (g) | Time (s) | Taste Notes |
|---|---|---|---|---|---|---|
| Oct 26 | Ethiopia Yirgacheffe | 8.5 | 18.0 | 37.1 | 22 | Fast, a bit sour. Grind finer. |
| Oct 27 | Ethiopia Yirgacheffe | 8.0 | 18.0 | 36.5 | 29 | Balanced, sweet, berry notes. Perfect. |
Ultimately, achieving consistency with manual espresso is the result of discipline, not magic. It stems from a deliberate workflow that controls for variables and prioritizes precision at every step. By starting with a defined recipe of dose, yield, and time, you create a clear target. You then build a meticulous puck preparation routine—focused on distribution and a level tamp—to ensure an even extraction. When the results don’t match your target, you make small, singular adjustments to your grind size. Finally, by logging your data, you create a feedback loop that empowers you to replicate success and learn from every shot. This routine transforms the espresso-making process from one of frustrating unpredictability into a deeply satisfying and consistently delicious ritual.
 No products in the cart.