Troubleshooting your Profitec Go: Why the pressure gauge won’t hit 9 bar
You’ve invested in a fantastic machine, the Profitec Go, known for its precision and quality. You’re ready to pull the perfect espresso shot, but you notice something puzzling: the brew pressure gauge stubbornly refuses to climb to that magic 9-bar mark. It’s a common concern that can cause a lot of frustration, leading many to believe their new machine is faulty. However, more often than not, the reason is less about a defect and more about the physics of espresso extraction. This article will demystify what your pressure gauge is telling you, exploring the roles of the over-pressure valve (OPV), the critical difference between static and dynamic pressure, and how your own puck preparation is the final piece of the puzzle.
The over-pressure valve (OPV) explained
At the heart of your machine’s pressure regulation is a component called the Over-Pressure Valve, or OPV. Its primary job is to act as a gatekeeper, setting the maximum pressure the system can reach. When the pressure from the vibratory pump exceeds the level the OPV is set to, the valve opens and diverts excess water back to the reservoir, preventing the pressure from climbing any higher. This is crucial for protecting the pump and, more importantly, for ensuring shot-to-shot consistency.
The Profitec Go is equipped with an adjustable OPV. While often set at the factory to around 9 or 10 bar, this setting can vary slightly from machine to machine. So, the first thing to understand is that your machine is working against a pre-defined limit. If the OPV is set to 9.5 bar, the needle will never go past that point, no matter how finely you grind your coffee. This is the absolute ceiling for your machine’s pressure as it is currently configured.
Static vs. dynamic pressure: a common misunderstanding
This is perhaps the most critical concept to grasp when diagnosing pressure issues. The pressure reading on your gauge changes depending on whether water is flowing through coffee or hitting a dead end. This leads to two different types of pressure readings:
- Static Pressure: This is the pressure measured when there is no flow. You can test this by using a blind basket (a portafilter basket with no holes). When you run the pump with the blind basket locked in, the water has nowhere to go. The pressure will quickly build until it hits the maximum limit set by the OPV. This test tells you exactly what your OPV is set to. If it reads 9.5 bar with a blind basket, that is your machine’s maximum pressure.
- Dynamic Pressure: This is the pressure measured during an actual extraction, when water is flowing through your coffee puck. Because there is flow, the pressure reading will almost always be lower than the static pressure. The amount of resistance your coffee puck provides determines how close the dynamic pressure gets to the static limit.
Many new users see 8 or 8.5 bar during a shot and assume something is wrong, when in fact their OPV might be perfectly set to 9 bar. The coffee puck simply isn’t providing enough resistance to push the pressure all the way to that limit.
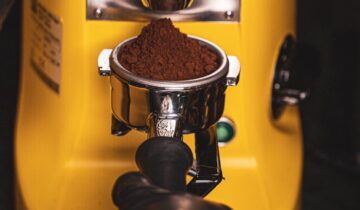
How your grind and tamp affect brew pressure
Following on from the concept of dynamic pressure, the coffee puck itself becomes the most significant variable you control. The pressure you see on the gauge during a shot is a direct result of the resistance the puck provides against the water being forced through it by the pump. If that resistance is low, the water will flow through easily, and the pressure will never build to its maximum potential.
The most common culprit for low brew pressure is a grind that is too coarse. When coffee grounds are too large, there are bigger gaps between them, creating an easy path for the water. The result is a fast-flowing, under-extracted shot (often called a “gusher”) and a low reading on the pressure gauge. The solution is simple: grind finer. By reducing the particle size, you create a more compact and dense puck, increasing resistance and forcing the pressure to build higher to push the water through. This is a fundamental part of “dialing in” your espresso. Tamping pressure and distribution are also factors, but grind size has the most significant impact.
A step-by-step troubleshooting guide
If your gauge isn’t reading 9 bar, don’t panic. Follow these logical steps to diagnose the issue. The key is to first test the machine in isolation and then look at your technique.
- Test the static pressure. Insert your blind basket into the portafilter and run the pump for about 10 seconds. Watch the gauge. This reading is your true OPV setting. If it’s in the 9-10 bar range, your machine is performing perfectly.
- If static pressure is correct, evaluate your shot. If the machine shows 9.5 bar with the blind basket but only 8 bar during extraction, the issue lies with your coffee puck. Is your shot flowing too fast? A good target is a 1:2 ratio (e.g., 18g of coffee in, 36g of liquid out) in about 25-30 seconds. If your shot is much faster, your grind is too coarse.
- Adjust your grind. Make a small adjustment to your grinder to produce a finer coffee ground. This is the most likely solution. Repeat until your shot time is in the target range, and you will see the dynamic pressure on the gauge rise accordingly.
- Consider OPV adjustment (advanced). If your blind basket test reveals a low static pressure (e.g., 7.5 bar), you may choose to adjust the OPV. This is an internal adjustment, so please consult your user manual or a qualified technician if you are not comfortable performing this yourself.
This table summarizes the process:
| Symptom | Test to Perform | Likely Cause | Solution |
|---|---|---|---|
| Gauge reads 8 bar during shot, but shot is very fast (<20 sec). | Run a shot with coffee. | Grind is too coarse. The puck isn’t providing enough resistance. | Grind finer. Make small adjustments until the shot time is 25-30 seconds. |
| Gauge never goes above 8 bar, even with a very fine grind that chokes the machine. | Use a blind basket to test static pressure. | The OPV is likely set to 8 bar from the factory. | The machine is working as intended. You can adjust the OPV if you want a higher maximum pressure. |
| Pressure seems fine, but the shot tastes sour or bitter. | Taste the espresso. | Dialing in is needed. Pressure is just one variable. | Adjust grind, dose, and ratio to perfect the taste. Don’t chase a number on the gauge. |
In conclusion, seeing a pressure gauge on your Profitec Go that doesn’t reach 9 bar during a shot is rarely a sign of a broken machine. It’s an invitation to better understand the beautiful science of espresso. By grasping the difference between the static pressure set by your OPV and the dynamic pressure created by your coffee puck, you can diagnose issues with confidence. The first and most important step is to use a blind basket to confirm your machine’s maximum pressure setting. If that checks out, the solution almost always lies in your grinder. By learning to “grind finer” and dial in your shot, you’re not just fixing a number on a gauge; you’re taking control of your extraction and moving one step closer to espresso perfection.
 No products in the cart.