
Mastering your Flair: A guide to managing heat loss for perfect espresso
The Flair espresso maker has captivated home baristas with its promise of purely manual, high-quality espresso. Its elegant design and direct feedback loop offer an unparalleled connection to the extraction process. However, this manual nature presents a unique challenge: thermal management. Unlike machines with active heating elements, the Flair’s metal components, particularly the brew chamber, act as a heat sink, rapidly pulling temperature from your brew water. This heat loss can lead to sour, under-extracted shots, masking the true potential of your coffee beans. This guide will delve into the essential techniques and advanced strategies needed to conquer heat loss, ensuring you can consistently pull rich, balanced, and delicious shots from your Flair.
Understanding the thermal challenge in Flair espresso
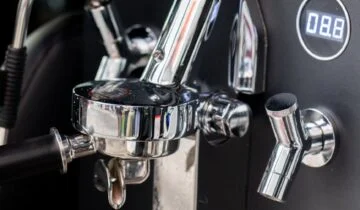
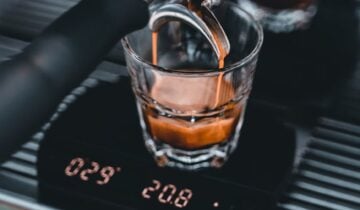
At the heart of the Flair’s heat loss issue is a simple concept in physics: thermal mass. The stainless steel brew chamber, while durable and food-safe, is a significant piece of metal that starts at room temperature. When you introduce boiling water, a battle for thermal equilibrium begins. The metal immediately starts absorbing heat from the water, causing the water’s temperature to plummet before it even touches the coffee grounds. An ideal espresso extraction requires water to be within a very specific temperature range, typically between 90-96°C (195-205°F), throughout the entire shot.
If the brew water temperature drops too low, it won’t have enough energy to properly dissolve the desirable flavor compounds in the coffee. This results in:
- Sourness: The acids in coffee are extracted first. Without sufficient heat to extract the sugars and deeper flavors that provide balance, the shot will be overwhelmingly acidic.
- A thin body: Proper extraction dissolves oils and solids that give espresso its characteristic syrupy texture. Cold water fails to do this effectively, leading to a watery, weak shot.
- Lack of complexity: The nuanced floral, fruity, or chocolatey notes in your beans will remain locked away, resulting in a one-dimensional and uninteresting flavor.
Mastering heat management is not just a technical exercise; it is the fundamental step to unlocking the full flavor potential of your coffee with a Flair.
Essential preheating techniques for the brew chamber
The non-negotiable first step in managing heat loss is aggressively preheating the brew chamber. Simply running hot tap water over it is insufficient. You need to bring the metal as close to your target brewing temperature as possible before you even begin. This ensures that the water you add for brewing stays hot. There are several effective methods, each with its own advantages.
The steam method: This is often considered the most effective technique. Place the brew chamber on top of the spout of a gooseneck kettle as it comes to a boil. The continuous flow of steam will heat the metal intensely and evenly from the inside out. Let it steam for at least 30-60 seconds after the kettle boils. Be sure to use an oven mitt or a thick towel to handle the extremely hot chamber afterwards.
The submersion method: A simpler alternative is to fully submerge the brew chamber and the piston in a cup or bowl of boiling water. Let them sit for at least a minute to absorb as much heat as possible. While easier than the steam method, it can be slightly less efficient, and you’ll need to dry the components quickly before use, which can introduce a small amount of cooling.
The pour-over method: This involves placing the brew chamber on a cup and slowly pouring boiling water through it multiple times. While better than nothing, this is generally the least effective method as the water passes through too quickly to transfer a significant amount of heat. It’s a viable option if you are in a hurry, but for best results, steaming or submersion is recommended.
Advanced strategies for temperature stability
Once you have a solid preheating routine, you can incorporate more advanced strategies to maintain that temperature throughout the brewing process. The goal is to minimize every potential point of heat loss from the moment the water leaves the kettle to the final drops of espresso in your cup. It’s a game of seconds and degrees, and optimizing your workflow is key.
First, consider your water temperature. Always start with water that is a few degrees hotter than your target brew temperature. If you want to brew at 93°C, bring your kettle to a full boil (100°C) and use it immediately. This extra thermal energy acts as a buffer, compensating for the slight temperature drop that will inevitably occur when you pour the water into the preheated chamber. Second, speed is your ally. Have your coffee ground, dosed, and tamped in the portafilter before you preheat the brew chamber. This minimizes the time the hot chamber is exposed to the air, cooling down while you prepare your puck.
Finally, don’t forget the other components. The portafilter and even your espresso cup should be preheated by rinsing or filling them with hot water. A cold portafilter base and a cold cup are two final opportunities for your perfectly extracted espresso to lose its precious heat. Using a temperature strip on the side of your brew chamber can also provide valuable visual feedback, helping you confirm your preheating routine is consistent.
Tailoring your approach to different roasts
Not all coffees are created equal, and your heat management strategy should adapt to the type of beans you are using. The roast level of your coffee has a significant impact on how easily its flavors can be extracted, which directly relates to the ideal brewing temperature.
Light roasts are the most demanding. These beans are denser and less soluble, requiring more thermal energy to unlock their delicate and often acidic, floral, or fruity notes. For these coffees, you must be meticulous with your preheating. Use the steam method, start with water right off the boil, and work quickly. Failing to achieve a high enough brew temperature will almost certainly result in a disappointingly sour shot.
Dark roasts, on the other hand, are more porous and soluble due to the longer roasting process. They are much more forgiving with temperature and can even become bitter and ashy if brewed too hot. While you still need to preheat to avoid under-extraction, you have more leeway. You might start with water at 92°C instead of a full boil. This adaptability is crucial for getting the best taste from every bean.
| Roast level | Recommended starting water temp | Preheating intensity | Common flavor impact |
|---|---|---|---|
| Light roast | 98-100°C (208-212°F) | High (Steam method is ideal) | Crucial for extracting delicate floral/fruity notes and avoiding sourness. |
| Medium roast | 93-96°C (199-205°F) | Medium-High (Submersion or steam) | Balances sweetness and acidity; good preheating ensures a well-rounded shot. |
| Dark roast | 90-93°C (194-199°F) | Medium (Submersion is sufficient) | Prevents over-extraction which can cause excessive bitterness and ashy flavors. |
Conclusion
Effectively managing heat loss is the single most important skill to master for consistently excellent Flair espresso. It transforms the machine from a source of potential frustration into a tool for incredible control. By understanding the core thermal challenges and implementing a rigorous preheating protocol, you take charge of the most critical variable in your extraction. Remember to use effective methods like steaming or submersion, work with an efficient workflow, and adjust your water temperature based on the roast level of your coffee. While it may seem like a lot of effort initially, these steps quickly become a simple and rewarding routine, paving the way for shot after shot of cafe-quality espresso in your own home.
 No products in the cart.