
How to pull Slayer-style espresso shots on your Cafelat Robot
The name “Slayer” evokes a certain reverence among espresso aficionados. These high-end machines are famous for their signature shot profile, which uses a long, low-pressure pre-infusion to unlock incredible sweetness and complexity, especially from light roast coffees. While a Slayer machine might be a dream for many, its price tag is a reality check. But what if you could achieve a similar, game-changing extraction profile with a purely manual, minimalist brewer? Enter the Cafelat Robot. This brilliant little machine, with its direct-lever design, gives you complete control over pressure. In this article, we’ll guide you through the theory, gear, and technique required to master the Slayer-style shot on your Cafelat Robot and elevate your home espresso to a new level.
Understanding the Slayer shot profile
Before you can pull a Slayer-style shot, it’s crucial to understand what makes it so special. It isn’t just about pushing water through coffee; it’s a meticulously controlled process broken down into distinct phases. Unlike a standard espresso shot that quickly ramps to full pressure, the Slayer profile is a patient dance between pressure and time.
The entire philosophy hinges on one key phase: extended pre-infusion. Here’s the breakdown:
- Pre-infusion: This is the heart of the technique. You apply very low pressure, typically between 2 and 3 bars, for an extended period, often 20 to 30 seconds. The goal is not to extract coffee but to gently and completely saturate the entire coffee puck. This minimizes the risk of channeling, where water finds a path of least resistance and bypasses parts of the coffee bed, leading to an uneven and sour extraction. Full saturation promotes a much more uniform extraction once you apply full pressure.
- Ramp-up: After the puck is fully saturated, you smoothly increase the pressure up to the traditional 8 or 9 bars. This transition should be controlled, not abrupt.
- Full extraction: This is the familiar phase where the bulk of your espresso is extracted at a steady high pressure. Because of the flawless pre-infusion, the extraction itself is more uniform, leading to higher clarity, a rounder body, and enhanced sweetness. You can then choose to taper the pressure down as the shot finishes to reduce any late-stage bitterness.
This method is particularly effective for modern, light roast coffees. Their dense cellular structure can be resistant to extraction, and their bright acidity can easily become sour. The Slayer profile’s long pre-infusion gently coaxes out their delicate floral and fruit notes while taming acidity, resulting in a balanced and complex cup that is otherwise difficult to achieve.
Gear and puck preparation for success
The Cafelat Robot’s manual nature is what makes this technique possible, but your success depends on having the right supporting tools and an impeccable workflow. Inconsistent preparation will be amplified by the long pre-infusion, so precision is non-negotiable.
First, let’s talk about your gear. While the Robot is the star, its supporting cast is just as important.
- A capable grinder: You need a grinder that can produce a fine, uniform grind for espresso. This is the single most important piece of equipment next to the Robot itself.
- A pressure gauge: While you can learn to go by feel, a pressure gauge is almost essential for accurately replicating the low-pressure pre-infusion. It transforms guesswork into a precise, repeatable science.
- A scale: A scale with 0.1-gram accuracy is needed for weighing your dose and your final yield.
- WDT tool: A Weiss Distribution Technique (WDT) tool uses fine needles to break up clumps in your coffee grounds. This is a critical step for ensuring an even puck density and preventing channeling.
With your gear ready, your focus shifts to puck preparation. This is where the shot is made or broken. Grind your fresh, light-to-medium roast coffee beans, weigh your dose accurately, and use your WDT tool thoroughly to create a fluffy, homogenous bed of grounds. Follow this with a firm, level tamp. Any inconsistencies in the puck will become glaring channels during the extraction. Finally, don’t forget to preheat the piston by resting it in a cup of hot water, which helps maintain thermal stability throughout the shot.
The step-by-step pulling technique
With the theory understood and your station prepared, it’s time to pull the shot. This process requires your full attention. Focus on the pressure gauge and the visual feedback from the basket. Let’s walk through it step-by-step.
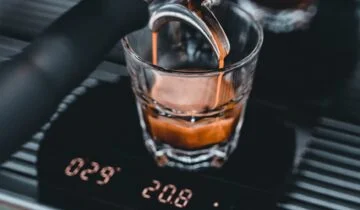
1. Lock and load: Lock your prepared portafilter into the Robot. Place your scale and cup underneath and add your boiling water to the basket, leaving a few millimeters of headspace.
2. Begin low-pressure pre-infusion: Slowly lower the Robot’s arms until the pressure gauge reads between 2 and 3 bars. Now, hold it there. This is the most critical part. You need to maintain this gentle pressure for about 20-30 seconds. Your goal is to see the bottom of the basket become fully saturated, with the first few drops of espresso just beginning to form as you reach the end of this phase. Don’t rush this; patience is key.
3. Ramp to full pressure: Once pre-infusion is complete, smoothly and deliberately increase your force on the arms. Over 3-5 seconds, ramp the pressure up to your target of 8 or 9 bars. Watch the gauge to ensure a steady increase.
4. Hold and decline: Maintain your target pressure as the rich, syrupy espresso flows into your cup. As the stream starts to turn a lighter, blonde color and you approach your target yield (e.g., a 1:2 or 1:2.5 ratio), begin to ease off the pressure. Let it decline gradually from 9 bars down to 6, then 4, before stopping the shot. This final ramp-down can help cut out bitterness for an even cleaner finish.
Here is a sample recipe to visualize the process:
| Phase | Target pressure | Target time | Visual cue |
|---|---|---|---|
| Pre-infusion | 2-3 bar | 25-30 seconds | First drops appear / full saturation of puck |
| Ramp-up | 3 bar → 9 bar | 3-5 seconds | Steady increase on the gauge |
| Full extraction | 8-9 bar | 15-25 seconds | A steady, syrupy stream of espresso |
| Ramp-down | 9 bar → 4 bar | 5-10 seconds | Shot begins to blonde, approaching target yield |
Dialing in and troubleshooting your shots
Pulling your first Slayer-style shot is just the beginning. The next step is to refine your technique to suit your specific coffee. Dialing in this type of shot involves adjusting one variable at a time until you achieve a taste that is balanced, sweet, and vibrant. Your primary tool for this is your grinder.
If your shot is sour and thin, it likely ran too fast, meaning it was under-extracted. The solution is to grind finer. This will increase the resistance in the puck, slowing down the flow of water and allowing for more extraction. Conversely, if your shot is bitter and harsh, it probably ran too long and was over-extracted. The fix here is to grind coarser to allow the water to flow through more easily.
Pay close attention to what happens during extraction. Are you seeing spurts or jets of espresso shooting out from the basket? This is channeling, and it’s a sign that your puck preparation needs work. Revisit your WDT and tamping routine to ensure the puck is perfectly uniform. Don’t be discouraged if you don’t get it right on the first try. This is an advanced technique. The key is to be methodical: change only your grind size, taste the result, and adjust again. Before you know it, you’ll be consistently pulling shots that are rich, sweet, and bursting with clarity.
Conclusion
The Cafelat Robot proves that you don’t need a multi-thousand-dollar machine to explore the cutting edge of espresso. By leveraging its direct-manual control, you can replicate the coveted Slayer-style shot profile right in your own kitchen. As we’ve discussed, the secret lies in a patient, low-pressure pre-infusion that fully saturates the coffee, followed by a smooth ramp-up to full pressure. This method unlocks a new dimension of flavor, especially in light roasts, transforming bright acidity into complex sweetness. Mastering this technique requires practice, meticulous puck preparation, and the invaluable feedback from a pressure gauge. But the reward is worth the effort: a truly exceptional cup of espresso that stands shoulder-to-shoulder with shots from the best cafes in the world.
 No products in the cart.