How to cool down the gaggia boiler after steaming milk
For users of single-boiler espresso machines like the Gaggia Classic Pro, temperature management is a fundamental skill. These machines use the same boiler for brewing espresso and steaming milk, two functions that require vastly different temperatures. While steaming requires temperatures around 140°C (284°F) to produce steam, brewing espresso demands a much lower and more precise range, typically 90–96°C (195–205°F). Brewing with a boiler that is still at steam temperature will scorch the coffee, leading to an unpleasantly bitter and astringent shot. Therefore, learning to cool the boiler effectively is not an optional tweak but a critical step for achieving espresso quality and consistency.
Why boiler temperature management is crucial
A single-boiler, dual-use (SBDU) machine operates with two separate thermostats: one for brewing and one for steaming. When you flip the steam switch, the machine bypasses the brew thermostat and allows the heating element to raise the water temperature well beyond the boiling point to generate steam pressure. After you finish steaming, the boiler and the water within it remain at this elevated temperature.
Simply turning off the steam switch and waiting for the boiler to cool down naturally is impractical and unreliable. The boiler’s thermal mass means it will retain heat for a long time, and the cooling process is not linear or predictable. This passive approach introduces a significant variable into your shot preparation. To regain control and ensure your espresso is extracted at the correct temperature, you must actively cool the boiler. This process, often called temperature surfing, is a hands-on technique that allows the user to guide the machine into the optimal brew window.
The standard cooling flush method
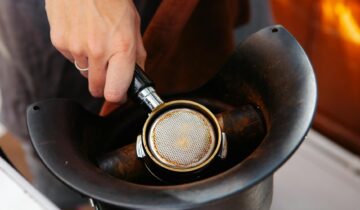
The most direct way to lower the boiler temperature is to flush hot water from the system and replace it with cool water from the reservoir. This is achieved by running the group head after steaming. The process is straightforward but requires careful attention to the machine’s indicator lights.
- Turn off the steam switch. After you have finished steaming your milk, this is the first step. The boiler is now extremely hot, and the machine’s goal is to return to its brew temperature setting.
- Place a vessel under the group head. Use a spare cup or milk pitcher to catch the hot water and steam that will be discharged.
- Activate the brew switch. Run the pump as if you were pulling a shot. You will see steam and sputtering water exit the group head. This is the overheated water being purged from the boiler. As this happens, cooler water from the reservoir is drawn in, actively reducing the internal temperature.
- Watch the temperature ready light. The ready light, which indicates the boiler is at brewing temperature, will be off. Continue flushing water until this light turns back on. The light reactivating signifies that the temperature has dropped to the lower limit of the brew thermostat’s deadband, causing the heating element to kick on. At this exact moment, you have a known, repeatable thermal reference point.
Once the heating element engages, turn off the brew switch. Your boiler is now at the bottom of its brew temperature cycle and ready for the next step.
Achieving a stable and repeatable brew temperature
The cooling flush gets you into the correct temperature ballpark, but precision requires a bit more refinement. When the heating element turns on, the boiler is technically ready, but it is at its coolest point. Pulling a shot immediately will likely result in an under-extracted coffee. The goal is to start the extraction as the temperature rises into the ideal zone.
This is where a technique known as “temperature surfing on the rise” comes in. After the cooling flush has caused the heating light to come on, you wait a specific amount of time before starting your shot. This allows the heating element to raise the temperature slightly. A common starting point is to wait 5 to 10 seconds after the light appears before locking in your portafilter and beginning the extraction. The ideal duration depends on your specific machine and target temperature, so experimentation is key. By timing this “rebound” consistently, you can achieve a highly repeatable brew temperature for every shot.
For a faster and more aggressive cool-down, some baristas also open the steam valve to purge excess steam pressure immediately after turning off the steam switch, before flushing the group head. This rapidly reduces both pressure and temperature inside the boiler.
Integrating boiler cooling into your workflow
A common question for baristas making milk-based drinks is whether to pull the shot first or steam the milk first. Each approach has its merits, but when using a single-boiler machine, the workflow is often dictated by temperature management.
Steaming milk first is a highly efficient workflow. While the steamed milk rests, you can perform the cooling flush, wipe down the steam wand, and prepare your espresso shot. This sequence ensures that minimal time is lost and the espresso is brewed just before it is combined with the milk. The cooling flush also serves the dual purpose of cleansing the shower screen of any residual grounds from a previous extraction, preparing it for the next shot.
Conversely, pulling the shot first means it will sit and its quality may degrade while you wait for the boiler to heat up to steam temperature. For this reason, most experienced users of SBDU machines prefer the steam-first-then-cool workflow for its efficiency and logic.
Conclusion
Mastering temperature control on a Gaggia single-boiler machine is what separates inconsistent results from consistently excellent espresso. The core issue is the significant temperature difference between steaming milk and brewing coffee, a gap that cannot be managed by passive waiting. An active cooling flush is the essential technique required to bring the boiler down from steam temperature to the optimal brew range quickly and reliably. By carefully observing the machine’s indicator lights and using a timed method to “surf” into the perfect extraction window, you can eliminate temperature as a variable. This manual control is a rewarding part of the craft, offering a deeper understanding of the espresso-making process. For those looking to further refine their technique, various tools and accessories are available at papelespresso.com that can aid in achieving greater consistency.

 No products in the cart.