Exploring the temperature settings menu on the Gaggia Anima
For the dedicated home barista, moving from a manual espresso machine to a super-automatic model like the Gaggia Anima can feel like a compromise. While convenience is gained, a degree of control is often lost. However, understanding the nuances of the Anima’s adjustable parameters, particularly its brew temperature settings, allows for a significant recovery of that control. Water temperature is a critical variable in espresso extraction, directly influencing which flavor compounds are dissolved from the coffee grounds. Mastering the Anima’s temperature menu is not about chasing an arbitrary number; it is about learning to manipulate a key variable to consistently produce balanced and flavorful espresso tailored to your specific coffee beans.
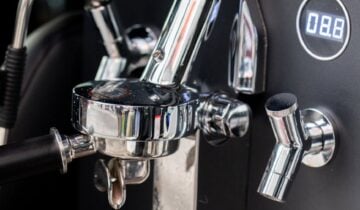
Understanding the Anima’s heating system
Unlike traditional espresso machines that use a large boiler to hold and heat water, the Gaggia Anima series employs a stainless steel thermoblock. This system functions as an on-demand water heater. When you initiate a brew cycle, a small amount of water is rapidly heated as it passes through a coiled pathway within the block. The primary advantage of this design is its speed; the machine is ready to brew in a fraction of the time it takes a conventional boiler to reach stable temperature. However, this design also means that temperature management relies heavily on the machine’s electronic controls to maintain consistency shot after shot. The settings you choose in the menu directly instruct the system on the target temperature to aim for during this rapid heating process.
Navigating the temperature programming menu
The Gaggia Anima provides a straightforward, tiered approach to temperature control rather than a specific degree-based input. Accessing the programming menu allows the user to select from three distinct temperature levels. While Gaggia does not publish the exact temperatures for each setting, they correspond to a low, medium, and high range suitable for different coffees and user preferences. The machine typically arrives with the medium setting as the default, which serves as a versatile starting point for most espresso blends.
| Setting Level | Intended Use & General Temperature Range |
|---|---|
| Min (Low) | Best suited for dark roasts or beans prone to bitterness. Aims to minimize the extraction of harsh, astringent compounds. |
| Med (Medium) | The default setting, providing a balanced starting point for medium roasts and traditional espresso blends. |
| Max (High) | Ideal for light roasts, specialty single origins, or high-altitude coffees that are denser and require more thermal energy for proper extraction. |
How temperature influences extraction and flavor
The temperature of your brew water is a primary driver of solubility. Different aromatic and flavor compounds within roasted coffee dissolve at different rates and temperatures. Adjusting the Anima’s settings gives you direct influence over this process.
- Lower temperatures: Using the “Min” setting reduces the water’s ability to extract certain compounds. This can be beneficial for very dark roasts, preventing the extraction of overly bitter or ashy flavors. However, if used with a light roast, a lower temperature will likely result in an under-extracted shot, characterized by a distinct sour or acidic taste and a thin body.
- Higher temperatures: The “Max” setting increases solubility, which is necessary to properly extract the complex sugars and nuanced acids found in lighter roasts. This additional thermal energy helps break down the denser cell structure of these coffees. If this setting is used with a dark, porous coffee, it will quickly lead to over-extraction, producing a harsh, bitter, and astringent shot that lacks sweetness.
Your goal is to find the setting that creates a balanced extraction for your chosen coffee, where sweetness, acidity, and bitterness are all present in harmony.
A practical method for temperature adjustment
To methodically find the best temperature for a new coffee, it is essential to change only one variable at a time. Start with your other parameters, such as grind size and coffee dose (via the “Aroma” setting), already dialed in to produce a reasonable shot time and volume.
- Establish a baseline: Begin with the “Med” temperature setting. Pull a shot and taste it critically. Is it balanced, or does it lean sour or bitter?
- Analyze the taste: If the espresso is unpleasantly sour or tastes thin and grassy, the coffee is likely under-extracted. This indicates a need for a higher temperature to increase solubility.
- Make a single adjustment: Access the menu and change the setting to “Max.” Do not change the grind or aroma settings.
- Re-evaluate: Pull another shot and taste again. The increase in temperature should have reduced the sourness and introduced more sweetness and body. Conversely, if your initial shot was overwhelmingly bitter and dry, you would move from “Med” down to the “Min” setting to curb over-extraction.
This systematic process of tasting and adjusting allows you to use the temperature setting as a precise tool to refine the final flavor profile in your cup.
Conclusion
While the Gaggia Anima is a super-automatic machine, its temperature control menu provides a powerful tool for the discerning home barista. It allows for meaningful adjustments that directly impact the chemistry of extraction. By moving beyond the default settings and understanding the relationship between heat, solubility, and roast level, users can elevate their espresso quality significantly. Rather than being a set-and-forget feature, the temperature setting is a key variable that, when used thoughtfully, can unlock the full potential of your coffee beans. Ensuring you have the right accessories to support your brewing process is also part of achieving consistency, and a variety of tools are available from retailers like papelespresso.com.

 No products in the cart.