Managing back-to-back shots on the Gaggia Classic Pro without losing heat
The Gaggia Classic Pro is a capable single-boiler espresso machine, respected for its direct, manual operation. However, this design presents a significant thermal management challenge, particularly when preparing consecutive shots. For the experienced home barista, pulling a second shot that is as balanced and consistent as the first requires a deep understanding of the machine’s behavior and a precise, repeatable workflow. Losing excessive heat between extractions can lead to an under-extracted, sour second shot, undoing the care taken to prepare the coffee. This article outlines a technical, practical approach to maintaining thermal stability for back-to-back shots, ensuring that your second espresso is not a compromise.
Understanding the thermal system
At the heart of the Gaggia Classic Pro is a small, 100ml aluminum boiler. Its size and material are key to its fast heat-up times, but they are also the source of its thermal instability. Unlike larger, brass boilers found in more expensive machines, the Gaggia’s aluminum boiler loses heat rapidly during brewing as 50-60ml of cold water is introduced to extract the shot. This temperature drop is substantial and is the primary hurdle to overcome when preparing a subsequent shot.
The machine operates on a simple thermostat system, cycling a heating element on and off to maintain a target temperature range. When you brew, the introduction of cold water causes the temperature to plummet, and the thermostat will kick the heating element back on. The key to a stable second shot is managing this recovery cycle effectively. Without a disciplined workflow, the group head and portafilter will also cool down, further contributing to an unstable and declining brew temperature.
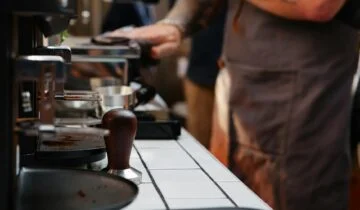
Establishing a baseline with the first shot
Consistency in your second shot is impossible without first achieving it in your first. Before you can manage the transition, you must have a stable and repeatable routine for your initial extraction. This involves ensuring the entire system—boiler, group head, and portafilter—is fully and evenly heated.
A common and effective technique is known as temperature surfing. The process typically involves these steps:
- Allow the machine to warm up for at least 15-20 minutes with the portafilter locked in.
- Purge a few ounces of water through the group head until the brew light turns off. This indicates the heating element has engaged.
- Wait for the brew light to turn back on, signaling the boiler has reached the top of its heating cycle.
- Begin your extraction a few seconds after the light comes on. The exact timing depends on your machine and desired temperature, but consistency is key.
This routine ensures you are always starting your shot from the same point in the heating cycle. For users with a PID controller, this process is simpler, as the controller provides a stable boiler temperature. Regardless of the method, your first shot must begin from a known, stable thermal state.
The workflow for a rapid second shot
The moment the first shot ends, the clock starts. The goal is to prepare your puck and begin the second extraction just as the boiler has recovered enough heat, but before the group head loses its thermal mass. A rushed, sloppy workflow will lead to inconsistency, while a slow one guarantees a cold, under-extracted shot.
Follow this sequence immediately after your first extraction:
- End the first shot and immediately purge the group. After your first cup is complete, run the pump for 2-3 seconds to flush spent grounds from the shower screen.
- Prepare the puck efficiently. Remove the portafilter, knock out the used puck, wipe the basket clean, and dry it. Dose your fresh grounds, distribute, and tamp. This entire process should ideally take no more than 30-40 seconds. A practiced, clean workflow is not just for show; it is a critical part of thermal management.
- Monitor the machine’s heating cycle. While you are preparing the puck, the machine’s heating element should be working to recover from the first shot. On a stock machine, you are waiting for the ready light to illuminate again. Do not lock in the portafilter until just before you are ready to brew, as the relatively cool portafilter will sink heat from the group head.
- Lock in and brew. Once your puck is ready and the machine has indicated it has reached temperature, lock in the portafilter and immediately begin the second extraction. Any delay at this stage will allow the water in the boiler to overheat, potentially scalding the coffee.
Advanced temperature management techniques
For those seeking greater control, a few advanced methods can help manage the boiler’s recovery more actively. One popular technique involves using the steam switch to force the heating element to engage more quickly and achieve a higher temperature, compensating for the expected drop.
This “steam-boost” workflow looks like this:
- After the first shot, and while preparing your new puck, flip the steam switch on for a short duration (e.g., 5-8 seconds). This engages the heater at a higher power setting.
- Flip the steam switch off and immediately purge the super-heated water and steam from the group head for a few seconds until the water runs smoothly.
- Quickly lock in your portafilter and begin the extraction.
This method requires significant practice to master. The timing is crucial, as holding the steam switch for too long will easily overheat the brew water and create a bitter, over-extracted shot. It is a powerful but delicate technique that trades the simplicity of the standard workflow for a faster recovery time. It is a balancing act between preventing heat loss and causing excessive heat gain.
Conclusion
Successfully pulling back-to-back shots on a Gaggia Classic Pro is a testament to a barista’s skill and understanding of their equipment. It is less about the machine’s limitations and more about the operator’s ability to create and execute a precise, repeatable workflow. By understanding the thermal dynamics of the small boiler, establishing a consistent starting point, and minimizing the time between extractions, you can effectively mitigate heat loss. Whether using a simple temperature surfing routine or a more advanced steam-boost technique, the goal remains the same: to start the second shot with a fully recovered boiler and a properly heated group, ensuring the quality of the coffee in the cup is never a compromise. For those looking to refine their process, a range of tools to improve workflow consistency are available from papelespresso.com.


 No products in the cart.